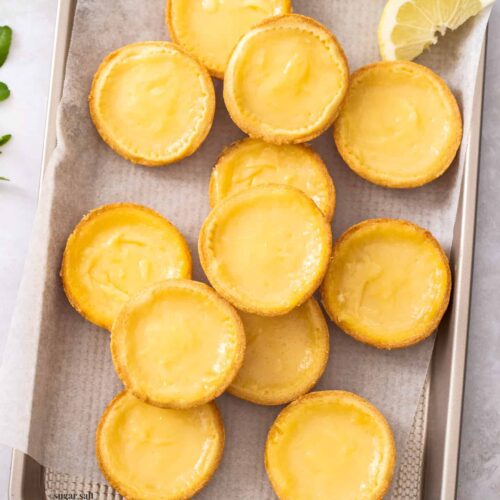
If you love a good tangy lemon treat, then you definitely need to try these lemon tartlets. The pastry is buttery, crisp and the perfect contrast to the soft, sweet, zingy lemon curd filling.
If you love lemon desserts, you’ll love these lemon Danish pastries and this coconut lemon slice.

Why you’ll love it
I mean, how cute are these little lemon curd tarts? They’re easier to make than you may think and perfectly portioned for one.
The simple lemon curd filling is soft, luscious, rich and super tangy – you can certainly turn down the tang if you prefer it more mild by leaving out some of the lemon zest but, for me, it’s got to make your lips pucker.
And that shortcrust pastry – this really is my favourite recipe. It’s just the right amount of buttery, has a very subtle sweetness and holds the filling perfectly while still being crisp and a touch flaky. These tart shells are a variation on my perfect tartlet shells recipe.
Ingredients you’ll need
With both the pastry and lemon curd made from scratch, can you believe this recipe is only 8 ingredients?

Detailed quantities and instructions in the recipe card below.
- Lemons: The flavour star of the show is lemons. You’ll need fresh lemons for this – 2-3 will be enough. Make sure they aren’t waxed and give them a good wash and dry before using the zest.
- Flour: Just regular plain flour / all-purpose flour is all you need for the pastry.
- Butter: Use unsalted butter so you can control the salt level.
- Icing sugar: Also known as powdered sugar or confectioners sugar, icing sugar is very powdery and keeps the pastry crisp.
- Eggs: I use large eggs in all my recipes. Get free range if you have the means – it’s good for the chickens and for the flavour.
- Sugar: Regular white granulated sugar or caster sugar (superfine sugar) will work in the filling.
- Cornflour / cornstarch: Cornflour (aka cornstarch) will help to thicken up the filling.
- Salt: Just a little touch of salt gives everything balance.
This recipe will work with other citrus fruits too, so if you have an abundance of oranges, mandarins or limes, feel free to use those.
How to make lemon tarts
From the easy homemade pastry to the super quick filling, you’ll love how simple these are to make.

Detailed instructions in the recipe card below.
- Make the shortcrust pastry: Using a food processor, add the flour, icing sugar and grated butter to the bowl (photo 1). Process until it looks a bit like breadcrumbs. You should be able to see bits of butter but they’ll be smaller than a grain of rice. Add an egg yolk (photo 2) and process that through then slowly drizzle in cold water until it starts clumping.
- Rolling the pastry dough: Gently shape the dough into a smooth disk (photo 3) (try not to knead it too much) then roll it out between two sheets of baking paper (photo 4) until it’s 3-4mm thick. Chill for a short time.

- Shaping the pastry dough: Cut circles out of the dough (photo 5) and gently press them down into the holes of a 12 hole muffin tin making sure to press them into the corners (I actually use the flat end of my rolling pin for this). Prick the bases with a fork (photo 6) and chill again. Place a cupcake case into each tartlet shell and fill with rice. Bake for 20 minutes then let them cool slightly while you make the filling.
- Making the lemon curd: Combine sugar, cornflour, salt, lemon juice and water in a saucepan and heat until it turns into a thick, almost gel-like consistency. Add butter and lemon zest followed by egg yolks and cook for one more minute over low-medium heat (photo 7). Fill the tart shells with the lemon curd (photo 8) and bake another 5-8 minutes or until the lemon curd just starts to bubble a little and levels out.
- Serve: Let the lemon tartlets cool in the tin for 15 minutes before transferring to a wire rack to cool completely. I find the best way to remove them from the tin is to give them a gently twist to loosen, then press down on one side so the other lifts and you can lift it out. Serve at room temperature or chilled.
Tips and tricks
Though not difficult to make, here are my tips for getting perfect little lemon tartlets.
- Keep it cold: The pastry ingredients should be kept cold as should the pastry itself – this is what helps to give it a crisp texture. Use cold butter (I grate mine, then place it in the freezer while I gather the rest of my ingredients.). Also, use cold (even iced) water and cold egg yolk.
- Don’t knead: For the same reason as above, don’t knead the pastry dough too much. The warmth from your hands could melt the butter which will mean you won’t get the slightly flaky texture.
- Chilling time: Along the same lines as above, don’t skip the chilling time where it’s mentioned. This is for two reasons – to keep the dough cold and to rest the dough which allows the gluten to relax (gluten is built up the more you play with dough) and will allow the pastry to keep it’s shape better.
- If the dough softens: When you’re cutting the circles and placing them in your tin, if you notice the dough getting very soft, place it back in the fridge. You want it to be soft enough to be able to push into the muffin tin holes but not so soft that it gets misshapen.
- Baking time: The baking time will vary, according to your oven (all ovens are different). The tart shells are done when they have a light golden colour and they are dry to the touch.
- The easy lemon curd: Technically, the lemon curd is already cooked by the time you put it into the tart shells and you could just put them into the fridge to set. I like cooking them an extra few minutes because it gives the lemon curd a slightly jammy texture which is lovely and crisps up that pastry a touch more too.

To serve them as fresh as possible
You can make these ahead of time. For perfectly fresh lemon tartlets to serve at a party or gathering, you can get ahead by making the pastry and the lemon curd ahead of time, then baking the day you want to serve them.
- The pastry can be kept in the fridge for 1-2 days or frozen for up to 2 months. Do this either by wrapping the disk of dough after you’ve first mixed it or after you’ve shaped them in the muffin tin.
- The tart shells: You can even go ahead and make the tart shells ahead of time to the point that they’re ready to fill with curd. Keep the baked tartlet shells in an airtight container at room temperature for 1-2 days.
- The lemon curd can also be made and stored in an airtight container in the fridge for 2-3 days. I recommend warming it slightly before adding it to your tart shells and baking, so that it levels out a bit better.
The lemon curd is based on my biscuit base lemon meringue pie curd but you can also use my homemade lemon curd recipe which is slightly different. You could also add a little meringue to the top like I have with my mini lemon meringue tarts.
Variations
You can flavour these lemon tartlets with other citrus as well. Oranges, limes, mandarins, grapefruit – these will all work in this curd recipe in place of the lemon.
You can also add a little vanilla extract to the curd as well – up to 1 teaspoon. It will give it a more rounded and slightly sweeter flavour.
If you’d prefer them less tangy, strain out the lemon zest before adding the lemon curd to the tartlet shells.
You can use store-bought curd if you don’t feel like making your own but also fruit jams are lovely in these mini tart shells.
Storage
These are best served as fresh as possible. They will stay crisp a while but will soften over time – still delicious and completely edible, just not as crisp.
Store any leftover tarts in a cool place for up to 24 hours, then store in the fridge for 3-4 days.
Pastry dough can be made ahead and kept in the refrigerator for 1-2 days wrapped well in plastic wrap or for up to 2 months in the freezer.

If you try this lemon tartlets recipe, please take a moment to leave a rating and comment below. I love hearing from you, and it helps other readers too!
More recipes you’ll love
Never Miss a Recipe!
Get the latest recipes straight to your inbox!
Ingredients
FOR THE PASTRY SHELL
- 195 g plain (all purp) flour (1 1/2 cups / 6.9oz)
- 2 ½ tablespoons icing (powdered) sugar (25g / 0.9oz) (notes 1)
- 113 g unsalted butter, cubed & chilled (¾ stick / 3oz)
- 1 egg yolk, from a large egg
- 1 – 2 tablespoons cold / iced water (notes 1)
FOR THE LEMON FILLING
- ½ cup white granulated sugar (100g /3.5oz)
- 2 tablespoons cornflour (cornstarch) (25g / 0.9oz) (notes 1)
- pinch of salt
- ½ cup lemon juice (125ml)
- ⅔ cup water (160ml)
- 28 g unsalted butter, chopped (2 tablespoons / 1oz)
- finely grated zest of 1 large lemon (2-3 teaspoons)
- 3 egg yolks, from large eggs
For best results, always weigh ingredients where a weight is provided
Equipment
- Cupcake liners
- circle cookie cutters
Instructions
FOR THE SHORTCRUST PASTRY
- Place the flour, icing sugar and chilled butter into the bowl of a food processor. Blitz to a crumb-like texture. Pieces of butter should be visible but smaller than a grain of rice.
- Add the egg yolk and blitz again until well combined.
- With the processor running, slowly drizzle in the water, just enough until it starts clumping together.
- Pull the pastry dough into a smooth ball (try not to knead too much). Roll out between two sheets of baking paper to 3mm thick, then place on a tray or flat surface in the fridge to chill for ½ an hour. (Don’t skip chilling)
- Have a 12 hole muffin tin at the ready.
- Using a circle cookie cutter about 1cm larger than the opening of the muffin tin holes, cut out circles of dough. Carefully press each down into the muffin tin holes, gently pressing into the corners. If the dough is getting too soft, chill again. Chill for another half an hour. (Don’t skip chilling)
- Preheat oven to 180C / 350F / 160C fan forced.
- Prick the bases of the tartlet shells a few times with a fork. Place a cupcake case or piece of baking paper into each, pressing it to the pastry at the bottom, and fill with rice (or pie weights).
- Transfer to the preheated oven and bake for 15 minutes then remove the cupcake cases and bake a further 5 minutes. Set aside.
FOR THE LEMON CURD
- Combine sugar, cornflour and salt in a saucepan, then pour in the lemon juice and water. Whisk well to combine. Cook, whisking regularly so you don’t get lumps, until you have a thick gel with big bubbles popping all over the surface.
- Take it off the heat and add butter and zest, mix until melted and fully combined.
- While whisking vigorously, tip in the yolks and whisk well until fully combined – this is important so the yolks don’t scramble in the hot gel.
- Place the saucepan back over the heat and cook for a further minute whisking frequently.
- Divide the curd evenly among the cases – each should be full pretty much to the top. Bake a further 5-8 minutes until the curd is level and just starting to bubble.
- Let them cool 15 minutes in the muffin tin, then gently give each one a twist and lift it out. Finish cooling on a wire rack. They can be eaten at room temperature or cold.
- Store leftover tarts in a cool place for up to 24 hours or in the fridge up to 2 days.
Notes
- I use a standard Australian 20ml tablespoon (equal to 4 teaspoons worldwide).
- For best results, you should always weigh ingredients like flour and sugar. Kitchen scales are relatively cheap but if you can’t weigh the ingredients, use the spoon and level method (don’t scoop).
- All ovens are different: The tart shells are ready when they are a light golden colour and dry to the touch.
- Don’t knead: Don’t knead the pastry dough too much. The warmth from your hands could melt the butter which will mean you won’t get the slightly flaky texture.
- Chilling time: Along the same lines as above, don’t skip the chilling time where it’s mentioned. This is for two reasons – to keep the dough cold and to rest the dough which allows the gluten to relax (gluten is built up the more you play with dough) and will allow the pastry to keep it’s shape better.
- If the dough softens: When you’re cutting the circles and placing them in your tin, if you notice the dough getting very soft, place it back in the fridge. You want it to be soft enough to be able to push into the muffin tin holes but not so soft that it gets misshapen.
This post may contain affiliate links that earn me a small commission for my referral, at no extra cost to you. Thank you for supporting Sugar Salt Magic.
2 Comments on “Lemon Tartlets”
These lovely little tartlets are so bright and fresh – just like sunshine. They really remind me of spring (That will not be coming to Canada anytime soon haha). Wonderful!
Thank you so much Ben. They sure do look sunshiny