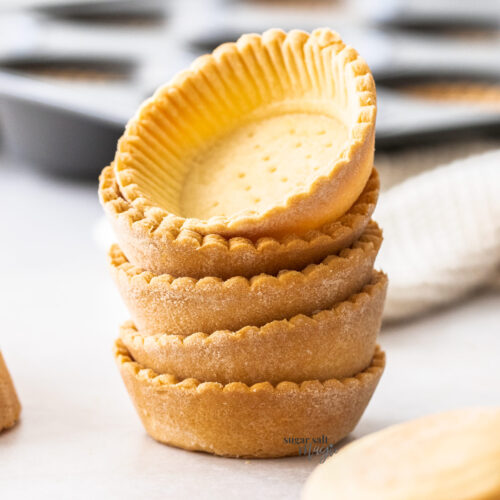
Perfect for finger food parties or picnics, these mini tartlet shells can be made in a muffin tin (or mini tart pans) and taste amazing. Their individual size means everyone gets their own perfect little tart.
- Buttery and lightly sweetened.
- Super crispy.
- Only 4 ingredients.
- These work with baked and unbaked fillings.
And that gorgeous look, with the scalloped edge and the pretty lines inside all just comes from using a scalloped cookie cutter and lining them with cupcake cases when you blind bake. So easy!
These are delicious filled with lemon curd, chocolate mousse or pastry cream. If you have a filling that needs to be baked, these will work too.

Never Miss a Recipe!
Get the latest recipes straight to your inbox!
Ingredients you’ll need
With just 4 ingredients, you probably have what you need right now in your pantry to make the sweet shortcrust pastry. You can make these right now and freeze them for up to 3 months until you need them.

Detailed quantities and instructions in the recipe card below.
- Flour: You need plain flour / all-purpose flour.
- Sugar: Icing sugar aka powdered sugar aka confectioners sugar.
- Butter: Make sure to use unsalted butter and check the ingredients label – you want a butter that doesn’t contain water.
- Egg: I use large free-range eggs in all my baking. Make sure it’s cold for this recipe.
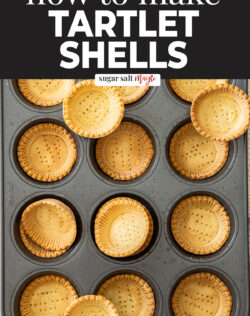
How to make tartlet shells (step-by-step)
Making tart shells from scratch is actually a very easy process. The ingredients are blended in a food processor, you roll out the dough, cut out circles, press them into an non-stick muffin tin then bake. Here it is in a little more detail.

Detailed quantities and instructions in the recipe card below.
- Make the tartlet dough: Start by processing flour, sugar and butter in a food processor (photo 1) until it’s a bit like lumpy sand – you’ll have small pieces of butter still visible and that’s perfect (photo 2). Now add the egg and process until it starts forming large clumps (photo 3).

- Roll it out: Now, pull the pastry dough together into a disk shape on a lightly floured surface (photo 4). Roll it out to about 3-4mm thick (⅛ inch) (photo 5). Cut out rounds using a 9cm (3 ½ inch) round cookie cutter (I use a fluted cookie cutter) (photo 6).
- Shape them: Grab a non-stick muffin tin, lay one of the dough circles over one of the holes, and gently press your fingers down in the centre to push it down without poking a hole through it. Press it into the corners carefully (photo 7).

- Chill: You must chill them in the refrigerator for a minimum of 2 hours or up to 3 days. You’ll get the least shrinkage from chilling at least overnight, or more.
- Bake: Prick the bases of the tartlet cases with a fork (photo 8) then place a paper cupcake case inside each one. Fill each with rice (photo 9). Now bake the tart shells for 15 minutes. Remove the paper liners and rice and bake a little longer – the time will depend on whether you’ll bake them with filling afterwards or add an unbaked filling.
Tips and tricks
- Sharp corners: To get nice sharp corners and a flat base, if your rolling pin has a flat end, use that, gently pressing it around those base corners.
- Chilling time – don’t skip it: Don’t be tempted to skip or shorten the chilling time. That time is vital for relaxing and setting the pastry dough and will result in less shrinking while baking.
- Baking time: You can bake these all the way to done (about 20-22 minutes all up) or just par-bake them for around 17 minutes before adding a filling. You won’t want to bake them any more than 10 minutes once the filling is in them or the tartlet shells themselves will be very overbaked.

Tartlet fillings
These empty tart shells are so handy to store in the freezer then when you’re having guests, just make up one of these no-bake tartlet fillings to fill them with.
- Fruit curds:
- lemon curd
- passionfruit curd
- mango curd (pictured above)
- orange curd
- lime curd
- blackberry curd
- Mousse:
- Pastry cream:
- Caramel or chocolate ganache
- Tiramisu – see these Tiramisu tartlets
- Pistachio paste inside with a topping of cheesecake or panna cotta.
You could also try my chocolate tartlet shells.
No matter what filling you use, a topping of fresh fruit or berries will look gorgeous and give them a nice, fresh finish.
@sugarsaltmagic How to make Tartlet Shells in a muffin pan! Recipe at https://www.sugarsaltmagic.com/tartlet-shells/ Crisp and buttery, these mini tart shells are easy to make with just 4 ingredients. They’re great for parties or portable desserts. Perfect for finger food parties or picnics, these mini tartlet shells can be made in a muffin tin (or mini tart pans) and taste amazing. Their individual size means everyone gets their own perfect little tart. Buttery and lightly sweetened. Super crispy. Only 4 ingredients. These work with baked and unbaked fillings. #tartlet #tartlets #tartletsrecipe #recipe #recipes ♬ original sound – Marie – Sugar Salt Magic

FAQs
Yes, you can adapt this recipe slightly to make savoury tartlets too – perfect canapes. Just swap the butter for salted butter, leave out the icing sugar and, only if you need it, add a touch of cold water until it comes together into the clumping dough.
A tart tamper is a wooden utensil used for pressing the dough into tart tins perfectly but you can skip that and use the end of a flat rolling pin – it’s nearly the perfect size and does the job just as well.
While they use similar ingredients, pie crust is normally made to be much flakier than a tart shell. Tart shells should be crispy with a little flakiness rather than the large flakes of a pie crust.
Just 4 ingredients – flour, sugar, butter and egg.
No. Tart crust is most often made with shortcrust pastry which doesn’t puff up into flaky layers like puff pastry. Some free-form tarts however will use puff pastry.
If you don’t have tartlet pans, you can use a regular non-stick muffin pan as I have in this recipe.
Yield and storage
If you’re careful to roll the dough out thin enough, you should be able to get 18-19 tartlet shells from this recipe.
Unbaked mini tart shells can be stored in the fridge, in the pan, covered, for 3 days before baking. They can also be frozen for up to 3 months. Let them thaw in the fridge overnight before baking.
Fully baked tartlet shells can be stored at room temperature for 7-10 days or in the freezer in an airtight container for up to 3 months.

More recipes you’ll love
Did you try this mini tart shells recipe?
Leaving a rating and comment below the recipe is so helpful!
Hungry for more? Subscribe to the newsletter for free recipes straight to your inbox. Also, follow along on Facebook, Pinterest and Instagram.

Video
Ingredients
- 225 g plain flour (all purpose flour) (1 ¾ cups / 8oz) (notes 2)
- 60 g icing sugar (powdered sugar / confectioners sugar) (½ cup / 2oz)
- 100 g unsalted butter, chilled & cubed (7 tablespoons / 3.5oz)
- 1 large egg, cold
For best results, always weigh ingredients where a weight is provided
Instructions
- Place the flour and icing sugar in the bowl of a food processor. Process a few seconds to distribute evenly.
- Add the cubed cold butter and blitz until the mixture looks a bit like sand – there may be lentil-sized pieces of butter left here and there and that’s perfect.
- Add the egg and process on low until the mixture starts forming large clumps.
- Turn the dough out and pull it together into a smooth ball with your hands (making sure not to handle it too much) then press it out into a 1-inch thick disk.
- Place it onto a lightly floured work surface and dust the top with just a little flour too. Gently and gradually roll the pastry out, turning it often, to about 3mm (1/8 inch) thick.
- Have a non-stick 12 hole muffin tin at the ready.
- Using a circle cookie cutter 9cm/3 ½ in wide (or just a little larger than the opening of the muffin tin holes), cut out circles of dough. Try to get 12 from the first roll, and at least 6 from a second roll out. Try to handle the dough only enough to bring back into a disk for the second roll.
- Lift with an offset spatula so they don’t become misshapen and gently push each down into the muffin tin holes, gently pressing into the corners (if your rolling pin has a flat end like mine, it’s perfect for getting them flat to the bottom with a nice corner). Chill 2 hours or overnight (don’t skip chilling).
- Preheat oven to 180C / 350F / 160C fan forced.
- Prick the bases of the tartlet shells a few times with a fork. Place a cupcake case or piece of baking paper into each, pressing it to the pastry at the bottom, and fill with rice (or pie weights). Press down lightly on the rice to settle the cases into the tart shell.
- Transfer to the preheated oven and bake for 15 minutes then remove the cupcake cases and bake a further;
- If the filling will be baked, bake the tartlet shells a further 2-3 minutes, just to set the bases.
- If the filling won’t be baked, bake the tartlet shells a further 7-8 minutes until golden brown.
- Carefully remove the mini tart shells from the tins and transfer to a wire rack to cool.
- Please take a moment to leave a comment & rating. It's appreciated and so helpful.
Notes
- All ovens vary – always test for doneness 3-5 minutes before the recipe suggests
- For best results, you should always weigh ingredients like flour and sugar. Kitchen scales are relatively cheap but if you can’t weigh the ingredients, use the spoon and level method (don’t scoop).
- Unbaked tart shells or even just the pastry dough can be stored in the fridge covered in plastic wrap for 2-3 days.
- Fully baked mini tart shells can be stored in an airtight container at room temperature for up to a week and frozen for up to 3 months.
- Par baked tartlet shells can be stored in the fridge in an airtight container for 2-3 days before filling and final baking or in the freezer for up to 3 months.
This post may contain affiliate links that earn me a small commission for my referral, at no extra cost to you. Thank you for supporting Sugar Salt Magic.
15 Comments on “Tartlet Shells”
This looks amazing. Any reason why the jam tart pastry is different from this one?
Is it possible to make jam tarts using this recipe?
The jam tarts are just a different recipe. The pastry on those is a little softer which I think works better. If you’re going to use this crispier tartlet pastry, make the shells shorter – not so tall – and I think it would work lovely.
Grata.
Vou experimentar com farinha sem glúten, tenho intolerância à glúten. Espero que funcione!
Good luck. I’d love to hear how it goes 🙂
I am going to try them hope they turn out like yours
Hi they look so good I’d love to make them but I can’t eat butter. Is there a substitute for butter I could use ?
Hi Maria. Sorry I’ve not tested them with anything but butter.
I made these and used them for Neenish tarts. Turned out great but I need to work on my presentation. I don’t have a food processor but the rub in method was a success.
So happy you love them, Kim. Truly appreciate you trying my recipe 🙂
Can you use gluten free flour
Hi Norah. I haven’t tried gf flour in these and in general find different brands of gf flours to have varying degrees of success in baking. If you have one you know you trust, give it a go.
The measurements are confusing for the tartlet shells
Flour – 1 and 3/4 cup or 8 ounces?
Powder sugar – 1/2 cup or 2 ounces?
Please clarify.
Thank you!
Hi Fran. They’re both the same so just pick one or the other. I include measurements in all formats as different people use different methods. Using weight is most accurate, if you have a kitchen scale.
I haven’t made these but I would like to know how to make them as decorative as they appear in the picture.
Thanks.
Hello Ang. That decorative pattern just comes from using a scalloped cookie cutter and use cupcake cases inside when blind baking.