
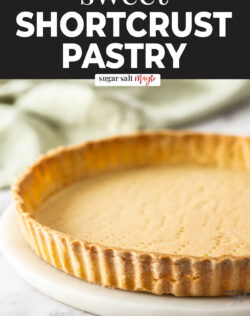
The base to any good dessert tart or pie starts with a sweet shortcrust pastry recipe and, luckily for us, it’s incredibly easy to make from scratch. This one that I use most is a French shortcrust pastry called Pâte sucrée.
The pastry is far more than just a vessel for the filling. It should be short so that it breaks apart easily with a fork or spoon but it also needs to taste good. It should be buttery yet light. It also needs to complement the filling.
This sweet easy shortcrust pastry recipe using just 4 ingredients and it could barely be easier. You can easily adapt the recipe to use it for savoury dishes like quiche and meat pies too.

Never Miss a Recipe!
Get the latest recipes straight to your inbox!

What Is Shortcrust Pastry?
First of all, what exactly is shortcrust pastry anyway? Well, it’s a rich pastry dough used to make crispy yet melt in the mouth pie and tart shells. It is used for both sweet and savoury dishes in everything from quiche to meat pie to fruit tarts.
Types of shortcrust pastry
There are a number of different types of shortcrust, all with fancy french names and slightly different ingredients and methods of combining them. The one I love and use most for sweets is pâte sucrée. this is a French sweet shortcrust pastry. It’s almost cookie like in texture, buttery, light and easy to cut through.
The difference between this sweet shortcrust (pâte sucrée) and the more commonly used pâte sablée is in both the method and texture. Pâte sucrée uses softened butter and is generally made in a stand mixer while pâte sablée is a more flaky style French shortcrust, made using a food processor.
Either version can be turned into fabulous pie or quiche pastry by omitting sugar and using salted butter instead of unsalted.
Sweet shortcrust pastry ingredients
Shortcrust pastry uses a combination of flour, icing sugar (for a sweet tart crust), butter and eggs. There is no added water since the more moisture in a pastry, the more it will shrink.
For savoury shortcrust, just omit the sugar in this recipe and use salted butter instead of unsalted.
How to make shortcrust pastry (step-by-step)
This easy sweet pastry recipe really is very easy to make and while all pastry recipes need chilling time to help reduce shrinkage, I’ve worked this recipe so it only needs one chilling time. This means you can make the pastry anywhere from 2 hours to up to 3 days before then you can just get on with making your tart as soon as you’re ready.

Detailed quantities and instructions in the recipe card below.
- Butter & sugar: Beat together butter and sugar until combined.
- Egg: Add the egg (photo 1) and beat to combine. If it’s not coming together, just add a spoonful of the flour, mixing on low until it does.
- Flour: Now add the flour (photo 2) and beat on low until it starts clumping together (photo 3).

- Roll: Roll the dough out (photo 4) to an 11 inch round (if using a 9 inch tart pan).
- Shape: Place the pastry into the tart tin (photo 5) and press the edges downwards gently to form the corners. Gently press around the edge so that the pastry works it’s way into the fluted edge of the tart tin (photo 6).
- Chill: Don’t skip chilling. You only need to chill this pastry once for a minimum of 2 hours or up to 3 days aka you can make the pastry well ahead of time.
This sweet shortcrust pastry is truly the work of minutes! It’s not hard and while a stand mixer is easiest, you can even use an electric mixer.
How to cook shortcrust pastry
Most shortcrust pastry dough recipes will start with blind baking. So, what is blind baking anyway? Blind baking means baking a tart shell before adding the filling, either partially or completely (depending on how long you bake it).
This helps either when the filling could cause the base to become soggy (like the jam in this Strawberry Bakewell Tart) or when the filling won’t be baked like in this Fruit Custard Tart.

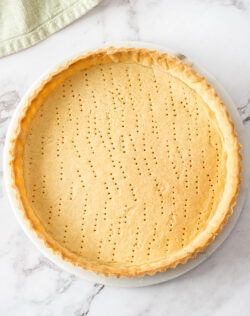
- Start by docking the pastry which means to prick it all over with a fork. This allows steam to escape and stops the base from puffing up.
- Line the base with baking paper then fill with pie weights or baking beans. You don’t need to buy pie weights, you can use rice or lentils instead and keep them stored somewhere so that you use those every time you make pastry.
- Cook the tart shell or pie crust for around 15 minutes, then remove the baking paper and pie weights.
- Cook a bit longer (the time will depend on the filling you use).
How long to cook shortcrust pastry
- You’ll blind bake the pastry first for around 15 minutes at 180C / 350F then remove the baking paper and pie weights.
- If your filling is going to be baked, you would cook the pastry another 5-7 minutes. This will allow the base to dry out and create a seal.
- If your filling is not going to be baked, you’ll cook it for another 15-20 minutes until golden and it looks dry.

Tips and tricks
- Press the edges downward to make the tight corners: While it’s tempting to press the base of towards the corners, you actually get a better result by pushing the edges downwards toward the corners.
- Use softened butter and room temp egg: Many shortcrust pastry recipes will ask you to use very cold butter and egg – this is typical for a flaky shortcrust recipe. With this one, we’re going for a crumbly melty kind of texture which comes from using room temperature ingredients.
- Don’t skip chilling: I’ve developed this recipe so you only need to chill once but don’t skip it entirely. Chilling is an important step that allows the glutens in the flour to relax and also to firm up the butter in the pastry. These result in a pastry crust that holds it’s shape better and doesn’t shrink as much.
How Much Pastry Do I Need?
- For tarts and quiche – This recipe makes enough shortcrust dough to cover the inside of an 9 inch fluted tarttin about 5mm thick, with a little overhang so you can trim it off easily. Perfect for tarts like this Fresh Peach Tart or this Passionfruit Tart
- For pies – Use 1.5x this recipe for a thin crust 9 inch pie or double the recipe for a thicker crust. You will still have enough overhang to trim neatly and seal the edge around the lip of the tin. Leave the sugar out andadd ½ teaspoon of salt for savoury pies like Mums Steak and Mushroom Pie.

FAQs
Yes. This sweet shortcrust recipe can be prepared 2-3 days ahead if stored in the fridge or up to 3 months in the freezer. See storage below.
Just like my Danish pastry recipe, shortcrust pastry freezes well. Wrap it well in plastic wrap and freeze for up to 2 months. Thaw in the fridge overnight.
This way you can have batches ready to go for any special occasions, especially at times like Christmas or Thanksgiving when you need more time.
You can make a gluten-free sweet shortcrust pastry by simple swapping the flour in this recipe with a gluten free plain flour (gluten free all purpose flour). Make sure it’s a blend that already contains xantham or guar gum as this will stabilise the pastry. You may need to test you gf flour as some work better than others.
Storage
Once you’ve made your sweet pastry dough and shaped it into a disk, you can immediately wrap it well in plastic wrap and store it in the refrigerator for up to 3 days or in the freezer for up to 3 months.
If you have enough space in your fridge or freezer (depending on how far in advance you’re making it) it’s best to go one step further and shape it into your tart tin. Again, the tart shell can be stored in the fridge for up to 3 days or be frozen up to 3 months.
If your filling will not be baked, you can go another step and bake the tart shell then freeze for up to 3 months. If freezing in shell form, make sure it’s in a safe place so that it doesn’t get damaged.

Recipes With Shortcrust Pastry
Did you try this sweet shortcrust pastry recipe?
Leaving a rating and comment below the recipe is so helpful!
Hungry for more? Subscribe to the newsletter for free recipes straight to your inbox. Also, follow along on Facebook, Pinterest and Instagram.
Ingredients
- 100 g unsalted butter, softened (7 tablespoons / 3.5oz)
- 40 g icing sugar (⅓ cup / 1.4oz)
- 1 whole large egg, room temperature
- 225 g plain flour (all purpose flour) (8oz)
For best results, always weigh ingredients where a weight is provided
Equipment
- Stand mixer or electric mixer
- 9 inch fluted tart tin with removable base
Instructions
- In the bowl of a stand mixer with paddle attachment, add the butter and icing sugar. Beat on medium until fully combined and smooth (1 – 2 minutes).
- Add the egg and beat on low until smooth. If it's not coming together just add a spoonful of the flour and mix until it does.
- Add the flour and beat just until just incorporated and it starts clumping together.
- Turn the dough mixture out and pull it together into a smooth ball with your hands (making sure not to handle it too much) then press it out into a 1 inch thick disk.
- Place it onto a lightly floured work surface and dust the top with just a little flour too. Gently and gradually roll the pastry out, turning it often, to about 4-5mm thick or about 11 inches in diameter.
- Place the rolling pin in the middle of the dough and fold one side of the pastry over the top. Lift the rolling pin so the pastry is hanging over it, and lightly dust off any excess flour from underneath. Carefully lay it into a 9 inch round tart pan with removeable base.
- Press the dough down from the edges into the corners all the way round, then press it into the scalloped sides. Leave the overhang standing upright and place the tart pan into the fridge to chill for a minimum of 2 hours or up to 3 days.
- PAR BAKE THE TART SHELL:Preheat the oven to 180C (160C fan) / 350F.
- Use a fork to prick the pastry base all over. Use a small sharp knife flat to the edge, to trim off the excess pastry.
- Line the tart shell with a sheet of baking paper and fill with pie weights or rice. Fill it quite full and making sure it’s pressed up tight against the edges.
- Bake for 15 minutes. Remove the baking paper and pie weights.
- If the filling will be baked, bake the tart shell for a further 5 minutes just until it's looking dry and set.If the filling is not going to be baked, bake the tart shell for a further 20 minutes until golden and it looks dry.
- Please take a moment to leave a comment & rating. It's appreciated and so helpful.
Notes
- All ovens vary – always test for doneness 3-5 minutes before the recipe suggests
- For best results, you should always weigh ingredients like flour and sugar. Kitchen scales are relatively cheap but if you can’t weigh the ingredients, use the spoon and level method (don’t scoop).
- You can flavour your dough with a little vanilla extract or lemon zest too.
- If your dough is too crumbly, and you’ve correctly weighed the flour, sugar and butter, it could be due to the size of your egg. The dough should be soft and pliable so If you need to bring it together a little more, just add a touch of cold water.
- For savoury pies and tarts, leave the sugar out and use salted butter instead.
More Information
These links will take you up to the post – just scroll down to get back to the recipe card.MORE PIES & TARTS
This post may contain affiliate links that earn me a small commission for my referral, at no extra cost to you. Thank you for supporting Sugar Salt Magic.
7 Comments on “Sweet Shortcrust Pastry (Pâte Sucrée)”
Hello! I don’t have a food processor so what would be the next best method to make the pastry?
Thanks
Hello Annie, just place it all in a bowl and use a pastry cutter or a knife to cut the butter into the flour. Make sure the butter is cold to start. This method will take a little longer than with a food processor but is the traditional way to make it.
I’ve never made one that uses egg and milk, but man I can totally imagine the richness, mouthwatering… I need to try this one out. Thanks for the recipe Marie!
Marie, great tips on a beautiful pastry crust!
Thanks so much, Kelly. So happy it’s helpful 🙂
Thank you for all of your amazing tips! This is such a well thought out post with excellent information in it 🙂
I’m so happy it’s useful. Thanks so much Alexandra 🙂