Want to know how to make Danish pastry? The easy way? I did too, so I created this Danish pastry dough recipe that takes just ½ an hour of hands on time and just another 20 to turn it into buttery, flaky breakfast pastries.
- Buttery, flaky and a perfect layered texture
- Crispy on the outside, soft in the middle
- Can be made ahead so you can bake your pastries fresh when you want them
- Create your favourite pastry shapes and fillings
- It can be frozen as a slab or as already assembled pastries
- Assembled pastries can be baked from frozen
You can also see my bear claw pastry where the pastry is adapted from this recipe but has a slightly different method (a little more like croissant dough) and these Spandauer (Jam and Marzipan Danishes) which have a higher butter ratio.
I can’t begin to tell you how amazing this recipe is. It’s easier than a traditional Danish dough but every bit as delicious. This recipe was actually adapted from my blueberry cinnamon roll dough.

FEATURED COMMENT
Ten stars! … This was a HUGE success at the office. I’ve already been warned that they will be requested again and again and again. Bring it! This recipe is so easy that I won’t mind making them many times.
Ed Anderson
Heads up, this post is loaded with information so here’s a table of contents to get you where you need to go or hit the jump to recipe button at the top to go straight to the recipe.
Never Miss a Recipe!
Get the latest recipes straight to your inbox!

What is laminated dough?
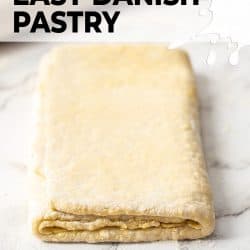
Laminating dough is the process of rolling butter into dough, then folding and rolling a number of times to create layers. Puff pastry is a type of laminated dough and so is Danish pastry dough. As the butter is not worked into the dough but rolled through in layers, it melts, creating steam as it bakes which lifts and creates the layers.
While not laminated in the traditional way (aka a slab of butter gradually rolled directly into the dough), I use a simplified method (mainly because patience isn’t my thing) and this Danish pastry still results in perfect flaky, Danish pastries.
What is Danish pastry?
Danish pastry is a yeasted, buttery pastry of many layers. Used most often for sweet breakfast or dessert pastries, it’s cooked until crisp and flaky on the outside, while the centre stays soft.
Danish pastry was created in Denmark but it translates to Vienna Bread – this is because it was created by Austrian bakers in the 1840s (source).
Ingredients for Danish pastry
Danish pastry ingredients are very few and very simple. You just need 7 ingredients and, if you’ve made bread before, you likely have all of them on hand.

Full details in recipe card below.
- Flour: Just plain (all purpose) flour is all you need. You can use bread flour if you like but it will make for a chewier texture.
- Yeast: Don’t be intimidated by using yeast. It’s easy and I’ll show you how to make sure it’s going to work. You can use instant yeast or active dry in this recipe.
- Milk: I recommend using full fat / whole milk in this enriched dough.
- Butter: A major part of this dough is the butter. Use unsalted, full-fat butter. This recipe has not yet been tested with alternatives.
- Sugar: Since we’re after sweet Danish dough, a little sugar is needed but not too much.
- Egg: Again, being an enriched dough, an egg helps to give that rich flavour.
- Salt: Always a little will add balance to any recipe.
How to make Danish pastry
While this recipe is very easy to make and only needs ½ an hour of hands on time, I don’t want to give the impression that it’s a quick recipe overall. This dough needs chilling time but further down in this post, I’ll give you tips on how to have it ready ahead of time so all you need to do on the day is bake.

Full details in recipe card below.
- Grate the butter: This little trick is how we make this recipe super simple while still giving us perfect flaky Danish pastry. Use a course grater to grate the butter, then place it in a bowl (photo 1) in the freezer for 5-10 minutes.
- Activate the yeast: Heat some milk, then add the yeast and sugar and mix it together. Let it sit for 10 minutes until it looks frothy (photo 2).
- Combine the butter and dry ingredients: Take the butter from the freezer and add the flour, remaining sugar and salt. Give it a light toss to coat (photo 3), then use a pastry cutter or your finger tips to work the butter into the flour until you have just small pieces about the size of lentils (photo 4).
- Add the wet ingredients: Add the yeast mixture (photo 5), remaining milk and egg to the butter and flour and stir together to a rough and sticky dough (photo 6). Chill 8 hours or overnight.

- Roll and fold: Turn the rough dough out onto a lightly floured surface (photo 7) then gently form it into a rectangle with your hands (photo 8). Roll the dough out to about a ¼ inch thick large rectangle (photo 9). Fold it like a letter by folding the top third down over the middle third (photo 10), then the bottom third over the top (photo 11). Turn it 90 degrees (photo 12) then roll and fold again 3 more times.
How to turn it into breakfast pastries
When you’re ready to turn your homemade danish dough into Danish pastries, roll the dough out, cut it into shapes, fill and bake. It’s that simple.
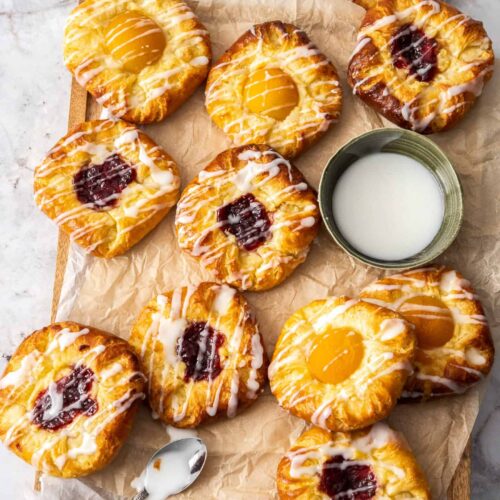
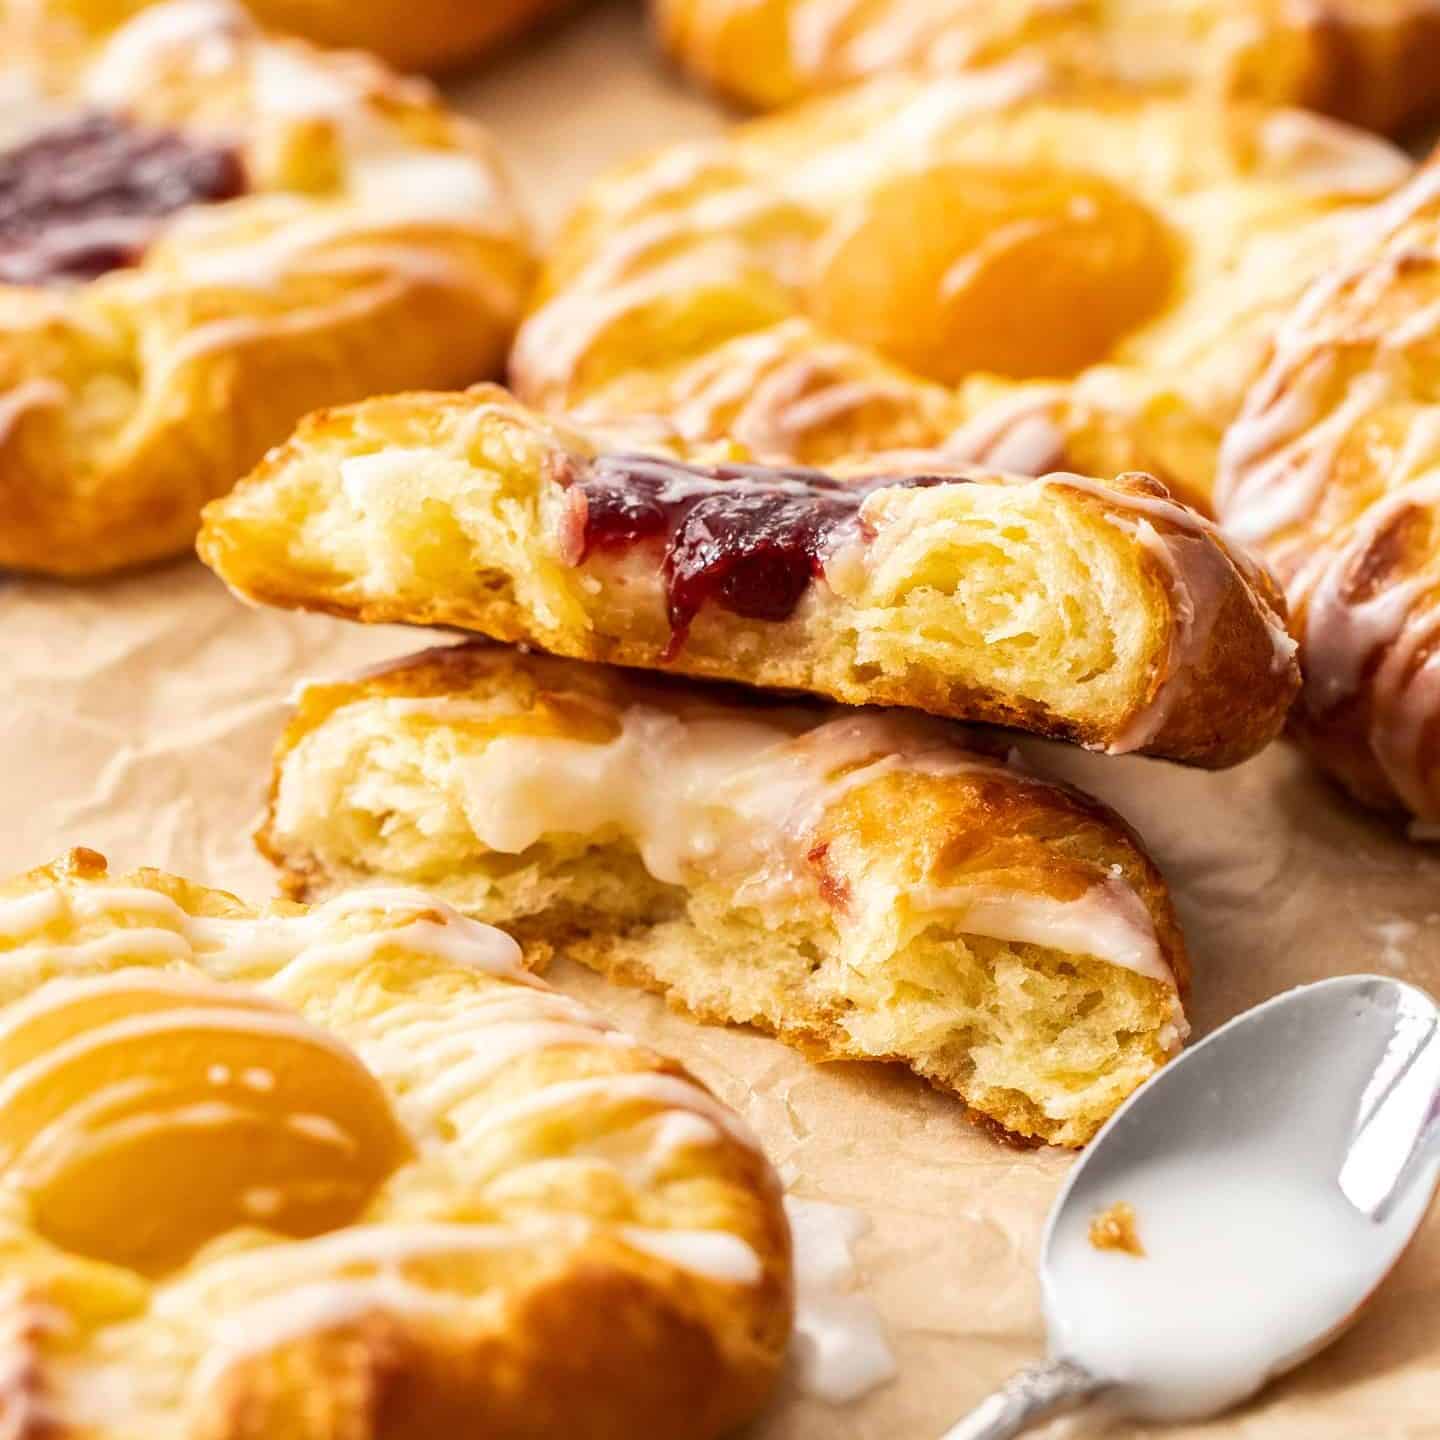
A simple square with the corners pulled in will give you a classic shaped pastry or cut rounds like the picture below.
Try turning it into;
- Custard Danish
- Lemon Danish pastries
- Cream cheese strawberry Danishes
- make these peach tarts
- You can even make these Nutella twists with this dough.
Baking temperature and time
The baking temperature and time for Danishes will depend on what size you make them and what you bake them in. For instance, if you bake a family sized Danish it will require different temp / time to a palm sized Danish or a Danish cooked in a muffin tin. So it will depend on your creation.
While this post focuses on making the base pastry itself, check out the recipes I’ve linked in the section above to help you create your own baked Danishes.

Pro tips and tricks
- Freezing the butter: Don’t skip this. The purpose is to make the butter very cold so that it doesn’t melt before you’ve finished cutting it into the dough.
- Activating the yeast: Technically, when using instant yeast, you don’t need to activate it (like you do with active-dry yeast) however I always take this step to check the yeast is good so I don’t waste time and a batch of ingredients on yeast that’s no good.
- Keep it cold: Try not to work this dough too much with your hands as you’ll melt the butter. It’s the small pieces of butter that will give you flaky layers, which, if the butter is melted, you won’t get.
- You can use your fingertips or a pastry cutter to cut the butter into the dough.
- Don’t skip chilling: This is for two reasons. First, chilling the dough keeps the butter cold and in small pieces which equals flaky layers. The second reason is to rest the dough. When you knead or handle dough, the flour in it develops gluten and tightens up. Chilling the dough allows it time to relax again.
How to prep Danish pastry ahead of time
Yes, this is an easy recipe – not difficult to make and no special equipment required – however, it’s not a super quick recipe. Chilling and resting the dough is vital and there are three stages of this.
- Stage 1: Once you’ve made the rough dough, which takes all of 15 minutes, the dough will need to rest 8 hours or overnight. You could rest it for as little as 4 hours but I prefer the results from at least 8.
- Stage 2: After you roll and fold the dough, which again takes all of 15 minutes) you’ll need to rest the dough for 1-2 hours.
- Stage 3: Once you’ve rolled and made your pastry shapes they’re best rested for 30-60 minutes.
This sounds long winded but you can have breakfast pastries in the oven first thing in the morning, pinky promise! Delicious, buttery Danish pastries, made from scratch, ready to eat for breakfast? Yes and please. So here’s how you do it.
- 1-2 days before you want them: make the rough dough first thing in the morning.
- Late afternoon, same day: do your roll and folds.
- 1-2 hours after the roll and fold or first thing the morning you want them: assemble the pastries.
For instance, I made the dough first thing on a Saturday morning (15 minutes). I went about my day then about 4pm I did my roll and folds (15 minutes). An hour later, I assembled my batch of pastries and put them on baking trays in the fridge, covered (20 minutes).
When I woke up Sunday, I turned the oven on and baked them and had fresh baked Danish pastries for a sweet and delicious breakfast treat.
Danish pastries can also be baked from frozen. Assemble then place on a baking tray and place in the freezer. Once solid, wrap them well and place in an airtight container. Unwrap, then place on a baking tray and bake from frozen.
Want to try choux pastry? Give these chocolate chouxnuts a try.

FAQs
Yes, you can freeze Danish pastry dough. Form it into a smoothish rectangle on a lightly floured surface. Wrap 2-3 times in plastic wrap and store flat in the freezer for 2-3 months.
Frozen Danish pastry should be thawed overnight in the fridge. On the other hand, if you have already assembled your Danish pastries, they can be baked from frozen, but may take an extra 3-5 minutes.
There are so many methods to folding Danish pastries. A very simple method is actually no fold at all. Just cut out circles of dough, make an indent in the middle and add a filling. Another simple way is to cut squares, then fold the corners into the centre.
Other methods include braids and pinwheels among many more and I aim to add a post in the near future with a bunch of Danish pastry shapes you can make with this dough.
The difference between Danish pastry and puff pastry is essentially yeast and egg. Danish pastry is leavened whereas puff pastry is not. In addition, Danish has egg in the dough. Danish dough is layered like puff pastry but is crisp on the outside whilst being soft on the inside as opposed to puff pastry that is crisp all the way through.

If you try this homemade sweet danish dough, please take a moment to leave a rating and comment below. I love hearing from you and it helps other readers too! You can also take a photo and tag @sugarsaltmagic on Instagram.
Hungry for more? Subscribe to the newsletter for free recipes straight to your inbox. Also, follow along on Facebook, Pinterest and Instagram.

Video
Ingredients
- 1 cup cold milk (250ml)
- 2 ¼ teaspoons instant or active dry yeast (1 sachet / 8g) (notes)
- 390 g plain (all purp) flour (3 cups / 13.8oz)
- ⅓ cup white granulated sugar (66g / 2.3oz)
- ½ teaspoon salt
- 226 g unsalted butter, full fat, no light versions, coarsely grated and very cold (1 cup / 2 sticks / 8oz)
- 1 large egg
For best results, always weigh ingredients where a weight is provided
Equipment
- Pastry cutter (optional)
Instructions
- If you haven't already grate the butter and place in the freezer to chill for 10 minutes. Grate it into a large bowl and don't press it down, leave it loose.
- Warm ½ cup of the milk in the microwave or a small saucepan, just until warm to the touch (not hot) or about 40C. Too hot and you'll kill the yeast, too cold and the yeast won't bloom.
- To the warm milk, add 1 tablespoon sugar and all the yeast and mix. Let it sit for 10 minutes to become frothy. If it doesn't look frothy, the yeast is no good and you'll need to start again with fresh yeast.
- To the large bowl of cold butter, add the flour, remaining sugar and the salt. Give it light toss to coat. Now very, very lightly with your fingertips or with a pastry cutter, cut the butter into the flour until the pieces are about the size of a lentil. Be careful not to melt the butter. If it's warm where you are place it in the fridge for a few minutes to cool again.
- Whisk the remaining ½ cup milk and the egg into the yeast mixture until well combined, then pour it into the dry ingredients.
- Use a spoon or spatula to mix the ingredients together just until you have a very rough and sticky dough.
- Cover the bowl with plastic wrap and chill in the fridge for 8-24 hours.
- Turn the dough out onto a very lightly floured surface – you don’t want to add too much flour as it will dry out the dough. Form a simple rectangle.
- ROLL AND FOLD: Roll it out to a large rectangle about 6mm / ¼ inch thick (about 27cm x 45cm). Fold, letter style in thirds (fold the top over the middle third, then the bottom third over that).
- Repeat this roll and fold 3 more times for a total of 4 times, ending with a much smoother folded dough. The last roll and fold, the dough will feel much tighter – it's ok if you can't quite roll it out to 6mm / ¼ inch. Add a touch of flour if you see it sticking to the counter or your rolling pin at any point but try not to add too much.
- Chill for 1-2 hours to relax before rolling and turning into danish pastries.
- To turn it into baked pastries, use these Lemon Danish Pastries or these Custard Danish Pastries as a guide. For baking temp and time, see notes 5.
Notes
- Yeast: You can use instant or active dry yeast.
- Start this recipe the day before. You can put the dough together first thing in the morning which takes about 15 minutes. Late in the afternoon, you can do all the roll and folds which also takes about 15 minutes, then leave it to chill overnight and put the pastries together the following morning for a delicious breakfast or brunch. Assembling only takes about 20 minutes including and they will need a 30 minute rest once assembled as well.
- You can also make it two days in advance. Prep the dough on day one, roll and fold day two then assemble and bake on day three.
- This dough can be frozen. Wrap well in plastic wrap 2-3 times. Thaw in the fridge overnight.
- The baking temperature and baking time for Danishes will depend on what size you make them and what you bake them in. For instance, if you bake a family sized Danish it will require different temp / time to a palm sized Danish or a Danish cooked in a muffin tin. So it will depend on your creation.
IN THE POST
Links will take you to the post -just scroll down to the bottom to get back to the recipe card.- How to turn it into breakfast pastries
- Baking temperature and time
- Pro tips and tricks
- How to prep Danish pastry ahead of time
- FAQs
MORE SWEET BREAKFAST RECIPES!
This post may contain affiliate links that earn me a small commission for my referral, at no extra cost to you. Thank you for supporting Sugar Salt Magic.
62 Comments on “How to make Danish Pastry”
Very nic recipe
So happy you love it, Chaita.
Recently discovered this website and have LOVED every recipe I’ve made so far!
For this particular one I made the mistake of throwing it in the freezer instead of the fridge for step 7🙈 If I let it thaw should it be okay to continue?
So happy you love it, Faith. It will still work but you’ll need to thaw it and then put in the fridge. You can let it proof out of the fridge as long as your home isn’t too warm. It won’t have proofed while it’s in the freezer unfortunately.
I made some mistakes on the way using this recipe, and even after all that, I still had the most beautiful flaky pastry eveerrr and on my first try too! Thanks for the recipe!!!
I’m so happy to hear this, Mary. It’s a pretty forgiving recipe and I’m so glad you love it 🙂
You have inspired me to go above my paygrade and attempt to make one of the most delicious of pastries………….The Danish !!
Many thanks for the thoughtful photos and tips. Your presentation is top notch !!
So happy to hear this, Tom. Enjoy 🙂
Been baking for many years, but Danish pastry (and croissants) have been my nemesis, lol. Tried this recipe a while ago but wasn’t happy with results. Tried again this week and got perfect results. Made apple Danish with 1/2 the recipe and Danish spirals with pastry cream and raisins with the other – tasters thought they were from a bakery. I have a go-to pastry recipe now. Thanks.
I’m so happy you love it, Baker Steve. Both your bakes sound absolutely divine!
This article offers a video to watch in the making of the pastry dough. One huge problem it stops after the flour mixture is whisked.
Hi David. You’ll notice part way into the video, two little buttons come up on the right-hand side of the video – one says stay and the other says next. Just tap or click on stay. If you don’t, it skips to the next video. Unfortunately, it’s part of the video player software that I can’t remove.
Your video on pastry dough starts ok then goes to a commercial and returns with a different recipe. It does not complete the pastry instructions.
Hello John. As the video gets part way through, two little buttons come up on the right hand side of the video screen that say “next” or “stay”. You just need to select to stay on that video.
This recipe looks great but the phone app version keeps jumping around as I’m trying to read it!
I appreciate the simplicity of your method.
Sorry to hear that Rita. I’ll try to work out what’s going on. In the meantime, you can click the print recipe button, it will open in another tab that won’t jump around at all.
Thank you Marie for this very tasty and fairly easy recipe for Danish dough.
I would say that you cannot go wrong if you follow your step by step instructions.
Continue your great work.
Thanks so much, Henri. I’m so happy you enjoyed it 🙂
Hello! What temperature and time should I bake my danishes for if I’m only putting 3 in the oven?
Hi Svetlana. You would bake at the same temperature. The time might be shortened slightly – just take them out when they’re a nice deep golden brown.
Seems like the perfect answer for my quest for bakery like Danish
I’m sure you’ll love it, Kenneth 🙂
How many days can I leave the dough in the fridge after doing the roll and folds step before I bake it?
It can sit in there 2-3 days.
I see that the time & temperature of baking may vary with whatever one is making…
but there is no guide. I need a ballpark figure… at what temperature are, say, a cinnamon roll for example. Or a lemon Danish etc. Approximate times would be
appreciated and we could all take it from there. …just saying…
Thanks,
Smokey
Thanks Smokey. I haven’t tested every size and shape Danish so I can’t say how long any persons particular bake will take. In the last recipe step, I’ve linked to recipes, including lemon danish, so that you can see the size of those and temp and baking time required. Happy baking 🙂
I was expecting the dough to be more like pie crust or puff pastry, but instead it was more like bread dough. Adding the egg and the milk threw the recipe off.
Hi Tasha. Danish dough is not like croissant dough, it’s a different type of dough. The egg and milk don’t throw it off, they’re mean to be in there if you want Danish dough. If you’re after croissants, go for a dedicated croisssant dough recipe 🙂
I have not yet made this recipe but want to make a New Years Pretzel out of it. I want to make it like a cinnamon roll only with Danish dough. Is this possible? thanks
Yes and it’s an idea I’ve often thought about doing too. It’s a very versatile dough so it should work fine.
Hi there…just wanted to let you know that your directions in the actual recipe for rolling out the dough differs from the explanation. You say to roll it out to 1/4 inch and the recipe says roll it out to 1/3 inch.
Thanks Pamela. I’ll adjust it to be less confusing but it’s just a guide so that it folds easily. The last roll is tricky to get to 1/4 inch.
There are no temperature guides. I’ve made the dough and how do I bake it?
Hello Cindy. Sorry you couldn’t see it. Check the last instruction and the notes section. It depends on what you’re making with it.
Unreal. I have never made pastry before but I made danishes with this and I thought they were almost better than shop bought!
So happy to hear this, Karen. Thanks so much for trying my recipe 🙂
I have obviously done something wrong. I left the dough overnight for the first stage but it is much too sticky to handle and roll. I used a scale for all measurements and the dough looked e aptly like yours in the video. Any ideas, can I save it.
Hi Jayne. If it looks like it does in my video then it sounds perfect. It’s meant to be sticky so that it’s not a dry dough. Just sprinkle some flour out onto your surface, tip out the dough and dust a little more flour on top. Only add as much as you need to be able to start rolling. Add a little more if necessary as you go. It will tighten up and “dry” up as you go.
Hi. I’ve been baking for over 40 years, and have made danish pastries the “traditional” way with varying success. So I was skeptical of a recipe so simple actually working well. I followed the directions given. The next day I turned out the dough and thought “Hmmm, not really sure about this…” But I started rolling and folding and by the third turn, the dough was like silk – just incredible – looked like something from a magazine. The pastries baked well and looked great. Probably the best-tasting I’ve made. I’m totally impressed. Thanks.
I’m so happy to hear this, BakerStevePA. I’m so glad my technique gave you the results finally that you’ve been craving.
Hi, do you have any tips for when the dough is super sticky even after resting it overnight?
Hello Latch. It will be slightly sticky still. Just add a little flour as you start rolling it out. Just add as little flour as possible as you don’t want to dry it out. It will become less sticky as you roll and fold too.
I have not made this but being Danish American, I can tell you my Danish mother and grandmother made it similarly. They also taught me to grate Frozen Butter and put that back in the freezer with the bowl. Refrigerator butter works too but Frozen is easier. I do the same for Southern Biscuits having grown up in Mississippi. I know a good real biscuit. And the technique makes gluten free biscuits even tastier and fluffier. Best regards! Anne
Thanks so much, Anne. I also use this technique in scones 🙂
Hello! Just a bit confused- do we let it rest overnight before or AFTER we roll it into folds?
Hi Ahlam. Yes, you rest it overnight before folding. It’s all written step by step in the recipe card.
Attempted this recipe twice and both times it has turned out bready and inedible. I feel there are some instructions missing from this that the recipe would benefit from, like how thick the dough should be rolled before shaping etc
Hi Louise. Are you weighing your ingredients? What size are you making your danishes and at what temp are you baking them? (you can refer to my other recipes for an idea). Are you letting it rest for the full resting time? The measurements for rolling out the dough are in those recipe posts as well.
Hey Marie,is this dough used in making almond bear claws?
Hi Amy. I don’t know if it’s the same dough traditionally used for bear claws but you can use it to make them.
Gotcha,thanks! I still plan on using this recipe for fruit danishes! Have a great day!
Ten stars! I started this dough on Saturday, then put it in the freezer. When I got out of bed today (Tuesday), I filled the “holes’ with lemon pastry cream and baked at 350 for 30 minutes. This was a HUGE success at the office. I’ve already been warned that they will be requested again and again and again. Bring it! This recipe is so easy that I won’t mind making them many times.
Love this, Ed. I’m so happy you love the recipe and truly appreciate you trying mine. I’ve got some cream cheese strawberry Danishes coming up in the near future your office pals may love.
First time making any kind of pastry and had never used yeast before so this initially felt a little daunting, however the guidance was super clear and simple so I gave it a go. Wow… I am so glad I did! The pastry is perfect and so delicious- slight crunch but then melts in the mouth.
The grated butter in the freezer before mixing works so well, it needed very little cutting together.
I made cherry jam danishes and they have been a big hit so far. I have actually impressed myself with the help of this recipe 😁
I love this, Leanne! So happy you found my recipe approachable and easy to follow and even happier they were a hit.
OMG. This recipe is FABULOUS. I pulled my Danish out of the oven and as far as I’m concerned they are as excellent as a bakery’s. My lemon curd pastries are incredible. Thank you. It all takes a little time, but the results are worth it. Enjoy! And, thank you to the chef.
So happy to hear this, Pamela. Thanks for trying my recipe.
Hi Margaret. This post is just a recipe for the Danish pastry itself. If you check the post there are loads of links and ideas for turning it into baked pastries. Try these lemon pastries or these custard danish pastries.
I made this recipe over the weekend. I can’t believe how easy it was & how little hands on time it required. These will become a family favourite. I especially liked the tip that you can bake them from frozen & also the step by step pics. I made an apple version, so delicious.
Thank you so much for trying my recipe Jane. So happy you loved it. I saw your pics on Instagram and the apple looks so good.
Hi! Do you think this recipe could work with the method of melting the butter and adding it to the near-freezing milk and stirring to get the little cold butter clumps? This seems pretty easy already (which I love!) but if the modification works it could save me a lot of cleanup.
Thanks! Super excited to try this 🙂
I don’t recommend it, Annika. You’ll get best results from grating it.