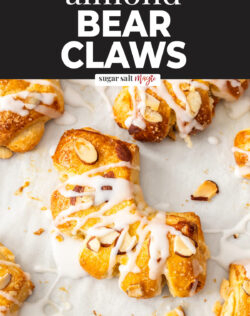
Why we love them
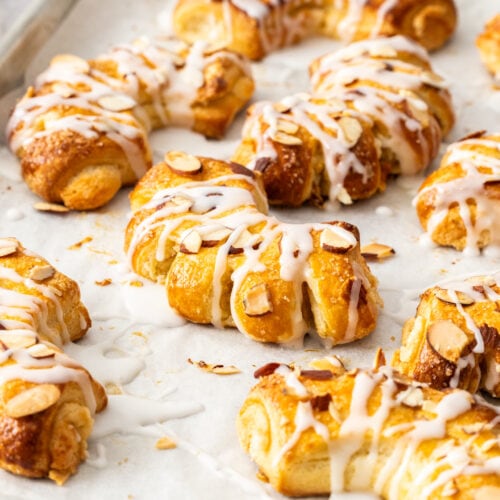
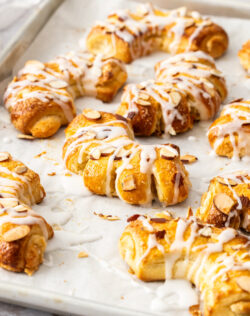
I truly had so much fun creating my bear claw pastry. The pastry is adapted from my Danish pastry recipe and these cute pastries are filled with homemade almond paste. A buttery, nutty sweet treat.
The pastry itself is soft on the inside while the outside gets golden brown and flaky. This laminated dough is a little like making croissant dough but waaaaay easier! It’s doesn’t puff up quite so much as croissant dough, but it’s the perfect pastry for making any breakfast pastry, including these bear claws.
The filling is sweet, buttery, nutty bliss. Loaded with almond flavour, almond paste is beaten together with butter, egg white and a little sugar. It’s takes just minutes to do.
If you love Danish pastry, try these cream cheese strawberry Danish and lemon curd Danish pastries.

Never Miss a Recipe!
Get the latest recipes straight to your inbox!
Ingredients you’ll need
Most of the ingredients in this bear claw recipe are very basic, every day ingredients. If you can’t find almond paste, you can very easily make it – it takes 5 minutes from scratch. Also, if you don’t feel like making the pastry, you could use puff pastry. The texture won’t be the same but they’ll still be delicious. I really recommend giving it a go from scratch though for the most delectable breakfast pastry texture.

Jump to the recipe for full ingredients and instructions.
- Flour: Just plain flour / all-purpose flour for this recipe.
- Sugar:
- regular white granulated sugar or caster sugar (superfine sugar) is used in the pastry.
- Icing sugar (aka powdered sugar) is used in the filling.
- Demerara sugar (aka turbinado sugar) is used on the outside to give a crunch.
- Milk: Use whole milk for the best flavour but others will work. Half n half, Hilo / light versions, or even plant-based milks will be ok.
- Butter: Stick to unsalted butter for these as the pastry is not very sweet.
- Instant yeast: I use instant yeast or instant dried yeast but you can also use active dry yeast in the same quantity.
- Eggs
- Almond extract: Make sure to use extract, not essence.
- Almond paste: If you’re buying it, make sure to get almond paste, not marzipan. If not, you can make it yourself using this recipe.
- Almonds: I use unblanched sliced almonds for the top. Blanched almonds are fine too.

How to make bear claws (step-by-step)
I’ve included loads of photos here for you to refer to as you make these almond bear claws. Some of the steps are a unique and sometimes hard to explain so these pics will show you exactly where you need to be.
To make the bear claw pastry:
This pastry is almost exactly the same as my Danish pastry recipe with just a bit of a change to the process. For this one, we make a regular dough, then grate over cold butter and roll and fold that in a number of times.

Jump to the recipe for full ingredients and instructions.
- Activate the yeast: Technically, you don’t need to activate instant yeast. You do, however, need to activate active dry yeast. I do it with instant yeast so that I know the yeast is working and I don’t go and waste a whole bunch of dough ingredients only to find out it doesn’t work. Just add the yeast and a little sugar to some warm milk and let it sit until it gets all puffy (5-10 minutes) (photo 1).
- Combine the dough ingredients: Add the remaining milk and an egg to the yeast mixture and give it a mix. Whisk together the dry ingredients in a large bowl, then pour the wet ingredients into the middle (photo 2).
- Mix it all up: Use a spoon to mix the dough together (photo 3), then turn it out onto a lightly floured surface and just knead enough to pull it into a mostly smooth ball. Flatten it out a bit (photo 4).
Roll and fold
The dough is rolled and folded a number of times to get loads of layers but it’s a very simple process. You might find the dough is a bit tight on the last roll. Just leave it sit for 5 minutes then come back to it. While you could stop at the third roll, the last one makes such a difference to the final result.

Jump to the recipe for full ingredients and instructions.
- First roll: Roll the dough out to a large rectangle (photo 5).
- Add the butter: Use a box grater on the coarse side to grate cold butter all over the dough (photo 6).
- Fold it: Now fold the dough letter style. You want to go from short side to short side but only pull one third of the dough over the top of the middle third (photo 7). Now fold the other side over the top of that (photo 8). Just fold that long rectangle once in half to get a square (photo 9) and it’s ready to go.

- Roll and fold: Now you roll the dough out again with the butter inside it to the same size large rectangle (photo 10). Repeat the letter style folding (photos 11 & 12).
- Repeat 3x: Repeat that last step 3 more times until you end up with a much smoother dough (photo 13) that is no longer sticky.

- Cut and chill: Divide dough into two squares (photo 14) and take a moment to appreciate all those layers (photo 15). Chill the dough for 4 hours or up to 24 hours.
Trim, fill and shape the bear claws

Jump to the recipe for full ingredients and instructions.
- Roll and trim: Roll one of the dough squares out to just over 27cm/11 inches. Trim the edges (photo 16) so you have the exact size square you need then cut that into 3 even strips (photo 17).
- Fill the bear claw pastries: The bear claw filling is just a matter of beating together butter, sugar, almond paste, egg white, almond extract and salt with an electric mixer until combined. Transfer it to a piping bag and pipe a line of filling down the center of each strip (photo 18).
- Encase the filling: Fold the dough over the filling to encase it and join the two edges (photo 19).

- Shape the claws: Cut each of the strips into 3, then make cuts in the filling side of each one (4 slits each opposite to the seam side) (photo 20).
- Rest, then bake: Transfer each of the bear claw pastries to a lined baking sheet and curve them a little to splay the “claws” open (photo 21). Rest on the baking sheet for at least 30 minutes or up to an hour, then brush with egg wash. Scatter over demerara sugar and almonds (photo 22), then bake until golden brown.
Tips and tricks
- Weigh your ingredients: You will always get the best result if you weigh out your ingredients. Plus, using a kitchen scale means you can measure directly into your bowl and you don’t need to wash up a bunch of cup measures.
- Don’t add too much flour: When rolling out the dough, only add as much flour as you need to stop the dough from sticking. The amount you need will lessen the more you work the dough. Check regularly to make sure it’s not sticking to your work surface. A bench scrape makes lifting the dough much easier if it does stick.
FAQs
What is a bear claw?
A bear claw is a Danish pastry with an almond filling first created in California in the early 20th century.
Yield and storage
This bear claws recipe makes 18 individual bear claws. You can make just 9, then freeze half the pastry dough and half the filling for another batch at a later date. Thaw it in the fridge overnight.
Store the baked bear claws in an air-tight container at room temperature for 2-3 days and after a day, they will be best just warmed slightly in the microwave (10 seconds or so).

Did you try this recipe for bear claws?
Leaving a rating and comment below the recipe is so helpful!
Hungry for more? Subscribe to the newsletter for free recipes straight to your inbox. Also, follow along on Facebook, Pinterest and Instagram.
Ingredients
FOR THE PASTRY (see notes for puff pastry)
- 1 cup cold milk (250ml)
- 2 ½ teaspoons instant or active dry yeast (notes 1)
- 425 g plain flour (all purp flour) (3 ¼ cups / 15oz)
- ⅓ cup white granulated sugar (66g / 2.3oz)
- ½ teaspoon salt
- 1 large egg
- 226 g cold unsalted butter (1 cup/8oz)
ALMOND PASTE FILLING
- 45 g softened butter (3 tablespoons / 1 ½oz)
- ½ cup icing sugar
- 300 g almond paste room temperature (10.5oz)
- ½ teaspoon almond extract
- 1 egg white
TOPPING
- 1 egg yolk beaten with a teaspoon of water (the egg wash)
- 1 teaspoon demerara sugar (turbinado sugar)
- ¼ cup flaked almonds
- 1 cup icing sugar (powdered sugar)
- 2-3 teaspoons water (or milk or lemon juice)
For best results, always weigh ingredients where a weight is provided
Equipment
- Pastry cutter (optional)
- electric mixer
- Ruler & sharp knife
Instructions
- Prep the yeast: Warm ½ cup of the milk in the microwave or a small saucepan, just until warm to the touch (not hot) or about 40C/104F. Too hot and you'll kill the yeast, too cold and the yeast won't bloom.
- To the warm milk, add 1 tablespoon sugar and all the yeast and mix. Let it sit for 5-10 minutes to become frothy. If it doesn’t look frothy, the yeast is no good and you’ll need to start again with a new pack of yeast.
- Combine dough ingredients: To a large bowl add the flour, remaining sugar and the salt. Give it whisk to combine.
- Whisk the remaining ½ cup milk and the egg into the yeast mixture until well combined, then pour it into the dry ingredients.
- Use a spoon or spatula to mix the ingredients together to a rough and sticky dough.
- Turn the dough out onto a lightly floured surface and just knead it enough to pull it together fully. Re-dust the work top with flour if needed but be careful not to add too much flour as it will dry out the dough. Form a simple rectangle.
- First roll & adding butter: out to a large rectangle roughly 30x40cm (12x16inches). Use a box grater to grate the cold butter over the top – as quickly as you can so it doesn’t start melting in your hand. Fold the dough letter style in thirds (fold the shortest side over the middle third, then the other side over that). Fold the whole thing in two, into a square.
- Roll and folds: Roll it out to a large rectangle again sprinkling over a little flour to stop it sticking to the rolling pin or worktop if needed. Fold, letter style again, then repeat this roll and fold 3 more times.– Each time you fold it, brush off any excess flour from the folded section.– The last time, the dough will be getting quite tight and tough to roll out. If it’s too tight, just let it sit there for 5 minutes to give it a chance to relax and come back to it. You could stop at the third time but that extra roll and fold makes a huge difference.
- Cut the dough into two square pieces, cover with plastic wrap and chill in the fridge for 4 or up to 24 hours.
- The bear claw filling: Add the butter and sugar to the bowl of a stand mixer with paddle attachment or into a large bowl if using a handheld electric mixer. Start beating on low.
- Once it starts coming together, add half the almond paste, torn into smaller pieces. Beat to combine.
- Add the egg white and almond extract and beat until combined and smooth before beating in the remaining almond paste.
- Transfer to a piping bag with roughly a ½ inch opening.
- Cut, fill and shape the bear claws: On a lightly very lightly floured surface, roll the first piece out to just over 27cm square (11 inches square) – I say just over so that you have enough overhang to trim the edges square. Trim the edges from the rolled dough to square them up so that it is now exactly 27cm/11 inches square.
- Cut the rolled dough into 3 even strips, 9cm/3 ½ inches wide.
- you can repeat the rolling and cutting process for the second square of dough or wrap it tightly in plastic wrap and freeze for a second batch at a later time.
- Pipe a line of almond paste mixture down the centre of each one using about 1/6 of the filling per strip of pastry. If you’re freezing half the dough, you can also freeze half the filling separately.
- For each strip, run a damp finger along the right hand edge, then fold the long edges together, over the filling. With the edge of your hand on the seam, gently press on the filled side to flatten it very slightly.
- The logs might have stretched out so just tap the ends in to get it back to around 27cm/11inches long. Cut each log into 3 even pieces.
- Seam side facing away from you, cut 4 slits, 2cm/¾ inch deep, in the folded/filled side of each pastry.
- Place the pastries onto a large baking sheet lined with baking paper and carefully curve them so the “claws” splay open a little.
- Sit at room temperature for 30 minutes to rest and puff a little and try to keep away from any warm spots. They won’t rise up much, that’s ok but resting is important.
- Preheat the oven to 200C (180C fan) / 395F.
- Brush the tops of the pastries with egg wash. Sprinkle over demerara sugar and sliced almonds.
- Bake for 18-20 minutes or until golden, 1 tray at a time, until golden brown.
- Totally optional: Some of the almond paste pushes out between the claws and it still looks gorgeous but to get the look of the individual claws, I just use a knife to gently push that filling back inside the claw while still hot.
- Let the pastries cool at least to room temperature, then mix together the icing sugar and water so that it’s just pourable (not too runny) and drizzle over the pastries.
- Please take a moment to leave a comment & rating. It's appreciated and so helpful.
Notes
- Yeast: You can use instant or active dry yeast.
- Puff pastry: You can use puff pastry in place of the homemade Danish dough. While it will have a different texture, they’ll still be delicious. Use 2 puff pastry sheets, each one should cut into 9 pieces almost the same size as recommended in the recipe.
- For best results, you should always weigh ingredients like flour and sugar. Kitchen scales are relatively cheap but if you can’t weigh the ingredients, use the spoon and level method (don’t scoop).
This post may contain affiliate links that earn me a small commission for my referral, at no extra cost to you. Thank you for supporting Sugar Salt Magic.
18 Comments on “Bear Claw Pastry”
First time making any sort of danish and I am hooked! I can’t wait to try some other of your recipes. My three year old daughter and I had an absolute blast making them. The comprehensive instructions with pictures made this so incredibly easy and my house is now filled with the gorgeous almondy smell as the last batch bakes. I can’t wait for our friends to try these when they get here!
I’m so happy to hear this, Chloe. I truly appreciate you dropping back to leave a review.
Turned out great but more work than expected
Hi Mark. So happy you love them. Yes, making Danish pastry takes a little time but it’s worth it.
I made these and everyone loves them! Thank you for the recipe! Although the almond paste is the clasic , I have put other fillings in as well. Poppy seed filling is my favorite! Thanks again!
I’m so happy you love them, Tammy. Thanks so much for dropping back to review.
Yum! Excellent recipe! Thank you! Perfect for Christmas morning. Definitely a process, but enjoyable and well worth the effort. I used active yeast, worked great as indicated. As a personal preference, I did use salted butter when lacquering the dough and added a pinch of salt to the filling and icing. I also added 1/4 tsp vanilla extract to the icing… Not overly sweet. I enjoyed both with & without icing. This was my first time making bear claws (actually first time making any type of danish). The instructions with pics were easy to follow. Delicious! A keeper!
So happy you love it, Jen
My neighbors and I made your recipe. We had so much fun doing it. We came out with 36 smaller claws, perfect with coffee the next morning which we invited more neighbors over. Thank you for all the friends and fun we had.
This sounds like such a fun time. I’m so happy you enjoyed both making and eating them. Thanks so much for dropping back to review.
This recipe is to die for. I own a bakery and these are top sellers for me. The homemade almond paste is the best! These are SO good. Thank you for sharing your recipe.
So happy you love it, Debbie and that your customers love them too 🙂 Thanks so much for dropping back to leave a review.
The bear claws were delicious and it’s worth the time working the dough, prepping and be sure to follow all the steps. The dough rose perfectly. I will make these again.
So happy you love them, Kathy 🙂 Thanks so much for dropping back with a review.
My hubby loves these!
So happy to hear that. Thank you Trang
My favorite pastry ever! I cannot wait to make these.
Let me know what you think of them 🙂