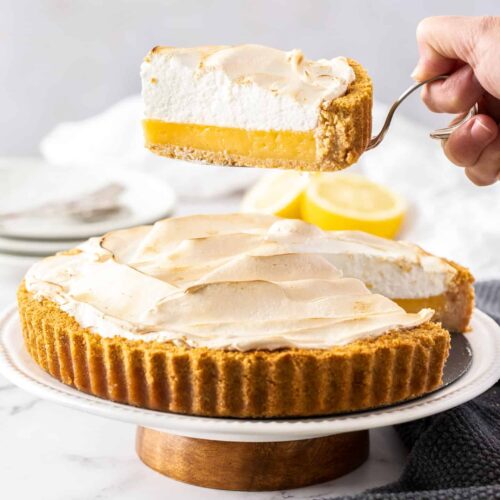

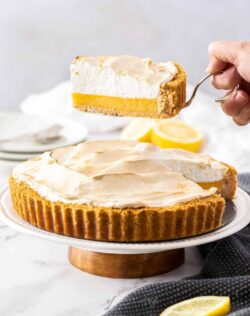
There’s no need to make a pastry base for this biscuit base lemon meringue pie. In no time, this crust is ready to fill with that luscious lemon filling and light-as-air meringue and it’s probably a lot easier than you imagine.
More popular lemon desserts? Try this flourless lemon cake and this self-saucing lemon pudding.

What is lemon meringue pie?
A classic lemon meringue is made with a crisp pastry base, a lemon custard filling and a meringue topping that is then baked. Once cool, the cake is sliced into wedges to show perfect layers of that lemon filling and meringue.
While it’s origins are a little vague, it seems there were versions of this pie in both France and America as early as the 19th century.
Why you’ll love this one
While normally made using a pastry base, I’m saving you the hassle and swapping it out for a biscuit base (cookie) instead. This change makes the base super quick and easy to make but no less crunchy and buttery.
The lemon custard filling tastes tangy and sweet and that lemon zing is the perfect contrast to the sweet meringue topping.
I grew up with homemade lemon meringue pie. Both my mum and dad made this, though with pastry, so it’s definitely a recipe close to my heart.
Tools you’ll need
- A food processor is helpful for the biscuit base.
- A nice pie dish or 23cm / 9 inch fluted tart tin with removable base to mould it in.
- You’ll need a heavy based saucepan for the lemon filling.
- I prefer a stand mixer for the meringue to keep it hands free but you can certainly use an electric hand mixer.
Ingredients in lemon meringue pie
All you need is 7 very simple, everyday ingredients.

Detailed quantities and instructions in the recipe card below.
- Lemons: Well, it wouldn’t be lemon meringue pie without lemons. You’ll need 3-4 lemons and you’ll need both the zest and juice.
- Biscuits / cookies: Use a simple biscuit like Arnotts Marie, Milk Coffee or Milk Arrowroot. Graham crackers will work perfectly too. Digestive biscuits have a far too strong flavour though, so steer clear of those.
- Butter: Used in both the base and lemon filling, stick to an unsalted butter for this recipe.
- Sugar: While you can use regular white granulated sugar, I recommend using caster (superfine) sugar for the meringue as it will dissolve quicker so you don’t overwhip your meringue.
- Eggs: The egg whites and yolks are used separately in this recipe. I use large free-range eggs.
- Cornflour / cornstarch: Cornflour / cornstarch is used to thicken the filling part way with egg yolks doing the rest of the work. Cornflour is also used in the meringue to give it the perfect texture and prevent weeping.
- Salt: You’ll just need a touch of salt in this to intensify the flavours.
It’s very easy to make this a gluten-free lemon meringue pie by simply replacing the biscuits / cookies with a gluten-free version. Also, check your cornflour / cornstarch is gluten-free.
How to make lemon meringue pie
There are three very distinct layers to this popular dessert and each is very simple to make. Here’s how to make it step by step.

Detailed instructions in the recipe card below.
How to make a biscuit base
- The mixture: Start by processing the biscuits / cookies to fine crumbs. Then mix in one egg white and some melted butter.
- Mould the base: Tip the crumb mixture into your pie dish or tart tin. Use a glass to help you press it down firmly to the bottom and up the sides (photo 1).The crumb mixture will seem like it won’t stick together but keep pressing it firmly all over until it’s shaped. Baking it will then set the shape.
If you want a pastry crust instead of a cookie base, you can use this shortcrust pastry recipe.
The lemon curd filling
- Make the gel: The gel is simply a mix of sugar, cornflour, lemon juice and water in a large saucepan (photo 2), that you bring to a boil, cooking until it’s thick (photo 3).
- Add butter and lemon zest (photo 4), off the heat, then whisk well until the butter has fully melted.
- Add the yolks, whilst whisking vigorously (photo 5). This quick whisking will stop the yolks from scrambling in the hot mixture. Heat it for another minute or so, then pour it into the tart shell (photo 6). Now you need to let the custard cool a little while you make the meringue.

The fluffy meringue topping
- Whisk the egg whites until they’re looking fluffy and have soft peaks when you pull out the whisk. Be careful not to overwhip them, so check them often.
- Add the cornflour: Sift the cornflour over the egg whites (photo 7) and beat that through until just combined.
- Add the sugar: With the mixer running on low, add the sugar a tablespoon (photo 8) at a time, counting to 20 seconds between each addition. Once all the sugar is added, beat it on high until the meringue is thick, glossy and has reached stiff peak stage. This is when you gently pull out the whisk only the very tip of the peak might droop over but is otherwise stiff.
- Spread it over the filling: Rub a little of the meringue between your thumb and finger (photo 9) and if it feels grainy at all, you need to keep beating until all the sugar grains have gone. Once you’ve hit that stage, tip it out onto your lemon base and spread it out (photo 10), creating deep peaks or swirls.
- Bake: Now bake the meringue until it starts turning golden – 15-20 minutes is perfect. If you want darker golden bits, you can use a kitchen blowtorch to get that really toasty look.
Feel free to pipe your meringue onto the top if you want pretty rosettes or a star like look.

Tips and tricks
- The biscuit base will feel loose and tricky to pull together but you just need to be firm with it.
- Tip all the crumbs into the middle, then level it out.
- Now, use a glass, starting in the centre and working outward pressing firmly on the bottom.
- When you get to the edge, place your thumb over the top pressing down on the crumbs at the same time as you’re pushing the glass up against the sides.
- Make sure you stir constantly as you’re cooking the gel or you’ll end up with lumps of cornflour instead of a smooth mixture.
- When you add the yolks, you must whisk vigorously at the same time. This will prevent the yolks from scrambling as soon as they hit the hot gel. You can let the gel cool a little first if you’re nervous about this step though.
- You can use a digital thermometer to check your lemon filling hits the right temperature for your eggs to be cooked and safe to eat (71C / 160F). If not, I find that (as long as you do this all without breaks in between), a minute back over the heat will get it there.
Tips for the meringue topping
Meringue is very simple to make, though if you haven’t made it before, there are some tips and important rules you need to know. Pay close attention to the stages of the meringue (soft peaks / stiff peaks).
- The egg whites should be beaten on their own first to soft peaks. All the egg whites should be white and fluffy and have no liquid egg white left. When you pull the whisk out, the tops will fall over but it will hold shape.
- The sugar must be added slowly so the meringue whips properly. Take time to count to 20 between each addition. I use my stand mixer, so I can literally be making a cup of tea and loading the dishwasher while I’m counting. Adding the sugar too quickly can cause weeping or deflation.
- Once all the sugar is added you turn the speed up to high and just let it beat until it’s smooth, glossy and has reached stiff peaks. Pull the whisk out slowly and if the peak stands upright, with maybe just the top of it dropping over, you’ve reached stiff peaks.
- Don’t overbeat the meringue or it may deflate or even cause weeping once baked.
- The filling should be cooled a little before adding the meringue so that’s it’s firm enough when you spread the meringue over it. I put it in the fridge for 15 minutes but you can just leave it at room temperature for half an hour or so.

Why is my lemon meringue pie weeping?
Weeping, or a watery layer between the meringue and lemon filling, can be frustrating but is unfortunately quite common. While I have never had this recipe weep using my recipe steps below there are a number of possible causes you can be aware of.
The meringue must go all the way to the edge, touching the crust. This will stop air getting between the meringue and lemon layers. As the meringue is only cooked for a short time, air getting to the bottom of it can cause the sugar in it to, essentially, start melting aka weep.
Don’t skip cornflour / cornstarch in the meringue. This helps to absorb moisture keeping it away from the sugar which can melt when it comes into contact with moisture.
Moisture beading on the surface of the meringue is most often due to overbeating.
While some believe you must add the meringue to a warm topping (as the heat will start sealing and cooking the meringue from underneath), I have added the meringue to both a warm filling and cold filling and have never had any weeping issues.
How to store a lemon meringue pie
While it’s best eaten on the day it’s made, you can store this biscuit base lemon meringue pie in the fridge overnight.
If serving the same day, make sure to make it early in the morning so that it has plenty of time to cool completely or it will be impossible to slice.
PIN IT:
Click to PIN this recipe for later!

If you try this biscuit base lemon meringue pie recipe, please take a moment to leave a rating and comment below. I love hearing from you and it helps other readers too! You can also take a photo and tag @sugarsaltmagic on Instagram.
More lemon recipes you’ll love
- Mini Lemon Meringue Pies
- Lemon Tartlets
- Lemon Vanilla Custard Slice
- Lemon Ricotta Cake
- Lemon Meringue Cake
- No Bake Lemon Meringue Cheesecake
Never Miss a Recipe!
Get the latest recipes straight to your inbox!
Ingredients
FOR THE BASE
- 250 g plain sweet biscuits (I use Arnotts Marie biscuits) (8.8oz) (notes)
- 100 g unsalted butter, melted (7 tablespoons / 3.5oz)
- 1 egg white
FOR THE FILLING
- ¾ cup caster (superfine) sugar (150g / 5.3oz)
- ⅓ cup cornflour (cornstarch) (40g / 1.3oz)
- pinch of salt
- ¾ cup lemon juice (180ml)
- 1 cup water (250ml)
- 42 g unsalted butter, chopped (3 tablespoons / 1.5oz)
- finely grated zest of 2 lemons (about 1 tablespoon)
- 5 egg yolks
FOR THE MERINGUE
- 4 egg whites, cold
- 3 teaspoons cornflour (cornstarch)
- 1 cup caster (superfine) sugar (200g / 7oz)
For best results, always weigh ingredients where a weight is provided
Equipment
- pie dish or 9 inch fluted tart tin with removable base
- heavy base saucepan
- stand mixer or electric hand mixer
Instructions
- Preheat oven to 180C / 350F / 160c fan forced.
- Separate your eggs. Keep one egg white aside and put the rest of the egg whites together in the fridge. The yolks can stay out at room temp too.
- Process the biscuits to crumbs in a food processor. Whisk the single egg white so that it’s a little frothy then add it along with the melted butter to the biscuit crumbs. Mix or process until well combined and it looks like wet sand.
- Tip the crumbs into a 9 inch removable base tart tin and level them out. Use a flat bottomed glass to press them down firmly all over and up the sides. It will seem too crumbly but it will come together – see notes for tips.
- Place the tart tin on a baking tray and bake for 10 minutes. Set aside.
- FOR THE FILLING: Combine sugar, cornflour and salt in a saucepan, then pour in the lemon juice and water. Whisk well to combine. Place over medium heat. Cook, whisking regularly so you don't get lumps, until you have a thick gel with big bubbles popping all over the surface.
- Take it off the heat and add butter and zest, mix until melted and fully combined. While whisking vigorously, tip in the yolks and whisk well until fully combined – this is important so the yolks don’t scramble in the hot gel.
- Place the saucepan back over the heat and cook for a further minute or until the temperature reaches 71C / 160F on a digital or instant read thermometer.
- Pour lemon filling into base then let it cool at room temperature for 30 minutes to set up a bit. This will make it easier to spread the meringue. Keep in mind, the filling should still be warm when you add the meringue so get straight onto making that.
- FOR THE MERINGUE: I find a stand mixer with whisk attachment easiest for making meringue.
- Whisk egg whites in clean glass bowl or the bowl of a stand mixer on medium-high speed, until soft peaks.
- Sift over the cornflour and mix on low to combine. Turn the mixer up to medium and add the sugar 1 tablespoon at a time, counting to 20 seconds after each addition.
- Once all the sugar is in, give the bowl a scrape down the sides with a spatula to get any sugar crystals that may be stuck there. Now beat on high until the meringue is glossy with stiff peaks and rubbing a little between your fingers, you can’t feel any sugar grains.
- Scoop the meringue out onto the filling and gently press out a little towards the sides, keeping a hill in the middle. Make sure to go all the way to the sides though, touching the crust. Create peaks or a swirly pattern with your spatula.
- Bake for 15-20 minutes until golden on top. If you want that nice toasted look, you can use a kitchen blow torch once the meringue has cooled, to add some toasty effect.
- Let it cool for 2 hours at room temperature, then place in the fridge uncovered to cool completely (3-4 hours) before you slice it. As long as your meringue is all the way to the edges, it will be fine in the fridge overnight like this.
Notes
- The biscuit base will seem like a lot of crumbs and will seem crumbly but as long as you keep pressing it evenly and firmly it will hold together. Once baked the egg white will keep it firmly together. When pressing up the sides, hold your thumb or finger over the top of the crumbs at the edge, pressing down at the same time the glass is pressing up against the sides – this will make the sides hold nicely.
- To get nice slices, this pie must be completely cooled before you cut it. If not, the biscuit crust is fragile and can break.
- Biscuits / cookies: You can use any plain sweet biscuits / cookies. Graham crackers work well. Arnotts Marie, Milk Coffee and Arrowroot are all great. I find digestives to strong a flavour though.
- Gluten free: For a gluten free lemon meringue pie, use gluten free cookies and cornflour.
- Pastry base: If you prefer a pastry base, you can use this shortcrust pastry recipe.
This post may contain affiliate links that earn me a small commission for my referral, at no extra cost to you. Thank you for supporting Sugar Salt Magic.
21 Comments on “Biscuit Base Lemon Meringue Pie”
Biscuit base ended up soggy and the filling is just set but barely. Worst recipe I ever tried. My lemon meringue usually comes out so good , this was incredibly disappointing.
You just didn’t cook it long enough, Andre.
I chose to just have the lemon pie with biscuit base, as GF i used LEDA Arrowroot biscuit for base.
Thank you for the fab instructions, best i have ever to follow receipt.
As its just base i have not put in over.
I’m so happy you love it, Jen
Hello
I love the look of this recipe. How long would the base and lemon filling keepin advance? I am wanting to bring this dessert to family over Christmas and thought it would be better not to travel with meringue and add the meringue when there.
Thanks
Lisa
Hi Lisa. This would keep fine for 2-3 days. Keep it covered with plastic wrap in the fridge.
Make this yesterday it is fabulous lovely zingy lemon. excellent pie
I’m so happy you love it, Marion. Thanks so much for choosing my recipe 🙂
Hi there! This pie was really delicious. I was wondering how long you would bake this pie for if made without the meringue. Thanks!
So happy you love it, Liz. Technically the egg is already cooked, so you wouldn’t absolutely need to bake it, but as I haven’t tested it (for slicing purposes), I’d still bake for 10 minutes or so just to make sure you get a slicing consistency. If I ever test it, I’ll be sure to update here.
Thanks so much for the reply, Marie! Looking forward to trying more of your great recipes 🙂
Great recipe
So happy you love it, Melanie 🙂
This was delicious. It’s been years since I made a lemon meringue pie and I love it with the biscuit base. Nice, tangy filling with a great ratio of meringue. Will definitely make this again!
I’m so happy you love it, Debbie. I truly appreciate you trying my recipe.
Not my best effort. After years of using my own recipe for years with pastry I decided to try your recipe. I made the filling and the base the day before.
The filling didnt set the way i hoped so i had to reheat it and add more cornflour which salvaged that problem. The meringue was great but when it was time to serve the base kept crumbling. Not sure what went wrong I have used similar bases for key lime pie without any worries at all.
I’m wonndering if you didn’t quite cook the filling long enough as I’ve never had setting issues. I hope you enjoyed the flaovur.
So delicious! And very easy to make.
So happy to hear you love it, Amera.
This luscious smooth lemon filling looks so delicious that I can probably eat it without any cake (but of course I won’t refuse a cake LOL). It looks terrific!
Thanks so much Ben.