

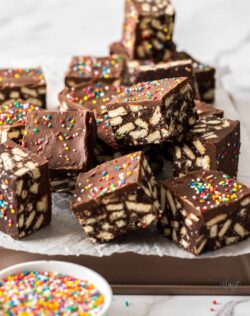
Give the oven a break! Whip up a batch of this chocolate hedgehog slice – a classic crunchy, chewy, sweet and chocolatey, no-bake dessert. You just need a few minutes to melt and mix the ingredients, then patiently wait while it sets.
Want more popular no bake desserts? Try this chocolate mousse tart and this caramel Malteser slice.

Why you’ll love it
This family favourite is incredibly simple and, best of all, completely addictive.
- No mixer required
- No oven required
- Just 9 basic ingredients
- 15 minutes of effort
- Loaded with chocolate flavour
- The kids can make it
With such simple ingredients, hedgehog slice is a simple dessert to throw together and perfect for taking along to a party. Kids love it too and can even get in the kitchen and help to make it.
Since it’s great for all kinds of celebrations, try out this Peppermint Hedgehog Slice for Christmas.
Tools you’ll need
- A mixing bowl and spatula.
- An 8 inch square baking tin.
Ingredients you’ll need
Chocolate hedgehog slice uses very simple ingredients – just 9 in my recipe – and they’re all very basic, easy to find things.

Detailed quantities and instructions in the recipe card below.
- Chocolate: This version uses two types of chocolate. Dark / semi-sweet (50%) and milk chocolate.
- Biscuits / cookies: Use a simple biscuit like Arnott’s Marie biscuits, Milk Coffee or Milk Arrowroot. Graham crackers will work perfectly too.
- Sweetened condensed milk: Instead of adding sugar, a tin of full-fat sweetened condensed milk plays that role and adds richness too. Don’t use the skim version or it won’t set properly.
- Coconut: Classic hedgehog slice always includes some coconut. I just use unsweetened shredded coconut. Fine desiccated will work too.
- Butter: Stick to an unsalted butter for this recipe.
- Cocoa powder: I use dutched process cocoa for it’s smoother flavour but regular unsweetened works perfectly well.
- Cream: I use a little cream in the milk chocolate topping to turn it into ganache but this is optional.
- Sprinkles: Another optional ingredient, sprinkles add colour and fun to this no bake slice. Use any you like.
- Salt: You’ll just need a touch of salt in this to intensify the flavours.
Other add-ins options
Many hedgehog slice recipes include nuts (especially walnuts) as well, feel free to use ⅓ of a up cup of your favourites, roughly chopped. You could also add dried fruit if you like or candies like Maltesers or chopped up Twix bars.
How to make chocolate hedgehog slice
There is really just a few steps to this hedgehog slice recipe and it takes minutes to make. With no need to turn on the oven, who doesn’t love a no-bake slice.

Detailed instructions in the recipe card below.
- The biscuits / cookies: Break up the biscuits into small pieces and set them aside. You can break them by hand, chop them or even put them in a plastic bag and crush them using a rolling pin.
- The melt: Melt together chocolate, butter, sweetened condensed milk, cocoa and just a touch of salt (leave out if using salted butter) in a heatproof bowl (photo 1), in the microwave. Do this in 30 second increments, stirring well between each. This normally takes no longer than 90 seconds microwave time.
- Mixing: Add the crushed biscuits and coconut to the melted chocolate mixture (photo 2) and stir it all together. Tip it into an 8 inch square baking tin and level it out (photo 3), then place it in the freezer while you make the topping.
- The topping: Melt together milk chocolate and cream to a smooth ganache, using the microwave again. Be careful not to overheat. Tip it over the hedgehog slice and spread it out, then scatter over sprinkles (photo 4). Let it set in the fridge for at least 4 hours before slicing.
When melting the chocolate and cream together for the topping, sometimes it can look like it’s going to seize up. Just keep stirring it well until it’s smooth and glossy before pouring over the slice. You can feel free to leave the cream out but it does make it easier to cut through the topping without it cracking.

Tips and tricks
- Don’t leave out the crumbs: When you break or cut up the biscuits, don’t throw away all the little crumbs. Make sure it all goes into the slice.
- Don’t overheat when melting: When melting in the microwave, make sure not to let the mixture overheat. Use 30 second increments, stir it really well between each one and stop microwaving before it’s all melted and stir using the residual heat to melt the last little bit.
- Line the baking tin: This will make it much easier to lift the slice out when it’s cold.
- Cutting the slice: If you heat your knife blade (either with a kitchen blowtorch or under hot water, then dry it), you can sit it on top of the slice and it will begin to melt a line into the chocolate, then just chop straight through. This will stop any ugly cracks on top.
Storing hedgehog slice
Hedgehog slice should be stored in the fridge, wrapped well or in an airtight container, for 4-5 days.
It will freeze well too. Cut it into pieces first then freeze on a tray until solid. Transfer to a ziplock bag or airtight container for up to 3 months. Cutting it into pieces first, means you can take out just as much as you need.
Perfect for parties, morning or afternoon tea, picnics and even school lunchboxes, this easy chocolate slice is delicious and also very customisable. I added Twix pieces to my latest version for a super rich treat.
This recipe got a few “best hedgehog slice ever” comments from my taste tester group too, so give it a try this weekend and see how easy and delicious it is yourself.
PIN IT:
Click to PIN this recipe for later!

If you try this recipe for hedgehog slice, please take a moment to leave a rating and comment below. I love hearing from you and it helps other readers too! You can also take a photo and tag @sugarsaltmagic on Instagram.
More no bake dessert recipes you’ll love
So quick and fun to make and you can even get the kids involved, no bake treats are always a family favourite. Here’s some of the most popular on Sugar Salt Magic.
- Milo Mars Bar Slice
- Chocolate Cornflake Cakes
- No Bake Caramel Peanut Butter Slice
- Coconut Lemon Slice
- No Bake Chocolate Fridge Cake
- Peppermint Hedgehog Slice
- Malteser traybake
Never Miss a Recipe!
Get the latest recipes straight to your inbox!
Ingredients
- 250 g plain sweet biscuits (I use Arnott's Marie biscuits) (8.8 oz )
- 200 g finely chopped dark (50%) chocolate (7oz)
- 115 g unsalted butter, cubed (1 stick / 4 oz)
- 1 tin full-fat sweetened condensed milk (395g / 14oz)
- ¼ cup unsweetened cocoa (35g / 1.2oz)
- ¼ teaspoon salt
- ⅓ cup shredded coconut (28g / 1oz)
FOR THE TOPPING
- 150 g milk chocolate, finely chopped (5.3oz)
- 2 tablespoons thickened (heavy) cream (optional) (35g / 1.2oz)
- 1 teaspoon sprinkles (optional)
For best results, always weigh ingredients where a weight is provided
Instructions
- Line an 8 inch square baking tin with baking paper
- Roughly chop or break the biscuits into small pieces pieces and set aside, including all the crumbs.
- In a large bowl, melt together the butter, sweetened condensed milk, cocoa, salt and chocolate in the microwave in 30 second bursts. Stir really well between each until it’s just melted together. Don’t overheat.
- Add the biscuit pieces and coconut and mix well.
- Tip into the prepared tin, pressing down firmly to give a flat surface.
- Place in the freezer while you prepare the topping.
FOR THE TOPPING
- Melt chocolate and cream in bowl in the microwave, in 30 second bursts, stirring well between each. It might look like it’s seizing up but just stir it until you have a smooth glossy ganache.
- Spread over the biscuit layer, then scatter over sprinkles.
- Leave it to set for at least 4 hours in the fridge then slice into small pieces to serve.
Notes
- Don’t use skim sweetened condensed milk, or the slice won’t set.
- The slice should be kept chilled in the fridge. Will sit at room temperature fine but will be a little sticky. If taking it on a picnic, wrap a piece of baking paper around the bottom and sides to make it easy to grab and keep it in a chilled esky / icebox.
- For clean cuts, without cracks in the top, heat the knife first then cut slowly allowing it to melt a line in the top layer of chocolate.
This post may contain affiliate links that earn me a small commission for my referral, at no extra cost to you. Thank you for supporting Sugar Salt Magic.
6 Comments on “Chocolate Hedgehog Slice”
Perfect for me
So happy you love it.
This is such a delicious sweet treat. Easy to make, and good to serve a big crowd. Good activity for kids too 👍🏻
I’m so happy you love it Naomi and glad the kids had fun too 🙂
I love how simple yet elegant this treat looks like. But the most importantly, it’s so delicious!
Thanks so much, Ben. It’s a simple and much loved dessert here.