


Creamy, buttery, sweet, spreadable lemon – that’s the best way to describe this homemade lemon curd. This is a simple recipe you can have ready in minutes too.
Imagine things like lemon slice or lemon meringue pie or lemon curd mousse and, if they get your mouth watering, then you need to make this curd immediately.
❤️ Why you’ll love this recipe
- It takes just 10 minutes to make.
- One pot – no double boiler required.
- Just 4 ingredients!
- No preservatives, artificial colours or flavours – this is all natural.
- It tastes so much better than shop-bought – silky smoth, tangy, and sweet.
- This recipe is the easiest and best – big call, but I stand by it.
- Use it in cakes, cookies, pies or just spread it on toast.
- Handy troubleshooting guide.
This recipe was first published here on 29th October 2018 and has been updated with new information, a troubleshooting guide and images.

Never Miss a Recipe!
Get the latest recipes straight to your inbox.
What is lemon curd
Lemon curd is a spread made from lemons, butter, sugar and eggs that originated in England. With an intense lemon flavour and it’s spreadable form, it’s used for topping toast and pancakes and also as fillings for pies, tarts and cakes.
It’s made a little like making a custard, though it doesn’t contain any milk or cream. The texture is thick, silky and spoonable but it is not translucent like jam or jelly; it is richer and creamier. With a bold lemon flavour, it’s perfect for spreading, filling or spooning over desserts.
Ingredients

- Lemon: Be sure to use fresh lemon juice and don’t skip the zest – it adds a wonderful punch of flavour. Bottled lemon juice will not give you good flavour here.
- Butter: Stick to unsalted butter. Lemon curd should not be salty.
- Sugar: It’s important to use white sugar. Brown sugar will impart a caramelly flavour that does not allow the lemon to shine so much. It would also change the colour. It’s best not to cut it down either as the sugar balances the acidity.
- Eggs: I use large eggs (not XL or Jumbo etc). Eggs will help to thicken the mixture but if yours are too large, you risk it tasting eggy.
How to make lemon curd
The wonderful part aside from it’s intense flavour is how quick and easy this recipe is to make.
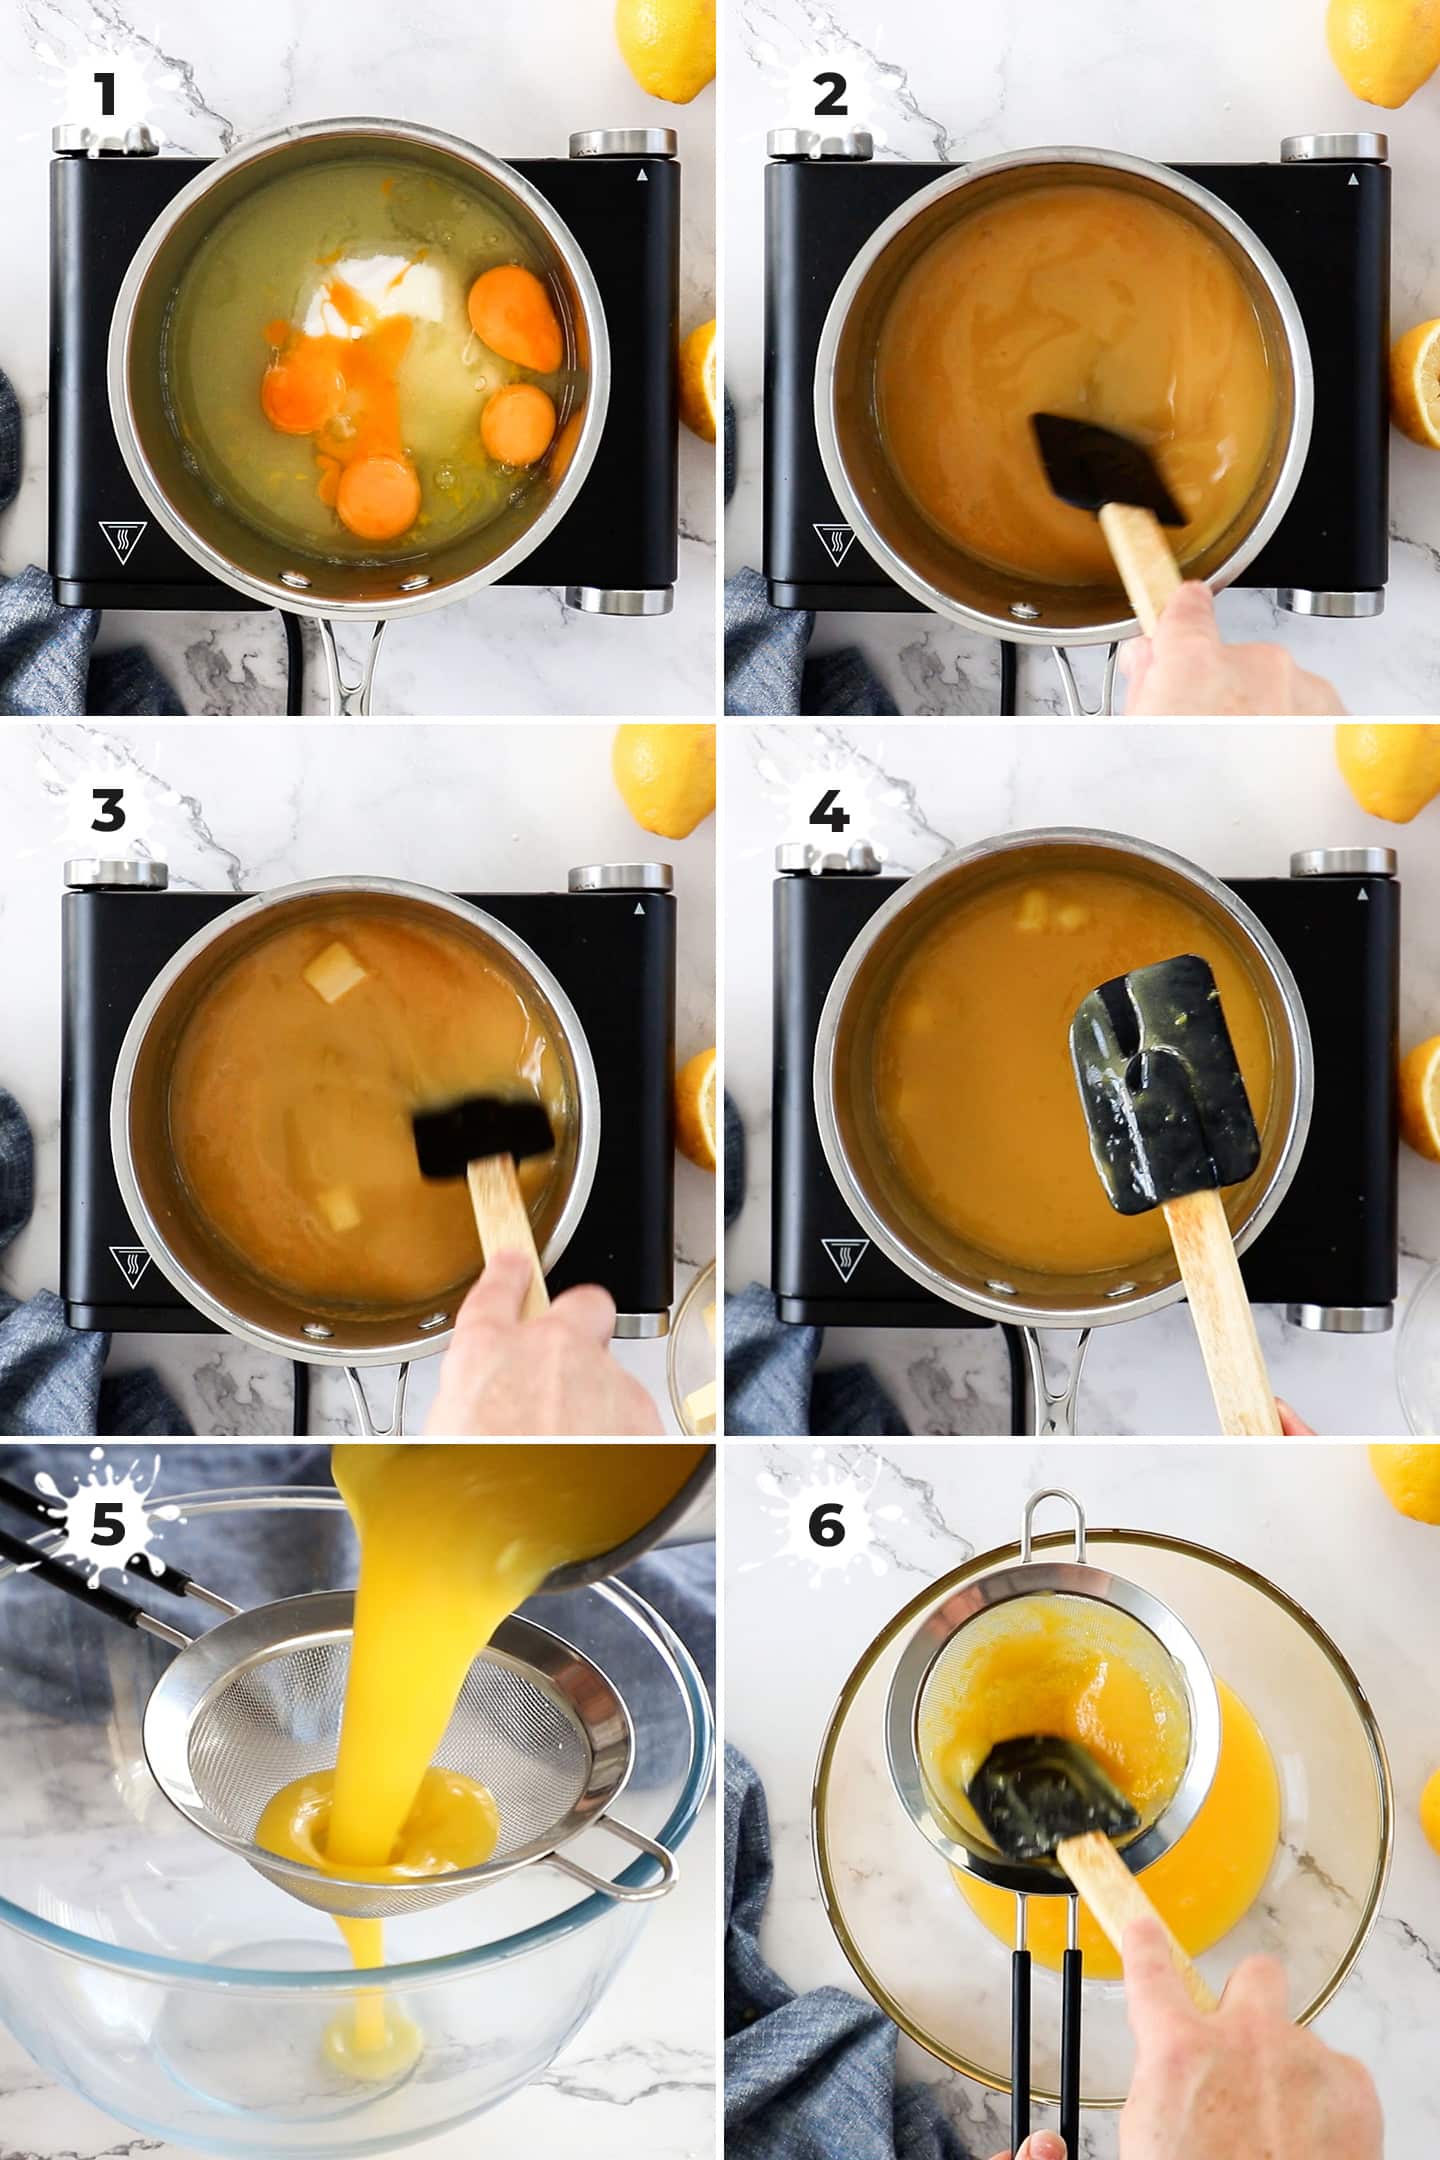
Detailed quantities and instructions in the recipe card below.
- Whisk together eggs, sugar, lemon juice and lemon zest in a saucepan (photo 1).
There is no need for a double-boiler here. - Dissolve the sugar by stirring over low heat (photo 2).
Keep the temperature low. - Add butter, 2-3 pieces at a time, stirring until each addition melts before adding more (photo 3).
Do not be tempted to add it too quickly. - Cook for another 3-4 minutes until it thickens to the point of thickly coating the back of the spoon (photo 4) or if you tip your saucepan to the side, then tip it back again, you will be left with a thick coating on the side of the pan.
- Strain the lemon curd to remove the zest (photos 5 & 6).
By this point, the lemon curd has already released its oils into the curd. Removing it means keeping your curd smooth. - Let it cool briefly before transferring to jars with tight fitting lids.
Top tips for perfect lemon curd
- Keep the heat low: There is no need for a double-boiler – this can be made directly in a saucepan but I recommend using a heavy-based saucepan and keep the heat very low so you don’t scramble the eggs. Also, overheating curd can make it turn grainy on setting.
- Don’t stop stirring: It’s only 10 minutes (or less), I promise. You don’t need to stir vigorously, just keep it moving so that it’s heating evenly.
- Add the butter gradually: This allows the fat to incorporate easily and prevents any chance of the fat splitting.
- Strain it: It’s always helpful to strain curd after cooking. This is to remove the zest which is no longer required and any other lumps that may be in it.
😥 Troubleshooting lemon curd
While researching and testing for this recipe, I came across comments like – My curd is too runny. My curd is not thickening. Why is my curd grainy? So, I decided to make a little troubleshooting guide.
Curd too runny
You may have added too much liquid, although if you stick to the ratios in this recipe, that won’t be a problem. In that case, it may be that you have not cooked the curd quite long enough. The fix? You can actually put it back on the stove and cook it a little longer until it coats the back of a spoon and you can draw a line through it that doesn’t run.
Curd is not thickening
Remembering that curd is not meant to be thick like a set custard, it may be that it wasn’t cooked long enough (see above). If you still want it thicker, try adding in another egg yolk (making sure to cook it through as per the instructions).
My lemon curd is curdled/split.
If your lemon curd looks split or curdled, it may be that the temperature was too high, the butter may have been added too quickly or the butter may not have been cold enough. Let it cool fully then return to the pan over very low heat whisking until it smooths out again.
Why is my curd grainy?
In my research, I felt sorry for the cooks who were saying my curd turned grainy after refrigeration and, despite them knowing it was not due to the eggs scrambling, the only responses they were getting were “sounds like your eggs scrambled”.
My answer to this? Not necessarily true. You will know if your eggs have scrambled. You can see it in the warm curd as you pour it into your jars and they don’t scramble by themselves in the fridge overnight.
The sciency reason: It’s likely the graininess is caused by the breakdown of the emulsification – ie: the fats (in this case butter) and liquids (lemon juice here) not emulsifying properly or that emulsification breaking. This can be caused by not whisking and agitating the mixture enough or by overheating or a combo of both. In any case, I tested this out and it can be fixed. Yay!
How to fix grainy curd:
Add one egg yolk and 1 tablespoon of the juice (in this recipe, lemon juice) to a saucepan and whisk them together fully. Turn the heat on the lowest possible setting. Add one tablespoon of your cold curd back to the pan. Whisk it in well. Continue to do this until all the curd is added back. Now heat it to 75C / 170F on a thermometer or to the point that the hot curd will coat the back of the spoon again. Pour it back into your jars and refrigerate again.

Uses for Lemon curd
With a bold lemon flavor in a spreadable consistency, homemade lemon curd is a magical ingredient you can use in any number of recipes or as a topping for so many treats.
- Top some beautiful danish pastry
- As a filling in pies or tarts
- As a filling in cakes or cupcakes
- Bake into cakes
- Spread directly onto toast or crumpets
- Spread on scones, pancakes or waffles
- As a filling for crepes
- As a filling in cookies, macarons or profiteroles
- Stir it into yoghurt, cream cheese, cottage or ricotta cheese
- Use it to top or swirl through ice cream
- A filling for donuts
How to store it
- Use sterilised jars.
- The recipe yields around 1 ½ cups.
Fridge
- Cool at room temperature for 30 minutes before sealing the jars.
- Store unopened jars in the fridge for up to 3 weeks.
- Once opened use the curd within 7-10 days.
Freezer
- Lemon curd can be frozen for up to 3 months.
- For easy thawing, freeze in small portions, such as in ice cube trays, then transfer to an airtight container.
FAQs
Lemon curd thickens more as it cools. It is thick enough when it coats the back of a spoon so that when you drag a finger through it, it doesn’t run. Also, if you tip the pan on an angle, you’ll see it coat the side of the pan and it will not quickly run back.
No, but it has two payoffs. It removes the lemon zest that has already done its job. It also remove any little lumps of egg that you may not realise are in there. Both will give you super-smooth lemon curd.
Once it’s slightly cool, you can screw the lids onto the jars then chill in the fridge. It’s best left overnight before use (but can be used the same day, if necessary) for the perfect texture.

More recipes you’ll love
- Lime Curd
- Creamy Easy Pineapple Curd
- Homemade Passionfruit Curd
- Homemade Blackberry Curd
- Blood Orange Curd
- Lemon Tartlets
If you made this easy lemon curd recipe,
be sure to leave a ⭐⭐⭐⭐⭐ rating below. Thank you!
Hungry for more?
- Subscribe via Email, Facebook, Pinterest and Instagram.
- Add Sugar Salt Magic as a Google Preferred Source.

Video
Ingredients
MAKES ABOUT 1 1/2 CUPS
- 2 large eggs
- 2 egg yolks
- 150 g caster (superfine) sugar (¾ cup / 5.3oz)
- ½ cup fresh lemon juice
- 1 tablespoon lemon zest (notes 1)
- 115 g unsalted butter, cubed and cold (½ cup / 1 stick / 4oz)
For best results, always weigh ingredients where a weight is provided
Equipment
- Fine-mesh sieve / strainer and bowl
- preserving jars like these small Weck jars
Instructions
- Beat together the eggs, egg yolks, sugar, zest and juice. Pour into a small saucepan and stir over low-medium heat until the sugar has dissolved.
- Add the cold butter a couple of pieces at a time, stirring until each addition is melted and incorporated. Make sure not to let the curd come to a bubble at any time.
- Continue cooking the mixture another few minutes until it is thickened and coats the back of a spoon or leaves a thick coating on the side of the pan when you tilt it.
- Pour the mixture through a fine-mesh strainer into a clean bowl to remove any bits of egg that may not have mixed through.
- Pour into sterilised conserve jars and cool at room temperature for 30 minutes. Seal the jars and store in the fridge. See notes for how long to keep.
- Please take a moment to leave a comment & rating. It's appreciated and so helpful.
Notes
- I use a standard Australian 20ml tablespoon (equal to 4 teaspoons)
- This recipe makes approximately 1 1/2 cups of curd.
- Cool for half an hour at room temperature, then seal and place in the fridge
- This curd will keep for up to 3 weeks in the fridge, unopened. Once opened use within a week. It will also freeze well.
- To sterilise the jars, boil them in a saucepan of boiling water for 10 minutes then set aside to drain, dry and cool. The second way is to wash the jars well with soapy water, rinse and then place them in an oven at 120C / 250F for 10 minutes. Let them cool.
- You can swap the butter for a vegetable-based spread if you would like to make this curd dairy-free.
This post may contain affiliate links that earn me a small commission for my referral, at no extra cost to you. Thank you for supporting Sugar Salt Magic.


196 Comments on “Easy Lemon Curd”
I’m off to the supermarket to stock up on more ingredients to make many more jars of this beautiful and delicious recipe. Silky, smooth, tangy but not overly, sweet yet not sickly, this is the perfect receipe. Love love love!
So happy you love it, Natasha. Thanks so much for dropping back to leave a review.
Delicious. Additional Notes for myself 5-6 grams for zest and cook to 170F (77C). Used on scones and crepes lined with blueberries nd cream.
I’m so happy you love it, Katy. Thank you so much for dropping back to leave a review.
Easy! I cut down on the sugar and leave in the zest as like it tart!
I’m so happy you love it, Patty. Thanks so much for dropping back to leave your thoughts.
Great recipe, very tasty. You need to plan ahead if you’re using it in another recipe. I made it for lemon tiramisu, so had to let it cool. But it’s delicious.
I’m so happy you love it, Joyce. Thanks so much for dropping back to share your thoughts 🙂
I like it and it tastes good.
Thanks so much Jacqueline.
I like your recipes of all the works you have done then now like the testing tilting the way you tell us how to cook the lemons curd.
I’m so happy to hear that, Jacqueline. Thanks so much for dropping back to leave a review.
I have used this recipe a few times now. And absolutely love it. It’s so easy and tastes great. Thank you so much for sharing.
I’m so happy you love it, Kalia. Thanks so much for dropping back to leave a review.
Love this! It was so simple! Do you think you NEED to use a strainer?
Hi Anne. So happy you loved it. The strainer is a “just in case” measure. It’s there to catch any little bits of cooked egg that might be in the curd. It also removes the zest which has already done it’s job flavour-wise by releasing all the lemon oils and keeps your curd perfectly smooth.
I made a half batch from yuzu, a Japanese citrus. It tastes devine and was so easy. Thanks for the detailed instructions.
I’m so happy to hear this, Melissa. Thanks so much for dropping back to leave a review.
This is delicious and saved me a lot of time. I’m a Brit and I’ve lived in China for many years now and lemon curd you can’t find in shops here where I live. So I make my own but this recipe slashes cooking time in half
I’m so happy to hear this, Alan. Truly appreciate you dropping back to leave a review.
Omg so easy and delish! I’m always asked to bring this!
I’m so happy you love it, Sandy. Truly appreciate you dropping back to leave a review.
This lemon curd is so good. So easy to make and so tasty.
I’m so happy you love it, Debbie. Thanks for dropping back to leave a review.
Soooooo good and easy! Rich, lovely texture. Did I say easy? Very much so!!!
I’m so happy you love it, Adrianna. Thanks so much for dropping back to leave a review.
This is absolutely delicious and so simple.
I’m so happy you love it, Lou. Truly appreciate you dropping back to leave a review.
I made this for your lemon curd bars, it is absolutely delightful!
I only had half the amount of butter so I used a vegetable based spread to make up the rest which worked out fab.
I used a double boiler because I didn’t have a heavy bottomed pot and worried it would curdle. It was so easy and absolutely delicious, thank you for this recipe!
I’m so happy you love it, Zahra. Thanks so much for dropping back to review.
Very easy to make. Tasted very good. Nice consistency. If I used less butter would it come out the same?
Hi Patty. So happy you love it. No, it would both taste different and be a thinner consistency.
I made this 5 days ago, for the (delicious!) lemon tiramisu recipe.
Marie says it’s easy- and yes, it is.
My eggs scrambled just a little because I was sidetracked for a moment, but once I sieved it, the curd stayed smooth, and still is now, in my fridge.
I’m absolutely keeping this recipe!
I’m so happy you love it, Janet. Thank you so, so much for dropping back to review.
This recipe was fantastic! Would make again – thank you so much!
So happy you love it, Hannah. Thanks so much for dropping back to leave a review.
This was such a good and easy recipe!!
Thank you for the great step-by-step instructions!
Also, if anyone else finds it helpful, I did not have several of the ingredients on hand (fresh lemons and castor sugar), but I found the recipe to work just as well with bottled lemon juice, 3 packets of crystalized lime (True Lime), and granulated sugar.
I’m so happy you love it, Chelsea and glad you were able to make it work with what you had on hand.
I have made this lemon curd before and tried doubling the recipe unsuccessfully is there something I should be doing ?
Hi Margaret. Use a larger pan so the curd isn’t too deep (requiring more heat to get through it all). You may need the heat a little lower and it will take a little longer to get to full thickness.
Yum yum yum! First time making lemon curd…came out perfect following the recipe. Thank you!!!
So happy you love it, Adrianna. Thank you so, so much for dropping back to leave a review.
Loved that cornstarch was not needed in this recipe.
Easy to make and delicious.
I will use the lemon curd on my cream cheese bagels in the morning.
So happy you love it, Klee. Thanks so much for dropping back to review.
Made this lemon curd and I will never buy a jar again! This is so much nicer! Thanks
I’m so happy you love it, Miss Sherrell. Thank you so much for dropping back to leave a review.
Great recipe. Quick easy, always works. For my dairy free family I add chopped solid coconut oil when the curd is thickened. Add in piece by piece, until melted whisking constantly. The curd does not taste of coconut.
So happy you love it, Sheila. Would love to hear why only 4 stars. Do you think it could be improved in some way?
So easy to make and works every time. Tastes fantastic and I will never buy from the shops again.
Yes 🙌 I’m so happy to hear this, Lorraine.
Easy to follow recipe, a little time consuming, but a lovely result. I had a small number of tiny bits of egg white in mine, but passing through the sieve sorted that out. Thanks for the recipe and tips.
So happy you love it, Catrina. To prevent those egg white bits, just turn the heat down a bit and make sure you’re stirring it constantly.
I just doubled the recipe, tastes fantastic.
So happy you love it, Marg. Thanks so much for dropping back to comment 🙂
So good and easy to make!
I’m so happy to hear this, Joan. Thank you for sharing your review.
Thank you for sharing your recipe. This is by far the best lemon curd. So easy and so so good!!
I’m so happy you love it, Lou. Truly appreciate you dropping back to leave a review.
This is delicious!!! I did not have unsalted butter so I used salted butter and had to use “real” lemon juice. It turned out great!
I’m so happy you love it, Jennifer. I need to try it with salted butter now 🙂
The best recipe for lemon butter! Thanks 🙏
I’m so happy you love it, Kitty. Truly appreciate you dropping back to leave a review.
This recipe was AMAZING! Full of flavour & delish. I made it for my daughter’s tea party for her birthday. It was a huge hit!
So happy you love it, Emily 🙂
Love this recipe, its so easy to make and its delicious 😋
So happy you love it, Kim.
I was dubious about this recipe, but oh my goodness it is the best lemon curd I have ever had and I made it myself with all credit to your wonderful recipe! Thank you so much! This is a game changer.
I’m so happy to hear this, Theresa. Truly appreciate you dropping back to leave a review.
Wonderful! No more store bought for me.
So happy you love it, Rene.
Easy Delicious recipe! I will be making my own from now on!
I’m so happy to hear this, Amy.
Absolutely delicious. My granddaughter had never tasted lemon curd. Just loved it.
A very great recipe.
Thanks
I’m so happy to hear this, Lindy. Thanks so much for dropping back to leave a review.
Literally just finished making this Lemon Curd, and it’s truly the easiest, most TART lemon curd recipe I’ve ever made! I love that the butter is gradually added, and your sensory indicators for doneness were so helpful. I made this in preparation for your Lemon Tiramisu tomorrow, and now I’m even more excited to try it because of how perfectly this turned out 🙂
I’m so happy to hear this, Emily. Enjoy your tiramisu too 🙂
Hey there,
Thank you for your recipe AND how to fix grainy, sandy curd! It worked!
So happy it was helpful, Ez.
Soooo easy. Delish.
I didn’t have fresh lemons.
So I used extract and real lemon.
Yum!!!!
So happy you love it, Tina.
I tried this for christnmas, it turned out to be perfect! Not too grainy or runny. Thank you
So happy you love it, Felicia.
Absolutely delicious! I have never made lemon curd before, and this was so easy and it came out silky smooth. I doubled the recipe as I will be taking it with me to use as an accompaniment to a baked lemon cheesecake I plan on making tomorrow to have with Christmas dinner with friends. Thanks for making my introduction to lemon curd so easy!
I’m so happy to hear this, Allison. Thanks so much for dropping back to review.
Surely pouring through a fine mesh strainer (to remove excess egg) would remove all of the zest as well.
Apart from that, a straightforward recipe.
That’s correct Keith but by the time you’re straining it the oils/flavour from the lemon zest has been well and truly infused into curd while cooking so you lose nothing in flavour, I promise.
I followed this recipe as presented. The lemon curd came out perfectly. Looking forward to using it the award-winning recipe for Cranberry Limencello Tart with a Gingersnap Hazelnut Crust.
So happy you love it, Anne.
This is the best lemon curd I’ve ever had
I’m so happy you love it, Toni. Thanks so much for dropping back to review.
easy to follow and tasted amazing
So happy you love it, Helo.
Great recipes thank you 😀
So happy you love it, thanks Petra.
Love this recipe! Come back to it every year when our lemon tree has an abundance of lemons.
So happy you love it, Kate. Thanks so much for dropping back to review 🙂
Just dun it for the first time and we love it
Great lemon flavor, easy recipe!! Delicious!!v Thank you!
So happy you love it, Renee.
Looks and tastes good
So happy you love it, Avril.
I have never made lemon curd before. I made this today. It is unbelievable and super easy to make. Thanks
So happy you love it, Toni. Thanks for dropping back to leave a review 🙂
Great recipe! I had to add an additional egg yolk. I would suggest straining the mixture before you put it in the jar. Otherwise you will end up with partially scrambled eggs! But delicious lemon curd!!
So happy you love it, Paulette. Just keep the heat lower and you shouldn’t get any scrambled bits. Low and slow is key 🙂
Hi Marie, thanks for the great recipe. Found some Meyer lemons, which are quite sweet, so I used only 100g of sugar. They were small, needed 5 to extract 125ml of juice juice. Curd turned out silky and beautifully tangy.
But it took much longer than expected to set. Was afraid of curdling, so I kept the heat fairly low. Took over 20 min to reach the spoon-coating stage, at around 80degC.
So happy you loved it, Nephe. The reduced sugar may have affected the thickening time or possibly you just cooked it lower than I do. So great to hear it’s delicious with meyer lemons too 🙂
Hi Marie, plan to make it again soon. Will let you know how it goes with regular lemons and the full portion of sugar, thanks.
Very good Lemon Curd recipe!
Thanks for all your additional notes!!!
So happy you love it, Kelly. Thanks so much for trying my recipe.
I liked this recipe. It worked very well and thickened quickly unlike some even before I finished putting butter in. It did give a slightly curdled scrambled appearance at first but keep whisking and do sieve it at the end.
So happy you love it, Catherine. It shouldn’t look curdled at any point so I’d say maybe the heat was just a touch high. Keep it a little lower – it’s better if it thickens more slowly.
Lovely easy recipe that turned out perfectly the very first time. Tastes delicious & definitely a keeper!
So happy you love it, Victoria. Thanks so much for leaving a review 🙂
Easy, simple and delicious. Had a lemon tree full of juicy lemons and didn’t want them to go to waste. This was the perfect recipe especially for a novice cook like me. Made 6 batches on Tuesday and am making another 6 batches more tonight.
Great work, Rhiannon – 12 batches in one week! So happy you love it 🙂
It was my first time hearing of and making lemon curd and it turned out amazing! Great texture and tangy taste! Thank you!
I’m so happy to hear this, Brenda. It really is so easy and delicious.
I have made your lemon curd and apart from being super easy to make it is THE best I have tasted. This is so easy to make. Thank you for your amazing recipe.
Makes my day to hear this, Valerie. I’m so happy you love it.
I have used many lemon butter recipes but this is my go to one. It’s easy, straightforward and extremely tasty.
The balance of the sweet and tangy is just right.
It’s been enjoyed by many of my customers as I make it as one of my preserves I sell for charity fundraising
Many thanks
Dianne
This makes my day to hear, thank you Dianne. So happy you love it 🙂
Absolutely lovely curd thank you
So happy to hear this, Christine. Thanks for taking the time to leave a review.
Totally scrumptious and so easy.
So happy you love it, Allison. Thanks so much for leaving a review 🙂
Have made this before turns out amazing
So happy you love it, Jennifer. Appreciate you dropping in to let us know 🙂
Wow fantastic recipe. Turned out so good. Thanks Marie
Thanks so much Misriya. So so happy you love it 🙂
Hi Marie.
I loved this recipe and it reminded me of how my grandma used to make it.
I’ll certainly be making it again.
So happy to hear this, Madonna. Truly appreciate you trying my recipe.
Fantastic recipe, easy and works, and that’s what you want.
I added less sugar and still turned out well, also tried Stevia granular sugar as a alternative, a little tricky working out equivalent quantities, it did change the taste and was a little bit more bitter (may need more tweaking) but still worth it, if you have blood sugar issues.
So happy you love it, Mandy. Love your little tweaks too.
I was not successful with this recipe. The curd has split – I did follow your instructions but must have made a mistake. The curd is in the fridge with butter at the top and liquid down the bottom. Is there any way to fix this?
I have made other recipes from your site and have always been successful. Not to worry! Thanks.
Sorry to hear that LM. I haven’t come across this before so I’m going to throw out a few things that I think may cause this. Most likely is that the butter was added too quickly and not stirred into the curd properly before adding more. Or, the heat may have been a little too high or the butter wasn’t cold. What I’d try is let it get completely cold and the butter set then return it all to the pan. Cook over a lower heat if possible, whisking constantly to incorporate it all until it looks smooth.
Thanks for your reply, Marie. I think that your last suggestion – butter wasn’t cold enough – could be my error. I went low and slow but, as it was a hot day, the butter was not cold as I progressed. Next time I’ll keep the butter on ice. I will also try your suggestion to try and fix the one I made. I don’t mind making a mistake, it’s how you learn. Thanks again.
Hi LM, I’d love to hear how you go with the reheating suggestion.
Attempting lemon curd several years ago I swore I’d never make it again. When I saw this recipe, not tempering the eggs, I thought this is for me! It was so simple and absolutely delicious!
I’m so happy you found this recipe then Linn. So glad you love it 🙂
I love all things lemon. I made some today and it turned out fabulous. Don’t think it’ll last too long. I also used this particular recipe but with orange and it also turned out wonderful. I will be making this on the regular from now on. Thanks so much!
So so happy to hear this Zoe. Definitely one of my favourite recipes.
Hi, could I substitute the sugar for honey? Would it still thicken up?
Hi Bel. It really depends on the reason behind it. If you’re after a honey and lemon flavour, then yes, I think it should still work. I’ve not tested it though. If you’re trying to replace the sugar with an alternative, I’d probably recommend trying rice malt syrup so you don’t get that strong honey flavour.
Made this first time last week and worked so well! I strained the liquid after adding all the butter, before returning to pan and heating it for 4-5 minutes until thickened. So tasty and silky and creamy and so good.
It didn’t last long, so made it a second time and tried to cheat by using medium heat during the butter addition – as you mentioned in the helpful tips, it was a bit grainy. Following instructions is the trick 🙂
Thank you for a fabulous recipe.
So happy you love it, LMac.
I’ve been making lemon butter for years but I have to admit this recipe is probably the best and easiest I’ve ever tried.
It will be my go to recipe from now on.
I’m so so happy you love it, Dianne. Thank you
Hi Dianne, I tried to email you directly but it bounced back. I’d love to help you troubleshoot. I’ve never had anyone with even a little complaint on this recipe and it doesn’t turn out bitter at all for me – more super buttery lemon flavour.
Could you have added too much of the white pith? Were your lemons particularly sour to start with / maybe not ripe?
Have you ever used bottled high quality lemon or lime juice to make this? I have used a bottled Key Lime juice in another recipe for lemon curd and it worked.
Thank you
Hi Julie. No, I’ve steered away from bottled since the two version I could find just did not taste like fresh lemon or lime. More like bitter lemony-ish water. If you can get a good-quality one, have at it 🙂
So delish.
Doubled the recipe, but also doubled the amount of lemon juice. We love things not too sweet. Perfect
Wow! That must be nice and tangy. So happy you love it
Easy and delicious lemon curd
Perfect filling for macarones
Thanks for sharing
So happy you enjoyed it Connie
The best lemon curd ever! Thank you!
You’re very welcome Lauren 🙂
Hello, I made this amazing recipe last night, and wow, it was easy peasy…..lemon squeezy..ha ha! Oh my! I was so excited to taste it this morning after it thickened up …..and double wow! It’s AMAZING! Better than that pricey one sold in a jar at the store! I will never buy it again! Thank you, thank you! I am just so thrilled! Best recipe ever! You are “THE WOMAN”!
Thank you so much Connie. I’m so happy you love it 🙂
Oh Boy! I have not made any for over 20yrs I got lazy and bought it but hubby said shops stuff is not the same as I made so found your recipe Marie and have just made it hubby had a taste and said to thank you its fabulous.
1 Question your recipe says to put in the jar and then the fridge but nothing said about cooling 1st?
Hubby said i’d best get on and do more as this jar will not last a week LOL!
Thank you
Lizzie
Hi Lizzie, so happy you loved it. I’ll update the post but I normally sit it at room temp for 1/2 an hour or so then put it in the fridge just so that it’s not boiling hot when it goes in there.
Worked perfectly. Thanks for this.
Thanks Saloni 🙂
Amazing!!!
So glad you loved it Denisa
Sooo delucious!! So easy to do that we do it on a weekly base. It never last long enough to make a lemon meringue pie!!🤣
Thanks so much Susanna, I’m so happy you love it 🙂
Love this, it has now over taken yet another Mary Berry recipe.
It’s sooo good that I have given the recipe to my sister in law.
I don’t know what I would do with out your recipes now ❤️
Oh my gosh, Mary Berry – I am honoured. Thank you Joanne, this means the world to hear.
Love this recipe! Way easier than Grandma’s (don’t tell)… the only thing I added was straining through a mesh sieve at the end… I had to make sure there were no little eggy bits! Thank you!
Thank you so much Kathleen, I promise not to tell Grandma 🙂
Hello Carol, yes that’s correct. As long as t’s coating the back of the spoon well it will be fine. It thickens as it cools 🙂
How long can this be frozen for?
Hi Jackie, I would use it within 6-7 months. If you freeze it in small portions (say an ice cube tray) then once frozen transfer it to an airtight container, then you can thaw just as much as you need at a time.
This recipe came out perfect!! I made mine as a trial as I want to make lemon cakes and do a little lemon filling in the middle and what are home made cakes if you have shop bought curd (ewww). I thought it was going to take a few goes but first time round it was amazing!!!
I’m from the UK and needed to buy jars so I bought a pack of 3 jars from Poundland and this recipe fills two of them right to the top.
This will be amazing for little hampers which i always make for Christmas.
I have one question it says further up the page that the curd can keep for 3 months but further down the page it says it will only keep for 3 weeks but can be frozen. Is the 3 months if you freeze it and the 3 weeks if you keep in the fridge?
Thank you so much for this recipe.
Hello Millie, I’m so happy you love it. Isn’t it so easy to make?!! I’m sorry, I’ll make those notes a little clearer – it should read up to 3 months unopened but once opened it will keep in the fridge 2-3 weeks.
That was so easy to make and taste so good!
Thank you so much, Sue. I’m so happy you like it 🙂
Loved the recipe and tried it! It’s a hit!
Thanks Aruni, so glad you loved it 🙂
So easy I doubled the quantity and very pleased with the result, many thanks
Thats great Bronwen. So glad you loved it 🙂
It turned out perfect, and I couldn’t stop myself eating the lemon curd, directly out of the jar.
Excellent Dasuni. So happy you loved it 🙂
WOW, I have never made lemon curd before, This stuff is AMAZING. Yummo. Going to fill cupcakes with this. IF it lasts ling enough.
Thanks Rose. So glad you love it.
This turned out perfect! Thank you!
Thanks so much Kyla. Glad you enjoyed it 🙂
This was an easy recipe and very tasty too!!!!!
THANX
Thank you Donna, I’m so happy you loved it 🙂
Would this hold well if baked for thumbprint cookies? As in will it set or melt? Looks delicious!
Hi Suzanne, it will set just don’t over fill. I’ve used it in these lemon curd cookies
One word. Yum! I made this to serve with cranberry scones. ? It was *perfect*.
Fast, super easy, and wonderfully lemony.
Thanks so much Stacy, I’m so happy you loved it 🙂
You have reminded me how much I like lemon..will give this a go
That’s great Robyn, hope you love it