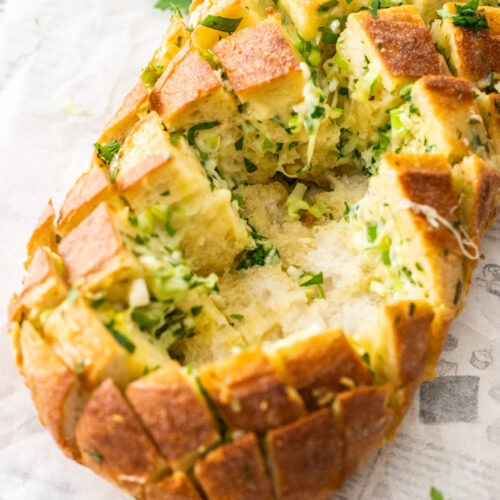

Cheese and garlic crack bread (or cheesy garlic pull apart bread) is flavoursome and simple to create and will be loved by all your guests. Grab yourself a crusty loaf and stuff it with cheese, garlic and spring onions for an epic party appetiser.
- Easy to make – use a pre-baked loaf.
- Seriously loaded with flavour.
- Buttery, cheesy, gooey goodness!
- Serve as is or use it for dipping.
- Customise with other flavours too.
Crack bread. Funny name right but once you taste it you’ll understand why – one piece is never enough. Sometimes referred to as pull apart bread, it is literally that. The flavour is piled into a gorgeous crusty loaf, then baked until it’s all melty. Serve it up hot and everyone can pull pieces of buttery, garlic-y bread out and devour.
You’ll love my garlic pesto bread too or try these cheese and garlic croutons.

Never Miss a Recipe!
Get the latest recipes straight to your inbox!
What is pull apart bread?
This cheese and garlic crack bread (so named for it’s addictive nature but also because of the “cracks” that the filling is stuffed into) is just one form of pull apart bread. They can also be a homemade dough put together in such a way that, once baked, you can pull the pieces apart.
Monkey bread is another form of pull apart bread, with small balls of dough piled one on top of the other and baked, again so that the small balls can be pulled apart.
Ingredients you’ll need

Detailed quantities and instructions in the recipe card below.
Just 8 everyday ingredients and the loaf is store-bought keeping this super simple. Of course, you can make your own bread if you have a favourite recipe, but what you need is a large crusty loaf of bread with a firm or dense texture. The softer or very hole-y types are more difficult to pull apart, though they’ll still taste amazing.
The garlic butter is made up of melted butter, salt, fresh garlic and fresh parsley giving it a bold buttery, garlic and herby flavour. I use salted butter but unsalted is fine. Please use fresh garlic as it has so much more flavour than jarred or powdered garlic.
The cheesy filling is just 3 ingredients – finely chopped spring onions, mozzarella cheese and cheddar cheese. Spring onions are also known as green onions or scallions. You can swap them for chives or leave them out entirely. Please buy your cheese by the block and shred yourself. Pre-shredded cheese has coatings that stop it from melting smoothly.
How to make garlic pull apart bread (step-by-step)

Detailed quantities and instructions in the recipe card below.
- The garlic butter: Melt some butter, then stir in minced garlic, salt and finely chopped parsley. Set that aside.
- The cheesy filling: Shred the cheeses then mix them with finely chopped spring onions. Set aside.
- Slicing the bread: You want to slice the loaf on an angle, with slices about 1 inch apart leaving the base intact. The bottom needs to stay together to hold the loaf together. Turn it 90 degrees and slice in the other direction too. Now you should have lots of little squares of bread all held together by the base.
- Filling the crack bread: Start by gently pulling apart between the slices and spooning the garlic butter mixture down the bread. Try to coat as much of the bread as possible rather than letting it drop straight into the bottom of the gap. Once the whole loaf is done, stuff all the gaps with the cheese filling.

- Bake: Wrap the loaf up in aluminium foil and bake for 30 minutes, taking the foil off for the last 5 minutes to get the bread nice and crusty on top.
Tips and tricks
- Use a serrated knife: A serrated knife is the easiest way to slice bread.
- Leave the base intact: Be very careful not to cut all the way through. The base should remain intact so that you can serve it up as a whole loaf.
- Drizzle slowly: When adding the garlic butter mixture, drizzle it slowly down the inside of the bread, so that it doesn’t just drop straight into the base of the bread.
Don’t ditch the base: Once all the cubes have been pulled out and devoured, it’s easy to think the base is just a vehicle that can now be discarded but take it from me, it’s just as good as the rest. Some of the garlic butter oozes right down there and the base gets super crunchy after baking – it’s just perfect for dipping!
If you feel like making your bread from scratch, try this no knead rosemary parmesan bread.

Variations
- Pesto: Swap the garlic butter mixture for a pesto butter mixture and you can use basil pesto or sun dried tomato pesto.
- Gruyere: Make it extra by swapping the cheddar for gruyere. Don’t swap the mozzarella though because it adds that glorious melty cheese pull that’s so good.
- Make it spicy: Make a jalapeno butter mixture instead or just add a good pinch of dried chilli flakes (red pepper flakes).
- Add mustard: A loaded teaspoon of wholegrain mustard is so good, added to the butter mixture.
- Dried herbs: Swap the fresh parsley for 2-3 teaspoons of dried herbs, like oregano, rosemary or thyme.
- Add a sauce for dipping: While this cheesy garlic crack bread is absolutely amazing just as it is, you can add a dip on the side. Try a ranch dip or marinara sauce (tomato pasta sauce). This avocado cream sauce is also a lovely subtle dip.
Yield and storage
Cheesy garlic crack bread can be used as an appetizer or side dish and will serve 8-10 people.
Making it ahead
You can make the crack bread ahead of time. Slice and add both the fillings, then wrap in foil and chill 1-2 days before baking.
You can also freeze it. In that case, once wrapped with foil, wrap tightly in two layers of plastic wrap. It can be baked from frozen but will need an extra 10 minutes baking time or just let it thaw in the fridge overnight.
Leftovers
Leftovers can be reheated in the microwave for a few minutes and the bread will still turn out crusty. You can also reheat it in the oven at 180C / 350F for 10-15 minutes until hot and gooey again.

Did you try this pull apart cheesy garlic bread recipe?
Leaving a rating and comment below the recipe is so helpful!
Hungry for more? Subscribe to the newsletter for free recipes straight to your inbox. Also, follow along on Facebook, Pinterest and Instagram.
Ingredients
- 1 large firm crusty loaf, oblong or round (notes)
- ½ cup salted butter
- 2 tablespoons finely chopped parsley
- 3 large cloves garlic, minced (or to taste)
- ½ teaspoon fine sea salt
- 2-3 spring onions (green onions/scallions), finely chopped (½ cup, not packed)
- ½ cup shredded cheddar, lightly packed (60g / 2.1oz)
- ¾ cup shredded mozzarella, lightly packed (95g / 3.4oz)
For best results, always weigh ingredients where a weight is provided
Instructions
- Preheat oven to 180C (160C fan) / 350F.
- In a microwave-safe small bowl, melt the butter. Add the parsley, garlic and salt and mix well. Set aside.
- In a medium bowl, combine the finely chopped spring onions and both shredded cheeses. Set aside.
- Using a serrated knife on a large chopping board, slice the loaf on an angle with slices 1 inch apart but leaving the base intact. It’s important not to cut through the bottom of the loaf so it holds together. Turn it 90 degrees and cut on the other angle to create a grid or checkerboard effect (see photos in the post if you need clarification).
- Place the loaf on a large sheet of aluminium foil, large enough to wrap it.
- Gently pry open the gaps and carefully spoon in the garlic butter (give it another stir regularly as the garlic and parsley sink to the bottom) letting the butter dribble down the inside of the bread. Take your time, you don’t want it all just to pool at the bottom. Go over the whole loaf this way.
- Now go over the whole loaf again, stuffing all the gaps with the cheese mixture.
- Wrap the whole loaf in the foil and bake for 25 minutes then uncover and bake another 5-8 minutes, until the top is crusty.
- Please take a moment to leave a comment & rating. It's appreciated and so helpful.
Notes
- A loaf with a firmer or chewier texture is better than a soft loaf as it’s easy to pull the pieces out without it breaking. Sourdough will work as long as it isn’t one that has lots of big holes through it.
- If you don’t want a bunch of people digging their fingers into the bread to get their piece, serve it with some tongs on the side.
This post may contain affiliate links that earn me a small commission for my referral, at no extra cost to you. Thank you for supporting Sugar Salt Magic.