With everything from looking stunning to making dessert customisable to everyone’s tastes, this pavlova grazing board has it all. It’s easy to make and can be made ahead too. What’s not to love about this elegant dessert board.
If you love pavlova, try this chocolate pavlova or these chocolate swirl meringues.

Why you’ll love it
Grazing boards are becoming increasingly popular and, while I love a traditional pavlova, this pavlova platter is the perfect dessert for a crowd. It works as a Christmas dessert, summer dessert and really is wonderful for so many occasions.
- It’s easy to make
- Can be made ahead of time – well ahead
- Endless topping options
- It looks elegant and beautiful
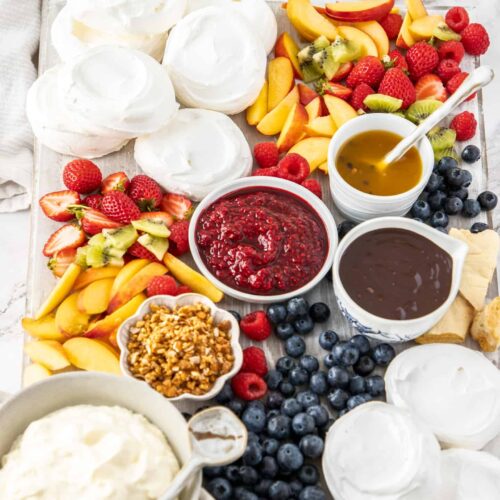
Perfect crisp meringue shells with the classic melt-in-the-mouth, marshmallowy pavlova centre. When you want to serve, make a simple chocolate ganache, whip some cream and serve on a board with loads of fresh fruit.
Believe it or not, pavlova is very easy to make and these mini pavlovas are even more simple since they’re less fragile than the larger version. It’s also fun for everyone to DIY their pavlova by choosing their favourite toppings and not having to pick off the bits they don’t want.
I’ve been wanting to post this pavlova grazing board ever since I created a pavlova bar for a family get together about 6 years ago. Finally, she’s here looking all pretty and ready to celebrate, just in time for Christmas.
Tools you’ll need
- A stand mixer or handheld electric beater
- Mixing bowls, spatulas
- Baking trays and baking paper
Ingredients for mini pavlovas
These mini pavlovas use the exact same ingredients as a traditional pavlova. There’s just 5 ingredients in the mini pavlova shells and the topping options are endless. Let’s start with the shells.

Detailed quantities and instructions in the recipe card below.
- Eggs: Use large, fresh, preferably free-range eggs if you can.
- Cream of tartar: Cream of tartar is an acidic ingredient that helps to stabilise egg whites, helping with the pavlova structure. You can swap it 1:1 for lemon juice or white vinegar.
- Cornflour: Cornflour (aka cornstarch) helps to get that perfect soft, marshmallowy centre.
- Caster sugar: Sugar and eggs together are the base for meringue. Just use white caster sugar to keep the shells white and to keep them simple. Use caster (superfine) sugar so that it dissolves into the egg whites easily. You can also use this homemade vanilla sugar for a more intense vanilla flavour.
- Vanilla extract: You don’t need to add vanilla to the meringue but it does taste lovely.
The pavlova toppings
Now for all the wonderful pavlova toppings you can choose. What I love about this pavlova grazing board is the option to add all the things you and your guests love and be able to create so many different versions of the same dessert.
While a traditional pavlova equals pavlova shell, whipped cream and fruit, these mini pavlovas and the way they’re served allow for even more creativity while still being simple.

- Whipped cream: The first topping on any pavlova is cream. While I’m not a lover of whipped cream, I love it on pavlova where it plays a very important role – between the sweet pavlova base and toppings, it adds balance, so don’t skip it. It takes literally 2 minutes to whip cream from scratch and you won’t have grainy overwhipped cream from a can.
- Sauces / spreads: On top of the cream or drizzled over your fruits, you often, though not always, have some kind of sauce. Most often it’s just simple passionfruit pulp. On this dessert platter, I’ve offered that, plus a very simple chocolate ganache and raspberry compote. Check out my sauces and spreads category for loads of compotes and fruit curds you could use. Lemon curd would be lovely.
- Fruit: What is a pavlova without loads of fresh fruit adorning the top (rhetorical question but essentially just a massive meringue). Berries are often use because they’re simple to prepare. Mango is a very popular topper, as is kiwi fruit. Try pomegranate arils and sliced peaches too.
- Other toppings: On this board I’ve served up some finely chopped nut praline (shown on the chocolate version) and honeycomb which is great for crunching over the top. You could also serve chocolate shavings or some shredded coconut.
The mini pavlova recipe
Pavlova is not as difficult as it looks. There are a few simple rules that I cover here and yes, I recommend a stand mixer or at the very least an electric hand beater but honestly there is nothing to it. Here’s the steps and why they’re important.

Detailed instructions in the recipe card below.
- Separate the eggs: Start by separating your eggs. One at a time, crack the eggs, let the white fall into one small bowl and the yolk into another, then place the white into your mixing bowl. Repeat for all the eggs.
- Why: This way you don’t risk getting yolk into your bowl of egg whites, which will prevent it from whipping up.
- Beat the egg whites: Now beat the egg whites for a few minutes until they’re all fluffy, there’s no liquid whites left and they have soft peaks – this means when you pull the beater out, the peak will fall over but not sink back into the whites. Don’t overbeat at this stage.
- Why: Getting them to soft peaks first ensures there is nothing interfering with the whites ability to whip, but overbeating, past the point of soft peaks, can affect the integrity of the pavlova structure.
- Add the cornflour and cream of tartar: Use a sieve to sift in the cornflour and cream of tartar, then beat that through for a few seconds until combined.
- Why: Sifting it in ensures no lumps and it’s easily dispersed through the egg whites.
- Add the sugar: With the mixer on low-medium, add the sugar one tablespoon at a time, counting to 20 seconds between each.
- Why: The small amount of sugar added stops the egg whites from collapsing, while counting allows time for the sugar to dissolve.
- Beat to stiff peaks: Now turn the mixer up to high and beat until the meringue is glossy, thick and holds nearly stiff peaks when you pull out the whisk. It should hold it’s shape whether you turn it sideways or upside down or any which way but the very tip may still fall over. That’s fine.
- Why: Beating to stiff peaks ensures your meringue shells will hold their shape in the oven.
- Check the meringue: You need to rub a little between your thumb and index finger and if you feel sugar crystals, keep beating until you don’t.
- Why: Sugar crystals can cause your meringue to weep, so making sure they’re all dissolved prevents this from happening.
- Bake: Bake low and slow at 110 fan forced (125C conventional or 260 fahrenheit) for about 50 minutes.
- Why: Slow baking allows the meringue to cook and set to get that perfect crisp shell surrounding a soft centre. The low heat ensures they stay white.
- Let the mini pavlova shells cool completely before serving.

Making the toppings
The toppings that need to be made or cooked for this pavlova platter are kept very simple with just a little whipped cream, chocolate ganache and raspberry compote.
- Cream: Pour cold cream into a bowl and whip using an electric beater or balloon whisk until soft peak stage. Be careful not to overwhip or it will have a grainy look and texture. Don’t be tempted add sugar – the rest of the dessert is sweet enough and the cream is there to balance it out.
- Chocolate ganache: Heat some cream in a saucepan then pour it over finely chopped chocolate. Let it sit to soften for a minute, then stir to a smooth ganache.
- Raspberry compote: Put frozen berries, sugar and lemon juice in a saucepan and cook for around 10 minutes until thick and syrupy. Add a little vanilla and it’s done.
You can make all of these toppings in less than half an hour but feel free to make the ganache and compote up to 2 days ahead. Cream is best whipped on the day as close to serving as possible, though it will sit in the fridge quite well.
How to make a grazing board
Now you have your meringues, your sauces, how do we put it together?
- Make sure to use a large board so everything fits without risk of it falling off. It’s also nice if the board is not too big so that it isn’t too difficult to carry or that you have lots of bare gaps.
- Make a mountain out of the pavlova shells and if you have room, in a couple of spots balances the look.
- Next place your 3 or 4 sauce type toppings and add them to bowls or jars with spoons. This along with the shells creates the structure of your board.
- Add any additional toppings, like the praline and honeycomb here or chocolate / coconut shavings in a small bowl.
- Now fill in with a variety of coloured fruits, all washed, sliced and ready to eat. Mango or peaches will give a sunny vibe, bright red berries look like jewels, blueberries add a little depth of colour. Kiwi fruit and, for that matter, some mint leaves will add a vibrant pop of green.
- Add the fruits in a few locations over the board – this gives the look of more variety and luxury. I recommend putting blueberries in a bowl – these ones were rolling all over the place.
- It’s best assembled right before serving so make a show of it. Put it out where everyone can see this stunning pavlova plater come to life.
If all this doesn’t make for a showstopping dessert, I don’t know what does. People love variety and I’ve yet to find anyone who doesn’t love pavlova. It truly is a classic for a good reason. You could even be inspired by this mango pavlova and create a tropical pavlova board.

What if I don’t have a large serving board?
Some really big serving boards and grazing platter boards can get pricey but there are ways around it.
- Make your own: Grab some timber and glaze it with a food safe glaze. You don’t even need to glue or screw boards together to make them wider, just sit them side by side.
- Use chopping boards: Large chopping boards sat side by side will get the job done and they have a dual purpose since you can use them in your kitchen every day.
- Build up: It doesn’t have to be a board. Just group similar bowls together in the same spot on the table. Have some that sit a little higher than others for a wow factor. For instance, sit the meringues on cake platter at the back, then a plate with little jam jars for the sauces and all the fruit on one large platter.
- Down the centre of the table: If the table is clear, you can serve everything on a runner straight down the centre of the table so everyone can reach it from their seats. Make sure to place groups of things along it’s length though so people don’t have to reach over each other.
How to store mini pavlova shells
I said right at the start this pavlova grazing board is a make ahead dessert and this is one of the greatest things about this pavlova grazing board as a host – the meringue shells can be frozen!
Make sure they have cooled completely, then gently stack them into an airtight container with solid sides (not a bag as they will get crushed). Freeze for up to 2 months. They will thaw very quickly at room temperature.
Always store meringue in a cool place. In an airtight container in the pantry is fine on the day of serving. Humidity can cause meringue to get sticky and, eventually, begin melting or dissolving, but so long as it’s somewhere cool and airtight, they’ll be safe.
PIN IT:
Click to PIN this recipe for later!

If you try this pavlova grazing board, please take a moment to leave a rating and comment below. I love hearing from you and it helps other readers too! You can also take a photo and tag @sugarsaltmagic on Instagram.
Be sure to check out these great posts too.
- How to Make Perfect Pavlova
- Pavlova wreath
- Chocolate meringue cake
- Swirled Chocolate Pavlova
- Peppermint Meringues
- Chocolate Meringue Brownie Cake
- Chocolate Swirl Meringues
- Biscuit Base Lemon Meringue Pie
Never Miss a Recipe!
Get the latest recipes straight to your inbox!
Ingredients
FOR THE PAVLOVA SHELLS
- ½ cup egg whites (approximately 4 large eggs), room temp
- 1 cup caster (superfine) sugar (200g / 7oz) (notes)
- 2 teaspoons cornflour (cornstarch)
- 1 teaspoons cream of tartar (notes)
- 1 teaspoon vanilla extract
TOPPINGS
- 1 ½ cups whipping (heavy) cream
- 150 g dark (50%) chocolate
- Fresh fruit, washed and sliced (notes)
- Passionfruit pulp
- Raspberry compote (or other compote or curd)
- Nut praline, chopped finely (or crushed nuts or coconut flakes, even granola)
For best results, always weigh ingredients where a weight is provided
Equipment
- stand mixer or electric hand mixer
- Mixing bowls, spatulas
- Serving board, chopping boards or nice platters
Instructions
FOR THE MERINGUE SHELLS
- Preheat the oven to 120C / 250F / 110 (fan forced). Line two baking trays with baking paper.
- In a stand mixer, with the whisk attachment (or using a handheld beater), beat the egg whites to soft peak stage. About 3-4 minutes.
- Sift over the cream of tartar and cornflour and beat through.
- With the mixer on low-medium, add the sugar one tablespoon at a time, counting to 20 seconds before adding the next.
- Once all the sugar is incorporated, turn the mixer up to high and beat until the meringue is glossy, thick and can hold a (fairly) stiff peak when you pull the whisk out – it’s ok if the very tip of the peak bends.
- Test the mixture by rubbing a little between your finger and thumb. It should be smooth. If it is still grainy, keep beating until it is smooth when you test it.
- Add the vanilla extract and give the meringue one final best to mix it through
- Use a large ice cream scoop, to take large scoops of the meringue mixture and carefully release them onto the cookie trays. You can use spoons, the scoop just helps shape them. Space them at least 3 inches apart as they will puff up while cooking.
- Use a spoon to swirl a little dent in the centre, not too deep, then use a damp finger to pat any peaks down.
- Bake for 50 minutes. Very gently remove trays from the oven and set them at room temperature to cool. They cool in about 1 hour.
WHIP THE CREAM
- In a mixing bowl, using a electric handheld mixer or balloon whisk, whip 1 cup of cold cream to soft peaks. Cover the bowl and place in the fridge until required.
FOR THE CHOCOLATE GANACHE
- Finely chop the chocolate and place it in a heatproof bowl.
- Heat the remaining ½ cup of cream over low-medium heat, swirling every so often, until starting to bubble around the edges.
- Pour it over the chocolate and give the bowl a shake to submerge the chocolate under the cream. Wait 1-2 minutes, then stir well until smooth.
OTHER TOPPINGS
- Use this recipe to make the raspberry compote or use another spread from here.
- Use this recipe to make your own nut praline, or use crushed nuts or coconut flakes instead.
- Prepare the fruit by washing and slicing as needed to make it ready to top the pavlovas.
ASSEMBLING THE PAVLOVA GRAZING PLATTER
- I recommend doing this in front of everyone and letting them watch the magic come together.
- Make a mountain out of the pavlova shells in one or two spots on the ends of the board.
- Place sauces in little jars with spoons and the cream in a nice bowl, then place them around.
- Fill in all the gaps with lots of fruit.
Notes
- Meringue nests / shells can be made up to 2 months in advance and frozen in a stiff-sided airtight container in the freezer.
- Chocolate ganache, raspberry compote and nut praline can all be made a couple of days ahead.
- The cream can be whipped a few hours in advance and stored in the fridge.
- Don’t top the meringues with cream to serve, let the guests do it themselves as the cream will soften the meringue.
- You can also use things like nutella or caramel sauce.
- Best fruits to use: Strawberries, raspberries, blueberries, blackberries, mango, peaches, nectarines, grapes, kiwi fruit. While not a fruit, fresh mint leaves add lovely colour.
This post may contain affiliate links that earn me a small commission for my referral, at no extra cost to you. Thank you for supporting Sugar Salt Magic.
4 Comments on “Pavlova Grazing Board”
Ooo such a fun, elegant, and entertaining idea to assemble your personal mini Pavlova! And less work for hosts 🙂
Everybody wins!
Superb idea . Thank you Marie.
Thanks for your support Pamela. So happy you love this idea 🙂