
Whether you’re planning a big get together or just a small one, this Chocolate Pavlova will be the star of the show. It’s so easy to make (pinky promise) and I’ll give you all the tips below.
This recipe is a combination of my swirled chocolate meringues and classic pavlova where I answer all the common pavlova questions.

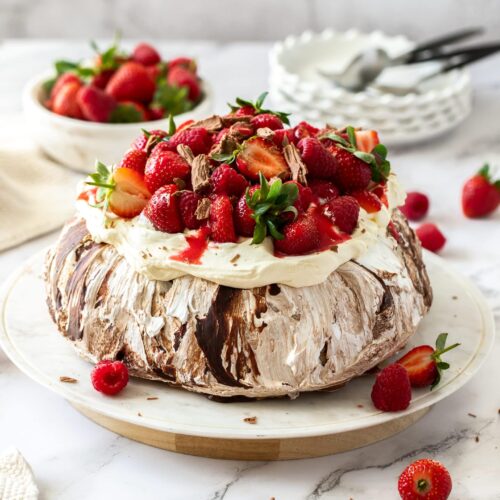
Chocolate lovers will love this slight deviation from the traditional version. This elegant meringue cake has real chocolate swirled right through the mixture before baking.
It has a thick crunchy crust and the perfect marshmallow centre, laced with chocolate throughout.
What you’ll need
This chocolate pavlova recipes needs just 5 ingredients for that meringue base, then whatever you want to top it with.
- Egg whites: Use fresh, large eggs. Cold or room temperature is fine as long as they’re fresh.
- Cream of tartar: This is an acidic ingredient that helps the meringue to hold it’s aeration once you’ve whipped it up. You can also use lemon juice or vinegar.
- Cornflour (cornstarch): This helps to create that gorgeous marshmallow centre.
- Sugar: Caster / superfine is the best option here as it dissolves into the mixture more quickly. You can use granulated in a bind, however it may take longer to dissolve meaning you may end up overwhipping the egg whites. Definitely, don’t use powdered / icing sugar.
- Chocolate: Use a good quality 70% cocoa eating chocolate. The chocolate flavour is very prominent so don’t use compound chocolate.
A good pav is always topped with fresh whipped cream (not from the can) and fresh fruit. This one has all that plus some crumbled up Cadbury Flake.

And don’t let that white interior fool you, there is chocolate swirled right through the mallow as well. In most slices, you’ll see lines of chocolate running through.
How to make it
Pavlova seems to have a reputation of being difficult to make and so many are intimidated by them but they really are very simple to make.
You can see all my tips and troubleshooting in my How to make Perfect Pavlova post but follow the steps below and you’ll have a gorgeous dessert in no time.
- Whip the egg whites until they get to soft peak stage
- Sift over the cream of tartar and cornflour, then mix it in.
- With the mixer on low add the sugar 1 tablespoon at a time and count to 20 between each one.
- Pour over melted and cooled chocolate and give it a quick turn over with a spatula (two turns at most), then tip it out onto a baking tray and shape it.
- Bake the pav for about 1 ½ hours then turn the oven off.
Tips and tricks
- A stand mixer is the easiest method but you can make pavlova using handheld beaters too.
- Make sure your bowl is perfectly clean
- Don’t let any yolk get into the whites – egg whites won’t whip with any trace of fat (like yolk) in them.
- Soft peak stage is when you lift the beater out and the top of the peaks curl over, but otherwise hold their shape.
- Make sure the meringue is smooth and at stiff peaks before turning it out onto your baking tray. It should look thick and glossy and you shouldn’t be able to feel any sugar grains when you rub it between your fingers.
- Don’t swirl the chocolate through too much. Just once or you won’t have a swirl effect when you shape it. Also, stirring real chocolate in completely has the potential to break down the meringue (due to the fat). As long as you just fold it through once or twice, then shape it, it will be perfect.
- Leave the pavlova in the oven after you turn it off for at least 2 hours. You can even leave it in there overnight. The 2 hours will be enough to stop it cracking. Overnight will just mean you can make it last thing in the evening, then turn the oven off and get on with your night.

Can I make chocolate pavlova ahead
Yes, you can. Make the meringue (the pav without the topping) 1-2 days ahead and make sure you have an airtight container and a cool, dry spot to store it. Meringue can be affected by humidity so keep that in mind.
Don’t top the pav until you are ready to serve, however, you can whip your cream and prep the fruit ahead of time, then simply put it together before serving it up.
It will keep in the fridge for a couple of days in an airtight container but the cream will soften the top crust.
Click here to Pin this recipe for later!

If you try this chocolate pavlova recipe, please take a moment to leave a rating and comment below. I love hearing from you and it helps other readers too! You can also take a photo and tag @sugarsaltmagic on Instagram.
Never Miss a Recipe!
Get the latest recipes straight to your inbox!

Ingredients
- 120 g dark (70%) chocolate (4.2oz)
- ¾ cup egg whites (approximately 6 large eggs), room temp
- 1 ½ cups caster (superfine) sugar (300g / 10.5oz) (notes)
- 3 teaspoons corn flour (cornstarch)
- 1 ½ teaspoons cream of tartar (notes)
- 1 cup thickened cream (heavy cream)
- 2 cups mixed fresh fruit (notes)
For best results, always weigh ingredients where a weight is provided
Equipment
- Flat cookie trays
- stand mixer with whisk attachment or handheld beater
Instructions
- Place the chocolate in a microwave safe bowl and melt in the microwave in 30 second bursts, stirring well between each until only just melted. Set aside to cool a little.
- Preheat oven to 120C / 245F / 110C fan forced. Trace around an 8 inch cake tin with pencil onto a sheet of baking paper. Place another sheet on top and set aside.
- In a stand mixer, with the whisk attachment (or using a handheld beater), beat the egg whites on low-medium to soft peak stage. About 5 minutes.
- Sift over the corn flour and cream of tartar and whisk for a few seconds, just long enough to incorporate it in.
- Add the sugar one tablespoon at a time, counting to 20 between each. Once all the sugar is all added, increase the speed to medium-high (not highest setting) and continue to whisk until the egg whites are thick and glossy and at stiff peak stage.
- Test the mixture by rubbing a little between your finger and thumb. It should be smooth. If it is still grainy, keep beating until it is smooth when you test it.
- Pour the cooled, melted chocolate evenly over the top and just fold through carefully once only. No more, it will swirl more as you shape it.
- Take the sheet of baking paper with the circle on it and dot little bits of meringue under the corners and press it down onto the tray. Do the same with the second sheet and place that on top.
- Use a spatula to spoon the mixture onto the prepared baking tray and gently coax it into the shape of a circle using the drawn line as a guide. Now make small sweeps from the bottom to the top all the way round and finally level the top out.
- Place in the oven and bake for 1 ½ hours then turn the heat off and leave the pavlova in the oven, undisturbed, for at least 2 hours (notes). Once out of the oven it will need a little longer to cool completely.
- Once cool, top the pavlova with whipped cream and fresh fruit.
Notes
- All ovens vary – if you notice it turning golden, the oven may be too hot, turn it down.
- Don’t use icing, powdered, granulated or brown sugar. Only caster / superfine so that it dissolves without overbeating the egg whites.
- Cream of tartar can be swapped 1:1 for vinegar or lemon juice.
- For topping ideas, use whatever fruit is in season.
- You can bake your pavlova in the evening and leave it in the turned off oven overnight to cool completely.
- Check out all the tips, tricks and troubleshooting in this post.
This post may contain affiliate links that earn me a small commission for my referral, at no extra cost to you. Thank you for supporting Sugar Salt Magic.
4 Comments on “Swirled Chocolate Pavlova”
Made this pavlova for Christmas and it was a big hit and looked very impressive. As I am not a huge chocolate fan I would use less chocolate next time I make it, but chocoholics will love it. Also very easy to make.
So happy you loved it, Sue
What a gorgeous and elegant Pavlova; that’s one of the most well-executed Pavlovas I’ve ever seen. Beautiful idea to incorporate the chocolate swirl – this makes the dessert truly outstanding!
Thank you so much Ben. We love this version a lot