
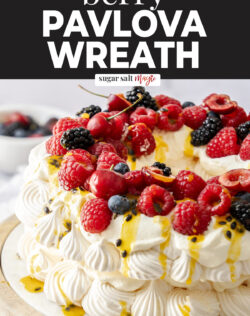
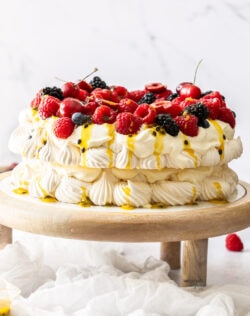
This pavlova wreath is so beautiful and perfect served up for Christmas or other celebrations. It has the classic crispy outer shell with a marshmallow-esque centre and is loaded up with fresh whipped cream and your favourite berries or fruit.
Like your favourite classic pavlova, this one has that gorgeous sweet and creamy flavour, with some tang coming from the fruit you add to the top. Then it’s piped, just like these meringue nests into a stunning shape.
While you could turn this into a single-layer traditional pavlova wreath, I piped two separate meringues and stacked them on top of one another to create a real showstopper. The other great thing about this meringue wreath is that you don’t need to pipe it. It looks just as gorgeous with big spoonfuls of meringue, so don’t feel intimated at the thought of having to pipe pretty swirls if it’s not your forte.
Looking for a quicker version? Try this pavlova roll.

Never Miss a Recipe!
Get the latest recipes straight to your inbox.
Ingredients

Jump to the recipe for full ingredients and instructions.
- Egg whites: You’ll need roughly 6 egg whites from large eggs.
- Sugar: Use white sugar so you get a nice white pav. Caster sugar (superfine sugar) is best as it dissolves more easily into the egg whites but white granulated will work too. Don’t use icing sugar (powdered sugar).
- Cornflour: Known as cornstarch in the US, cornflour is that very fine, soft flour often used for thickening sauces or in cake flour to soften the texture. Here, it helps create that soft marshmallow like centre.
- Vinegar: Plain white vinegar is perfect here. It helps to stabilise the egg whites while they’re baking. You can use lemon juice or cream of tartar in it’s place.
- Vanilla: Just a little vanilla adds a slight flavour.
- Whipping cream: Use a heavy cream / heavy whipping cream here for a nice stable yet light cream filling.
- Fresh fruit: I can’t go past fresh berries for this pavlova wreath but any fresh fruit will work.
How to make a pavlova wreath
Pavlova wreath really is the perfect Christmas pavlova. It’s easy to make and easy to decorate too with cream and your favourite fruits.

Jump to the recipe for full ingredients and instructions.
- Whip the egg whites to soft peaks: Start by adding the egg whites to the bowl of a stand mixer fitted with the whisk attachment (you can also use a large mixing bowl with a handheld electric mixer). Beat the egg whites on medium for 3-5 minutes until they have soft peaks when you remove the whisk.
- Add sugar: Add the sugar, very gradually, while the mixer is running on low. Add 1 tablespoon and count to 20 before adding the next – it works every time for me.
- Add cornflour, vinegar and vanilla then beat them in for another 20-30 seconds until incorporated.

- Shape the meringue into a wreath: To shape the pavlova wreath, you have a number of options. You could do a single layer or two layers like I have – both take the same time to cook. Once you’ve decided on a single or double layer, you can choose to pipe or dollop the meringue into shape. Here I’ve piped rosettes and filled in the gaps with little stars just using the same piping tip. You could also use a large spoon and dollop 7-8 blobs of the mixture around in a wreath shape, then smooth the tops slightly and even create a little dent in the top of each with the back of a spoon – this will give a space for the cream to sit. I use a large baking sheet for each but a round baking tray will work too.
- Bake: All that’s left to do is bake the pavlova. I always find my oven does a better job on the fan force setting while the conventional setting tends to brown the pavlova a bit. Whichever you choose, it bakes in 1 ½ hours and it’ll still be delicious, bright white or not.
This pavlova recipe can also be used for a classic pavlova shape. See more, along with all my troubleshooting tips over on my classic pavlova post.
Tips & tricks
- It’s important to add the sugar slowly. Adding it too quickly will knock the air out of the egg whites.
- The meringue is ready when it’s voluminous, glossy and has stiff peaks when you gently remove the whisk. Rub a little between your thumb and forefinger and you should not feel any grains of sugar – if you do, keep beating until you don’t
- If you’re piping your wreath, whether doing a single or double layer, the piping bag will be easier to work with if you only fill it with half the meringue each time.
- If doing a single-layer pavlova wreath, make the outside circle a little larger – say 10 inches or so – and once you’ve piped an even layer, start layering the meringue up on top. It will keep it’s shape well.
- Pavlovas are delicate and fragile which just means you need to be careful when handling them and don’t try to handle it at all until it’s completely cool.
- Don’t assemble your pavlova wreath until close to serving time. The longer it sits with fresh fruit and cream, the more it will soften. You can, however, and even should, make the meringue portion the day before.
- The pavlova wreath shell will keep quite well in a cool, dry place like the back of the pantry (or my linen cupboard). Don’t keep it in the fridge for days before using as it will soften.

Storage
Pavlova is best topped and served fresh, however you can make the meringue base ahead of time. Since the meringue needs a long, slow cooling time, it’s great if you can bake your meringue in the evening when you’re finished with the oven and just leave it in there overnight to cool slowly. This slow cooling process helps to prevent cracking and it’s also best not to handle a pavlova until cooled.
Once cooled, you can store the pavlova base in an airtight container in a cool place (not the fridge) for up to 2 days. I normally use my linen cupboard as it doesn’t get opened often and stays dark and cool. Of course, if you’re making your meringue wreath in the midst of winter, it will likely be fine on your kitchen bench top.
When you’re ready to serve or up to an hour before is best for topping the pavlova.
FAQ’s
Meringue is a mixture of egg whites and sugar that turns crisp when you bake it and serves as the base for pavlova. Pavlova is just a meringue topped with cream and fruit. While smaller meringues are often cooked until crisp throughout, pavlova is baked until the outside is crunchy but with a soft inside.
Eat it! There is nothing wrong with a weeping pavlova and it’s still completely edible. The “weeping” is actually sugar syrup that has escaped and can be caused by not beating in the sugar properly or by humidity.
Once a pavlova has weeped, you can’t fix it but there is nothing wrong with eating it. If you really don’t like how it looks, turn it into an eton mess instead. Make sure when making pavlova to mix that sugar in properly but also don’t overmix.
In parts, yes. The outside should be crisp and crunchy while the very inside should be soft and marshmallow like. The area between that crisp exterior and the soft inside is half way from both so has a slight chewy texture.
In many households across Australian and New Zealand especially, yes a pavlova is very traditional at Christmas. As it’s hot in these countries at Christmas, pavlova just happens to be perfect as it bakes at a cool temperature, the day before at least and is wonderful served with cold whipped cream and berries. That said, it’s a great dessert to serve at any time of year. Aside from the cream, it is served at room temperature.
Sweetness but not sickly sweet. Pavlova does not need to be flavoured at all, so it can be literally just sugar and egg whites. It does not taste eggy at all, just sweet. A little like sugar syrup doesn’t really taste like anything but sweetness but it’s still delicious. Often pavlova can be flavoured with vanilla extract.
Ok, so we’re talking about a classic pavlova here – this pavlova wreath doesn’t fall. If you make it into a classic pavlova though (which you can with this recipe), don’t worry if it falls, it’s really meant to. The fall in the centre is when the gap between the crunchy crust and marshmallow soft inside is larger. The centre of the pavlova is meant to be filled with cream and fruit so the crust can’t hold all that up without falling in. To prevent a cave in, you can shape your pavlova with a dent in the centre so that it doesn’t rise too far up and have that big gap.

Did you try this pavlova wreath recipe?
Leaving a rating and comment below the recipe is so helpful!
Hungry for more?
- Subscribe via Email, Facebook, Pinterest and Instagram.
- Add Sugar Salt Magic as a Google Preferred Source.
Ingredients
- ¾ cup egg whites (approximately 6 large eggs), room temp
- 1 ½ cups caster sugar (superfine sugar) (300g / 10.5oz) (notes)
- 2 teaspoons cornflour (US cornstarch)
- 1 teaspoon white vinegar
- ½ teaspoon vanilla extract
TO TOP THE PAVLOVA
- 1 cup Whipping cream
- Fresh berries or other fruits
For best results, always weigh ingredients where a weight is provided
Equipment
- 2 Large baking sheets or round baking trays
- Stand mixer or handheld elecric mixer
- Piping bag and open star tip, optional
Instructions
- Preheat oven to 120C (100C fan forced) / 245F.
- Trace around the edge of a 9 inch cake tin with pencil or non-toxic marker onto a sheet of baking paper, then use a small bowl roughly 10cm / 4inches to draw a circle in the center. Repeat with a second sheet of paper. Place both sheets marked side down on two large baking sheets or pizza trays.
- In the bowl of a stand mixer, with the whisk attachment (or using a handheld beater), beat the egg whites on medium until soft peaks form. About 5 minutes.
- Turn the mixer down to low and begin adding the sugar, one tablespoon at a time, counting to 20 between each addition. Once all the sugar is added, increase the speed to medium-high (not highest setting) and continue to whisk until the egg whites are thick and glossy and at stiff peak stage. Test the mixture by rubbing a little between your finger and thumb. It should be smooth. If it is still grainy, keep beating until it is smooth when you test it.
- Sift over the corn flour and add the vinegar and vanilla. Whisk for 20 seconds to incorporate it in.
- Take the first baking tray and dot little bits of meringue under the corners of the baking paper then press it down onto the tray. Repeat with the second tray.
- You can pipe the meringue onto the sheet or use a large spoon to create dollops.
- If you want to pipe rosettes, add half of the meringue to a large piping bag fitted with and open star tip. Pipe random rosettes between the larger and smaller template circles. Fill in any gaps with smaller rosettes or little stars. Repeat with the second sheet.
- To make dollops, just use a large dessert spoon to spoon mounds of meringue onto the paper template – half the meringue onto each one. Use a spoon or offset spatula to coax them into more circlular shapes if you need and to create a little concave centre.
- Place in the oven and bake for 1 ½ hours then turn the heat off and leave the pavlova in the oven, undisturbed, for at least 2 hours (notes).
- Use a handheld electric beater or balloon whisk to whip the cream to soft peaks. Chill until required.
- Top the first layer of the cooled meringue wreath with half of the whipped cream and spread it out evenly. Add the second wreath to the top, then top that with the remaining cream and fresh fruit.
- Please take a moment to leave a comment & rating. It's appreciated and so helpful.
Notes
- If you want to use an electric mixer, you may need to split this up into two bowls – make half, then make the other half. An electric mixer may not be large enough to whip 6 egg whites.
- All ovens vary – if you notice it turning golden, the oven may be too hot, turn it down.
- Don’t use icing, powdered, granulated or brown sugar. Only caster / superfine so that it dissolves without overbeating the egg whites.
- You can make one larger wreath instead of the two stacked ones. Start with a template that’s 10-11 inches instead of 9 inches wide. If piping, just keep layering up the rosettes. If using the dollop method, just make larger dollops.
- For topping ideas, use whatever fruit is in season. Strawberries, kiwi fruit, passion fruit, mango, raspberries are all classic but you could also use blueberries, blackberries, lemon or lime zest, slices citrus fruits.
- You can bake your pavlova in the evening and leave it in the turned off oven overnight to cool.
- Nutrition details are approximate only – scroll below the recipe to find the full nutritional information.
This post may contain affiliate links that earn me a small commission for my referral, at no extra cost to you. Thank you for supporting Sugar Salt Magic.

