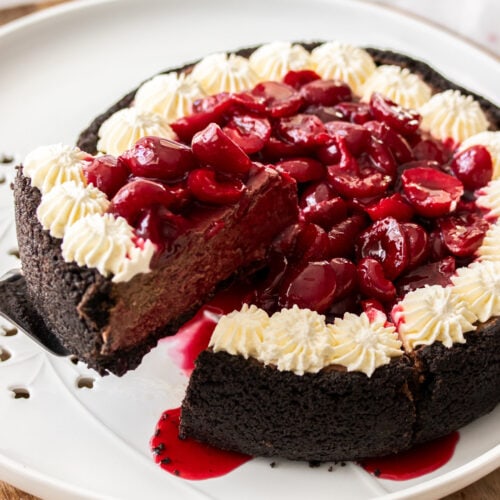
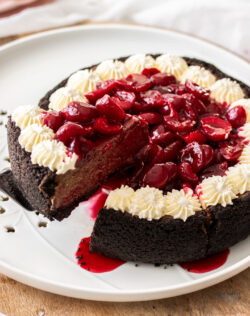
This black forest cheesecake starts with an Oreo crust (so easy!) filled with a rich chocolate cheesecake filling (with actual chocolate in the batter) and is finished with whipped cream and homemade cherry sauce.
It might sound like a lot, but every component is extremely simple to make and it’s all the parts you could expect from a classic black forest gateau with the addition of cheesecakey goodness. Based on my baked chocolate cheesecake, this is pure indulgence.
Baked cheesecakes are often thought of as difficult to make but they really aren’t. This one doesn’t require any special treatment and the cheesecake filling goes together as easily as a cake batter. The only cracks this cheesecake gets are the ones where I’ve stuck my finger through the top.
This post was first published on January 15, 2019 and has been updated with process shots and more information.

Table of contents
Never Miss a Recipe!
Get the latest recipes straight to your inbox.
Black Forest Cheesecake?
Black Forest is traditionally made in cake form and called black forest gateau. It’s an absolute classic for a good reason – cherries and chocolate are a winning combination. While I haven’t posted a recipe for black forest cake, I have posted these black forest cupcakes and black forest brownies, both of which are lovely.

Ingredients
Most of the ingredients are self-explanatory but there are a few tips to keep in mind.
Jump to the recipe for full ingredients and instructions.
- Use full-fat cream cheese for the best result.
- I find light sour cream works fine but you can use full fat sour cream too.
- This black forest cheesecake uses real chocolate in the batter, not cocoa powder. Grab a good baking chocolate (dark chocolate or semi-sweet chocolate that’s around 70% cocoa solids).
- I use Oreo cookies and just blitz them to cookie crumbs in a food processor. You can use any cream-filled chocolate cookie. You can use plain chocolate cookies (no cream) but increase the butter to 100g/3 ½ oz).
- Fresh cherries look the best but the sauce will work with frozen cherries as well.
- Cornflour where I live may be known as cornstarch where you are. It’s that very fine white powder often used for thickening sauces.
- To add even more classic black forest flare, try sprinkling over some chocolate shavings or chocolate curls!
How to make black forest cheesecake
Jump to the recipe for full ingredients and instructions.
1. The chocolate cheesecake crust
Simply blend Oreo cookies or another cream filled chocolate cookie in a food processor to crumbs, mix through melted butter, then press it into an 8 inch springform pan, pressing it up the sides too.

2. The chocolate cheesecake filling
This comes together so quickly! First, beat together cream cheese and sugar, mix in eggs, vanilla and sour cream, and finally stir in melted chocolate.


3. Fill the shell and bake
Pour the chocolate cheesecake batter into the Oreo cookie crust and bake it at a low temperature for around 50 minutes. Let it cool (overnight is best) before adding the topping but you can go ahead and make the cherry sauce.

4. Make the cherry sauce
You can get all the detail on this post for fresh cherry sauce but simply put, you just need to combine the ingredients in a pan over medium heat, then let it simmer for about 10 minutes until thick and unctuous.


This cherry compote is amazing stuff and can be served in so many ways. Try some of these ideas
- Over a classic baked cheesecake
- Stirred through ice cream – try this black forest ice cream
- In and over cake – try this almond cherry coffee cake
- In pastries – try this puff pastry cherry strudel
It’s also just great over pancakes or waffles.
5. Decorate and serve
Once everything has cooled completely, whip up some cream and pipe it around the edge. When you’re ready to serve, pour the cooled cherry sauce into the centre and slice it up.


Tips and tricks
- Room temperature ingredients (cream cheese, sour cream, eggs) will blend together more easily preventing a lumpy texture.
- Blend the cookies to a fine crumb texture. If it’s too lumpy the base won’t hold together.
- Don’t want to pit cherries? No worries, frozen cherries work too. Fresh cherries tend to look prettier at the end though. You could skip this and use a cherry pie filling but homemade is always best.
- Cool the cheesecake gradually and completely: Taking time to cool the cheesecake will prevent cracking. I do take mine straight out of the oven but let it cool in the tin at room temperature for at least 45 minutes before chilling in the fridge.

Why did my cheesecake crack?
I never experience cracking on this cheesecake but then, I’ve made a few cheesecakes in my time. Cheesecakes can crack for a number of reasons;
- The eggs were overbeaten creating too much air in the mixture.
- It was baked too long (drying it out too much)
- It was cooled too quickly
To prevent these from happening, don’t overbeat the mixture, bake it until the edge is set for about 2 inches in but there is still a wobble in the centre, and cool it gradually. You can leave it in with the oven door ajar to make the process even more gradual. Also, make sure to handle it gently when you remove it from the oven.
All that said, this cheesecake is topped with that amazing cherry sauce, so your guests are unlikely to notice or care about a crack in the top.
Storage
Leftovers should be stored in an airtight container in the fridge for up to 3 days.
This black forest cheesecake can also be frozen – whole or in slices, remember a whole cheesecake will take a very long time to thaw. If you do freeze it, make sure it’s in an airtight container and thaw it in the refrigerator. One slice might take a few hours, but a whole cheesecake will take around 24 hours.

⭐⭐⭐⭐⭐
Did you try this black forest cheesecake recipe? Show it some love in the comments below.
Hungry for more?
- Subscribe via Email, Facebook, Pinterest and Instagram.
- Add Sugar Salt Magic as a Google Preferred Source.
Ingredients
FOR THE BAKED CHOCOLATE CHEESECAKE
- 270 g Oreo cookies (2 packs / 9 ½oz)
- 85 g unsalted butter, melted (¾ stick / 3oz)
- 150 g dark 70% chocolate (5 ½oz)
- 500 g cream cheese, softened (1.1lb)
- ¾ cup caster (superfine) sugar (150g / 5 ½oz)
- 1 ½ teaspoons vanilla extract
- 2 large eggs
- 100 ml light sour cream (⅓ cup + 4 teaspoons)
- pinch of salt
FOR THE CHERRY SAUCE
- 300 g fresh cherries, halved and pitted (10 ½oz)
- 2 tablespoons water (notes 1)
- 2 tablespoons lemon juice (notes 1)
- 2 tablespoons sugar (notes 1)
- 1 ½ teaspoons cornflour
- 3 teaspoons water, extra
FOR THE TOPPING
- ½ cup thickened / whipping cream (125ml)
For best results, always weigh ingredients where a weight is provided
Equipment
- 8 inch springform pan (9 inch will work but will be thinner)
- blender or food processor to crumb the cookies but you can certainly do them with a rolling pin and a plastic ziplock bag
Instructions
- FOR THE BAKED CHOCOLATE CHEESECAKE:Preheat the oven to 160C (140C fan forced) / 320F. Grease and line an 8 inch/20cm springform tin.
- Blend the cookies to crumbs (if you don’t have a blender, put the biscuits in a bag and crush them with a rolling pin). Add the melted butter and mix well.
- Press firmly into the bottom of the prepared baking pan and up the sides about 2 inches. Place in the fridge while you make the filling
- Melt the chocolate in a microwave-safe bowl in 30 second increments, stirring well between each, until just melted. This shouldn't take more than 2 minutes. It can also be done in a bowl over a saucepan of simmering water. Set aside.
- Using a stand mixer with the beater attachment or handheld beater, beat the cream cheese and sugar together until smooth and creamy. Scrape down the sides of the bowl as required.
- Add the vanilla then the eggs, one at a time beating just until each is incorporated. Add the sour cream and salt and beat to combine then fold through the melted chocolate with a spatula.
- Pour the cheesecake filling into the cookie crust and smooth over the top as much as possible.
- Place the tin on the middle shelf of the oven. Bake for around 45-50 minutes or until the edges are set about 2in/5cm in and the centre still has a slight wobble.
- Allow to cool at room temperature for at least 45 minutes, before transferring to the fridge to cool completely (at least 6 hours but overnight is best).
- FOR THE FRESH CHERRY SAUCE:In a medium saucepan, combine the cherries, water, lemon juice and sugar and bring to a boil over medium heat. Turn the heat down so the mixture is just simmering.
- Simmer stirring every so often for about 10 minutes until the cherries have softened and the liquid has tripled.
- Make a slurry using the cornflour and extra water. Slowly dribble the slurry into the cherries while stirring constantly so that it doesn’t turn lumpy.
- Remove from heat and allow to cool completely.
- Just before serving, whip the cream and pipe around the edge of the cheesecake. Pour the cherry sauce into the middle.
- Please take a moment to leave a comment & rating. It's appreciated and so helpful.
Notes
- I use a standard Australian 20ml tablespoon (4 teaspoons worldwide)
- For best results you should always weigh ingredients like flour and sugar. Kitchen scales like these are relatively cheap but if you can’t weigh the ingredients, use the spoon and level method (don’t scoop).
- Nutrition details are approximate only – scroll below the recipe to find the full nutritional information.
This post may contain affiliate links that earn me a small commission for my referral, at no extra cost to you. Thank you for supporting Sugar Salt Magic.


19 Comments on “Black Forest Cheesecake”
Quick question, could I turn it into individual ones?
Hello Kathryn. It would work however, the baking time would be shorter but I couldn’t say how long as I haven’t tested it.
Thankyou so much for the reply….i just made a big one again ❤️
🙌
Absolutely amazing
I’m so happy you love it, Kathryn. Truly appreciate you dropping back to leave a review.
This recipe sounds so delicious
I’ve made this several times now and every time I’m just amazed how delicious it is and it comes out beautifully definitely picture worthy it’s so simple to make too
I’m so happy you love it, Claudia. Thanks for making my recipe.
Just wandering do I need to take the cream out of the biscuits for the crumb?
No, you don’t. The cream is part of the ratio that holds the crust together so definitely don’t remove it.
Can you make this using frozen cherries?
Hi there, yes you can.
Hi! Making this for my husband’s birthday tomorrow. I’m wondering how long I should leave it in the fridge?
It just needs to cool completely after baking. Overnight is best but 3-4 hours should be fine (since it’s quite thick).
I’ll make this for my mums birthday , thanks very much
You’re welcome, Mark.
Looks amazing. Will be trying this one.
I remember being introduced to cheesecakes back in the 1960’s when I was a teen. Got invited by an American family to dinner. When Eleanor told us we would be having cheesecake for dessert I thought ooooh yuk……, won’t be having that. Needless to say I became a convert instantly.
This recipe is a lovely change of flavour so I look forward to making it. Thanks Marie.
Oh such a lovely story, Pamela. I know you’ll love this one. It is rich so make sure to share it around 🙂