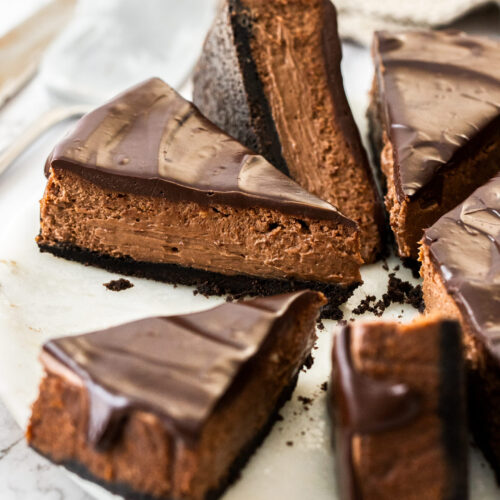
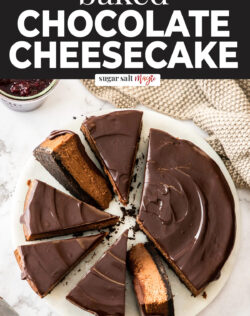
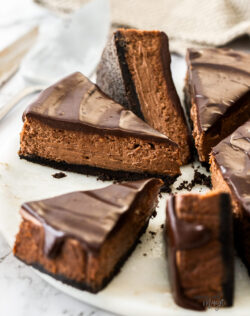
Calling all chocolate lovers, this ultimate chocolate cheesecake with chocolate cookie crust, creamy chocolate filling and chocolate ganache topping is for you. Yes, it’s baked but I promise it’s incredibly easy and delicious.
- Quick and easy to make.
- Amazing creamy, melt-in-the-mouth texture.
- No water bath required – so simple.
- Loaded with chocolate flavour.
- A lovely balance of sweetness and tang.
- Make ahead and freezer friendly.
This is truly the best ever chocolate cheesecake and everyone will be asking for the recipe. With triple chocolate flavour from the crust, filling and topping it can even be made in advance and frozen for up to 2 months, so you can get prepared now for Christmas! Or for any upcoming party.
You can even turn it into this stunning black forest cheesecake.

Never Miss a Recipe!
Get the latest recipes straight to your inbox!
An easy baked cheesecake recipe
Don’t let the ‘baked’ part scare you – it’s totally simple. I’ve made both baked cheesecakes like this easy baked cherry cheesecake and no-bake cheesecakes like my dulce de leche white chocolate cheesecake. While the ingredients and process are slightly different, a baked cheesecake takes no more effort to make than a no-bake cheesecake. It also doesn’t take any longer. A no-bake cheesecake has making and setting time, while a baked cheesecake has a similar make, bake and cool time.
The texture of a baked cheesecake is a little denser where no bake cheesecakes tend to have a fluffier texture (due to the addition of whipped cream). Both are truly wonderful and both will melt in your mouth. I’ve developed my baked cheesecake recipes to be really easy so you don’t need to worry about water baths or wrapping the tin in foil.
Ingredients you’ll need
You will likely have a lot of what you need on hand, if not all. We always have these ingredients in our pantry and fridge so I can literally make this baked chocolate cheesecake on a whim.

Detailed quantities and instructions in the recipe card below.
- Oreos: The cheesecake cookie crust is made with original Oreos (no extra stuffed ones). If you don’t like oreos, you can use plain chocolate cookies / biscuits, digestive biscuits, chocolate wafers or graham crackers. If using a cookie without cream, I find you need roughly another 2 tablespoons (28g) of butter.
- Butter: You’ll need unsalted butter for the cookie crust.
- Chocolate: Since this is where your chocolate flavour is coming from, don’t skimp. Get a good quality 70% dark chocolate (bittersweet chocolate). Even if you don’t like eating dark chocolate it is the perfect bitterness to counteract the sweetness and the cheesecake does not taste like dark chocolate – just rich. A chocolate bar will melt more easily than chocolate chips so stick to a good eating bar of chocolate.
- Cream cheese: Use full fat cream cheese and make sure it’s softened before starting so it blends together nicely.
- Sugar: Just regular white granulated sugar or caster sugar is perfect.
- Vanilla: Make sure to use a pure vanilla extract (not essence).
- Eggs: I use large free-range eggs. Make sure your eggs are at room temperature so the cheesecake batter can blend together smoothly. Cold ingredients are a struggle to make smooth.
- Sour cream: I use light sour cream, simply because that’s what we always have in the fridge, but full fat sour cream will work too and make the cheesecake even richer.
- Cream: The ganache is made using thickened cream (also known in other parts of the world as heavy cream or even fluid whipping cream).
I serve my baked chocolate cheesecake with a blackberry compote on the side. Any berry compote would work. It has a lovely tang that goes beautifully with the richness of the cake. You could also serve it with some whipped cream or simply serve it au natural.
How to make it (step-by-step)

Detailed quantities and instructions in the recipe card below.
- The Oreo cookie crust: The base is an incredibly easy mix of Oreo cookie crumbs and butter. You could use any chocolate cream biscuit you like though – for my Aussie readers, Arnotts Delta Creams also work wonders here. All you need to do is blitz them in a food processor, or if you’re looking to vent some frustration, place them in a plastic bag and bash away (gently) with a rolling pin, then you just add melted butter. Press it into a springform tin and the base is ready.
- The chocolate cheesecake filling: Beat the cream cheese until smooth, then one by one you’ll add the remaining filling ingredients, beating in each one until super smooth. The final step is folding in the melted chocolate and it turns it into the most silky, luscious chocolate cheesecake filling.
- Bake: Pour the cheesecake filling over the chilled base and level it out, then bake for around an hour.
- Setting: There are a few stages to the cooling time. Leave it in the oven with the oven turned off and door ajar first for ½ an hour – this slow progression to cool the cake is what will stop cracks from forming. Then you’ll let it rest at room temperature for ½ an hour before finally transferring it to the fridge to chill completely for about 6 hours. I’ll be honest and say I’m impatient and have sped this up before by placing it in the freezer for 30 minutes and I had it perfectly chilled within 4 hours of baking time.
- The chocolate ganache: Literally the icing the on the cake, the chocolate ganache is another rich chocolate layer and the perfect way to finish the cake. Just mix heated cream with finely chopped chocolate and mix until it’s smooth and glossy. You can let it cool if it’s too runny until it’s a nice consistency that you can spread on top of the cheesecake. The ganache can be added after an hour or two of chilling the cheesecake.
Tips and tricks
- Room temperature ingredients: This is the most important tip when making a cheesecake. Cold ingredients do not blend smoothly so make sure everything is at room temperature and it’s ok if the melted chocolate is tepid. This will ensure a smooth cheesecake filling.

FAQ’s
If you see white specks in your chocolate cheesecake mixture it just means the cheesecake mixture wasn’t mixed until smooth before adding the chocolate. If the lumps are very large, you can push the mixture through a fine mesh strainer to break them up. Small lumps are fine and won’t affect the flavour or texture.
You don’t have to use Oreos. You can use other cookie types too. If you use one that doesn’t have a cream filling just add an extra 2 tablespoons of butter to the crust.
A baked cheesecake is ready when there is about 2 inches of firm cheesecake filling around the edge while the middle is still slightly wobbly (it’ll look a bit like jelly / jello when you give it a shake).
No water bath needed. I specifically designed my cheesecake not to need one. The addition of sour cream keeps the filling moist and baked at a low temperature, then cooled correctly, cracks are less likely to form.
As long as you don’t overbake the cheesecake or try to cool it too quickly, you shouldn’t get large cracks in the top. Even if you do, it’s not the end of the world since the ganache will cover it.
Yield and storage
This recipe serves 10-12. It’s not a deep cheesecake so a slightly larger slice is appreciated by most.
Keep it chilled: The cheesecake must be kept chilled and can be served straight from the refrigerator. It will keep, in an airtight container in the fridge, for 4-5 days.
Freezing: You can freeze this chocolate cheesecake, making it perfect for making in advance. Freezing individual slices makes it easy to just take as much at a time as you need and they will thaw quicker than a whole cheesecake. That being said, you can freeze the cake whole. I would thaw it in the fridge for 24 hours before serving. If freezing slices, let them freeze until solid, then wrap them individually in plastic wrap.

Did you try this easy chocolate cheesecake recipe?
Leaving a rating and comment below the recipe is so helpful!
Hungry for more? Subscribe to the newsletter for free recipes straight to your inbox. Also, follow along on Facebook, Pinterest and Instagram.
Ingredients
FOR THE BAKED CHOCOLATE CHEESECAKE
- 200 g oreo cookies (notes)
- 57 g unsalted butter, melted (¼ cup / ½ stick)
- 150 g dark 70% chocolate (bittersweet chocolate) (5.3oz)
- 500 g full fat cream cheese, softened (1.1lb)
- ¾ cup caster sugar (superfine sugar) (150g / 5.3oz)
- 2 teaspoons vanilla extract
- 2 large eggs, room temperature
- 100 ml light sour cream, room temperature (⅓ cup + 1 tablespoon / 3.5oz)
- Pinch fine sea salt
FOR THE CHOCOLATE GANACHE
- 200 g dark 70% chocolate
- ¾ thickened cream (heavy cream) (180ml)
For best results, always weigh ingredients where a weight is provided
Equipment
- Silicone spatula – makes scraping down the bowl so easy.
- 8 inch springform pan
- Blender or food processor.
Instructions
- FOR THE BAKED CHOCOLATE CHEESECAKE:Preheat the oven to 160C / 320F / 140C fan forced. Grease an 8 inch springform tin. Line the base with baking paper. Grease the sides and line those with baking paper too.
- Blend the Oreo cookies to fine crumb (if you don’t have a blender or food processor, put the cookies in a bag and crush them with a rolling pin). Add the melted butter and mix well.
- Press firmly into the bottom of the prepared tin. Place in the fridge while you make the filling
- Melt the chocolate in a bowl in the microwave. Use 30 second bursts only and stir well between each until it is JUST melted – this will prevent overheating and causing it have a more bitter flavour.
- Using a stand mixer with the paddle attachment or electric beater and large mixing bowl, beat the cream cheese on medium speed for about 2 minutes until smooth and creamy. Scrape down the sides of the bowl as required.
- Add the sugar and vanilla and beat well until smooth, again scrape down the sides as necessary.
- Add the eggs and beat until each is well incorporated.
- Add the sour cream and salt and beat well. Make sure the mixture is smooth.
- Pour in the melted chocolate and beat it on low speed until fully combined.
- Pour the filling over the top of the Oreo base and smooth over the top as much as possible.
- Place the pan onto the middle shelf of the oven. Bake for around 50-60 minutes or until the centre is almost set. There should be a very slight wobble in the centre and about 2 inches around the outside will look set and not wobbly. The centre will firm up as it cools.
- Leave the oven door ajar for 30 minutes with the cheesecake still inside, then let it cool at room temperature for another 30-45 minutes before transferring to the fridge to cool completely.
- FOR THE CHOCOLATE GANACHE (once the cheesecake has cooled at least 2 hours)Finely chop the chocolate, place it in a bowl and set aside.
- Heat the cream in a small saucepan, swirling the pan every so often until it starts to bubble.
- Pour the cream over the chocolate, making sure to completely cover it and then don’t touch it for 1 minute. Stir until you have a smooth glossy ganache.
- Spread over the top of your cooled cheesecake.
- Let the chocolate ganache set before serving.
- To cut nice clean slices, use a sharp knife and wipe the blade after each cut.
- Please take a moment to leave a comment & rating. It's appreciated and so helpful.
Notes
- COOKIES: If you don’t like Oreos, you can use plain chocolate cookies / biscuits, digestive biscuits or graham crackers. If using a cookie without cream, I find you need roughly another 2 tablespoons (28g) of butter.
- MAKING AHEAD: This cheesecake can be made and frozen up to 2 months in advance. See more storage information here.
This post may contain affiliate links that earn me a small commission for my referral, at no extra cost to you. Thank you for supporting Sugar Salt Magic.
4 Comments on “Baked Chocolate Cheesecake”
First time making a cheese cake like this. Pretty easy to follow , the filling tastes so good.
My question is does the filling get hard after it cools or stays soft?
My cheesecake totally cracked in a few places. Ill just cover it with the chocolate topping.
So happy you love it, Julie. The filling stays soft but firms up enough to slice.
Wow Marie, this is just a delicious cheesecake. I will definately be making this again, it looks very professional when made and certainly the taste stands up to the presentation
So happy to hear this, Janet. Thanks so much for making my recipe 🙂