This vanilla tray bake came about after a reader asked me to make create a chocolate or vanilla sheet cake recipe. This one is so buttery, soft and fluffy and the 2-ingredient icing keeps it really simple to make.
If you love a lovely sheet cake or tray bake cake, try this beautiful strawberry sheet cake or my one bowl chocolate freckle cake.

Table of contents
Why you’ll love it
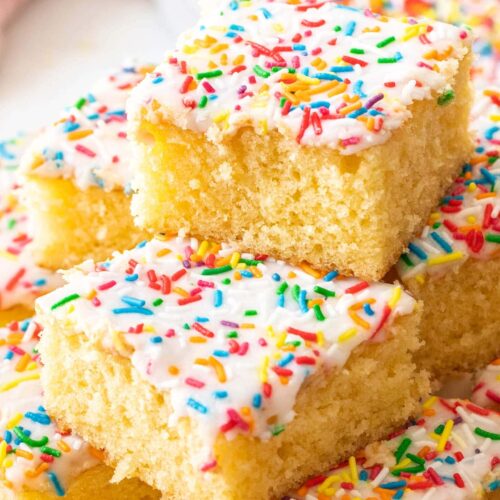
Buttery, super-soft vanilla sponge with a sweet but thin icing topping, this vanilla tray bake is so moist and tender and loosely based on the old school sponge tray bake – a UK classic. I promise you won’t regret making this.
While I originally was going to make a thick buttercream to top this, I went with a runny icing (like an old school sponge) because it’s easy to make, and the thin layer is just the right amount of sweetness for the cake.
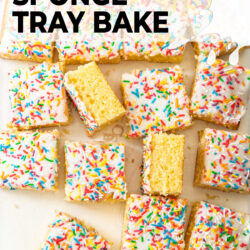
Perfect for a crowd, the sprinkles add a fun element and can be swapped for any colours that suit the occasion at hand, whether it be a birthday, a holiday or just for the fun of it.
There’s just one rule: Please, measure the sprinkles with your heart.
Of if you don’t feel like sprinkles, try this swiss meringue buttercream or this colourful, decorative piped buttercream.
This Cornflake tart is another UK school dinner classic.
Never Miss a Recipe!
Get the latest recipes straight to your inbox!
Ingredients you’ll need
With a collection of simple ingredients, you could probably make this vanilla traybake right now. Just saying!

Detailed quantities and instructions in the recipe card below.
- Flour: You’ll need just plain flour / all-purpose flour. You can swap it for cake flour if you have it.
- Baking powder: Make sure to use baking powder and not baking soda (or bicarb soda).
- Butter: Unsalted butter gives a rich, buttery flavour but allows you to control the salt level. Make sure it’s a little softened.
- Sugar: You’ll just need regular white granulated sugar here.
- Eggs: You’ll need 4 large eggs for this recipe. Make sure they’re at room temperature.
- Vanilla extract: It’s important to use pure vanilla extract and not vanilla essence. Extract is a natural flavouring.
- Milk: You only need a little milk so stick to whole milk for this one. With a little more fat than lighter versions, it adds flavour.
- Icing sugar: Icing sugar, aka powdered sugar, aka confectioners sugar, is very fine powdery sugar and it just what you need for the icing.
- Sprinkles: Use whatever sprinkles your heart fancies but if you aren’t into sprinkles, that’s fine too (I’ll try not to judge, haha) use some shaved chocolate instead and maybe berries, loaded up the way I did on this raspberry tiramisu.
You can swap both the flour and baking powder for self raising flour, if that’s what you have on hand.
Tools you’ll need
- Mixing bowls
- Silicone spatula – the best kind for scraping every last bit of batter out.
- Handheld electric beater or stand mixer with paddle attachment is helpful. While you could mix this one by hand, you need to get that butter and sugar well creamed which is much easier with a mixer.
- 9×13 inch baking pan
How to make vanilla tray bake
Just a simple, every day cake batter and the easiest of easy icings – you can make this quickly and everyone will love it.

Detailed instructions in the recipe card below.
For the sponge cake
- Dry ingredients: In a medium bowl use a whisk to combine and aerate the flour and baking powder.
- Wet ingredients: Beat together the sugar and butter until lightened and creamy. Add the eggs 1 at a time, beating well after each. Finally add the vanilla and milk and mix until just combined.
- Combine them: Now add the flour to the butter mixture in 3 parts, just mixing gently between each until just combined. Careful not to overmix.
- Bake: Spread the thick batter out in a prepared pan (greased and lined with baking paper) then bake for 20-22 minutes or until a toothpick comes out with a crumb or two attached.

For the icing
- Mix: In another medium bowl, stir together the icing sugar and water until you have a runny white icing. You can thicken it with more icing sugar or thin it with more water.
- Ice the cake: Once the cake has cooled, pour over the icing and give it an hour or so to set before slicing the cake and serving.
Don’t worry if the mixture looks like it’s a bit split after beating in the eggs. Beat it to as smooth as you can and adding the flour will get it the rest of the way smooth.
Tricks and tips
- Please weigh ingredients like flour using a kitchen scale. They’re cheap and will make sure all your bakes are perfect. A little too much or too little of these ingredients can make a huge difference to the result.
- Eggs should be at room temperature: Make sure to bring your eggs up to room temperature before starting so everything blends together well. If you forgot to take them out of the fridge, just leave them in a bowl of warm (NOT hot or boiling) water for 10 minutes.
- Scrape down the sides of the bowl often as you mix the batter.
- Don’t overmix once the flour has been added – just mix enough to just combine everything otherwise your cake may turn out dense.
- All ovens vary: This is really important as all ovens are different. Many run hotter or colder than the temperature gauge suggests. This means that what takes 21 minutes in my oven may take 20 or 23 in yours. I always recommend keeping an oven thermometer inside your oven (2 if it’s a large oven) so you can confirm the interior is at the right temperature. They’re very cheap.

Variations
You can top this cake with buttercream if you prefer or try this chocolate fudge frosting for a chocolate vanilla combo.
If you don’t like sprinkles, just use a vegetable peeler along the side of a chocolate bar to create chocolate shavings.
Storage
This cake is best on the day it’s made. Depending on the type of sprinkles you use, the colour may ‘bleed’ in to the white icing as the days go on.
It will start to stale after 2 days so eat it up as quick as you can.
This vanilla tray bake cake does freeze well too. You can freeze it whole – just wrap the whole tin 2-3 times in plastic wrap, making sure it’s airtight. You can also slice it up, then freeze the slices in an airtight container. It will thaw in 30-60 minutes depending on if it’s sliced or whole.

More cake recipes you’ll love
- Fairy bread lamingtons
- Jam and coconut sponge
- Lemon Ricotta Cake
- Fluffy Vanilla Cake
- Fluffy Lemon Vanilla Butter Cake
- Lemon Poke Cake
- Confetti cupcakes
- Passionfruit sponge cake
If you try this vanilla tray bake recipe, please take a moment to leave a rating and comment below. I love hearing from you, and it helps other readers too!
Hungry for more? Subscribe to the newsletter for free recipes straight to your inbox. Also, follow along on Facebook, Pinterest and Instagram.
Ingredients
FOR THE SPONGE
- 225 g plain (all-purp) flour (1 ¾ cups / 8oz)
- 2 teaspoons baking powder
- 225 g unsalted butter, softened (1 cup / 2 sticks / 8oz)
- 250 g granulated sugar (1 ¼ cups / 8.8oz)
- 4 large eggs
- ¼ cup milk
- 3 teaspoons vanilla extract
FOR THE ICING
- 2 cups icing (powdered / confectioners) sugar (163g / 5.7oz)
- 8 teaspoons water
- 2 tablespoons sprinkles
For best results, always weigh ingredients where a weight is provided
Instructions
- FOR THE SPONGE: Preheat your oven to 180C / 350F / 160C fan forced and line a 9×13 baking pan (or lamington pan) with baking paper.
- Combine the flour and baking powder in a medium bowl and whisk well to disperse and aerate. Set aside.
- In a large bowl, using an electric hand mixer (or the bowl of a stand mixer with paddle attachment) beat together the butter and sugar until pale and creamy. Scrape the sides and bottom of bowl a couple of times during.
- Add the eggs, one at at time, beating on low each time until just combined. Scrape around the bowl as necessary. It may look a little split at this point but don't worry – the flour will bring it together smoothly.
- Add the milk and vanilla and gently mix through.
- Swap to a spatula and gently mix through ⅓ of the flour mixture at a time until it is all just combined. Careful not to overmix.
- Tip into the tin and gently spread out into a thin layer, then bake for 20-22 minutes or until a toothpick inserted comes out with a crumb or two attached.
- Let it cool completely before glazing.
- To turn it out, place a wire rack on top and flip the whole thing over. Remove the baking paper, the place another rack on top of the cake and flip again to get it back up the right way.
- FOR THE ICING: Mix together the icing sugar and half the water. Slowly add more water until it gets to the desired consistency, then pour it over the cooled cake.
- Please take a moment to rate this recipe. I really appreciate it and it helps me create more recipes.
Notes
- All ovens vary – always test for doneness 3-5 minutes before the recipe suggests
- For best results, you should always weigh ingredients like flour and sugar. Kitchen scales are relatively cheap but if you can’t weigh the ingredients, use the spoon and level method (don’t scoop).
- Icing consistency: Add more icing sugar to thicken or more water to loosen, but don’t make it too runny or it will run straight off the cake.
This post may contain affiliate links that earn me a small commission for my referral, at no extra cost to you. Thank you for supporting Sugar Salt Magic.
57 Comments on “Vanilla Tray Bake”
Super tasty recipe!
I also had the same issue as others with the bake time and here’s what I found:
First time I followed the recipe exactly but changed the granulated sugar to caster because I had suspicions this is an American recipe due to the milk being in cups (please let me know if I’m right?!). I baked for 32 minutes. The middle was JUST done.
The mix was very loose and the cake didn’t rise evenly – shallow around the edges. It wasn’t terrible but not perfect. Tasted beautiful.
Next try: followed recipe but with caster sugar again and this time I used 2 large eggs and 2 medium eggs (UK sizing) and made sure the butter was really warm. The mix came together a lot better and was thicker in consistency. It baked more evenly and rose more.
I’m going to try a third one (I need 3 layers) with 4 medium eggs (UK) and will see how it turns out!
Love the science of baking.
Please let me know if the recipe is US or UK as egg sizes are different and could be the reason for some people not getting the desired results!
Thank you for the recipe, it really is easy and delicious!
Hi KK. This is an Australian based recipe. Eggs are different slightly the world over but I find this recipe works both with large (50g-58.2g) and extra-large eggs (58.3g-66.6g) here in Aus. Egg sizes, even within a set size name (like large, extra-large, jumbo) all vary in size too. In the UK, they tend to be a bit larger within each size grouping than the US or Aus.
Delicious cake! But I also had to leave it an extra 10 mins in oven to be perfectly cooked!
So happy you love it, Sidrah.
If I swap out all purpose flour for self-raising, should I add any additional baking powder or baking soda?
Hi there. Leave out the plain flour and baking powder if you use self raising.
Definitely needs longer than 22 mins! Nice otherwise though
Possibly your tin was just a little smaller?
I didn’t add the icing, but the cake itself is delicious 😋.
Only small issue I had was the baking time. Had to bake another 10 minutes but otherwise nothing bad to say!
Wow, an extra 10 minutes seems lengthy. Do you keep an oven thermometer inside your oven? It might be helpful to check it. So happy you love it though.
Hi I was just wondering if this would fit in an 11inch foil pan, that can hold up to 1litre?
Hi Sherie. I’m sure it would still work fine but may need a little longer to bake through the centre as the batter will be deeper. Also, the edges may get a little browner since foil is a little thinner – this is just a guess though as I haven’t tried it.
it is really good and i use it all the time ten out of ten definitely recommend this to anyone who is trying to make something easy and tastes good
So happy you love it, Idris. Thanks so much for dropping back to review 🙂
A lovely light sponge.
So happy you love it, Morag 🙂
Love this cake, I make it often
So happy you love it, Fatma.
its in the oven now hope it turns out good, it was really easy to follow and as a beginner baker i really enjoyed this one
Only thing I can fault is that I couldn’t find the oven temperature that it needed to be on took me a while but other than that all good
Hello Lisa. The oven temp is in the very first step in the recipe card but I’m glad you enjoyed the cake 🙂
Used it and it is just amazing, will definitely recommend
I’m so happy you love it, Layla. Truly appreciate you dropping back to leave a review.
Tried this on a cold winters day. My sons asked for more… yummy.
I’m so happy you love it, Jen. Thanks so much for dropping back to leave a review.
Absolute delicious bouncy cake 🙂 have made a few now for birthday cakes and LOVE IT!! Simple but delicious 😋 Thank you
I’m so happy you love it, Lisa.
Hi Anne, it sounds like you overmixed this or you’ve not measured out the ingredients properly. Did you weigh the flour? It makes a big difference over scooping it. It definitely should not take longer than 22 minutes to bake either so there’s a problem in the way you’ve combined or mixed the batter.
Fantastic sponge
So happy you love it, Jennifer.
Fantastic moist light sponge my grandkids love it
This makes my day, Jennifer. I’m so happy you all love it.
Easy to make, quick to make. The cake is always light, airy and moist. Not too much sugar either. Love it.
I’m so happy you love it, Barnra. Truly appreciate you coming back to leave a review 🙂
Made these cakes for the grandchildren. They were so easy and looked just like the picture. Definitely do them again
Hello Dawn. I’m so happy you love and the grandkids love them 🙂
This recipe made a delicious cake but sadly the middle sank. I think I may have over mixed it.
Hello Catherine. Yes, overmixing is likely if it sunk in the middle – it normally stays nice and risen.
My go to sponge cake recipe
I’m so happy to hear this, Nohaa. Thanks for leaving a review 🙂
great
So happy you love it, Karen
I just used your recipe for a cake I had to make and it’s the best cake I have ever made. Absolutely love your recipe!
So happy you love it, Akosu. Thanks so much for trying my recipe.
I just made this today following this recipe and I think it has turned out lovely – very tasty and moist! It did need a little longer in the oven for me, an extra 5 mins or so, but my oven is a bit weird with times and seems to always either over or undercook things no matter how closely I follow cooking times!
So happy you love it, Celeste. Thanks for trying my recipe 🙂
Great recipe worked perfectly, tried many tray bakes in the past always used Mary Berry but prefer your recipe, many thanks.
Oh wow! Well I do feel very honoured you like my recipe better than Marys. I truly appreciate you trying it and stopping to leave a note 🙂
Really really love this recipe! First time baking a sheet cake/tray bake sponge & it is the fluffiest & lightest sponge! Hopefully the photos do it justice!
Didn’t find the recipe confusing, the mix didn’t need more flour & it baked perfectly at 160°C for 22 mins in a Hotpoint oven!
Thank you, this will definitely be my go to!
Ps: will it bake just as well in a 7″ round tin do you think?
So happy you love it, CK. I think all the batter might be a bit much for a 7″ tin but maybe in two of them. It may need slightly longer to bake as they’ll be a touch deeper as well.
Love this recipe its so moreish. Sponge is light and fluffy – icing is a hit with the kids.
So happy you love it! Thanks for making my recipe 🙂
Hi Velvet. Are you sure you have it set to 160 celsius, fan? It’s impossible that it would need another 20 minutes if your oven is correct. Was the oven preheated? Did you use the right size pan? Have you increased the batter quantity?
I made this it’s yummy, and easy to make. I like it with butter icing
So happy you love it, Nova.
This recipe does not use enough flour and it hardly fills the bottom of a 9×13 tray. A batter for cake should at least come half way up the container that you use to bake it in and this one doesn’t. I would be curious to hear from someone who has had success with this recipe.
Definitely don’t add flour, you’ll dry it out. There is no rule about how far the batter should come up the pan, though. I have made this cake many times, successfully every time. This cake turns out about 1 inch or so thick and is then cut into small squares. I appreciate your comment as I’ve made a note in the recipe card so other readers don’t get confused about the amount of batter.