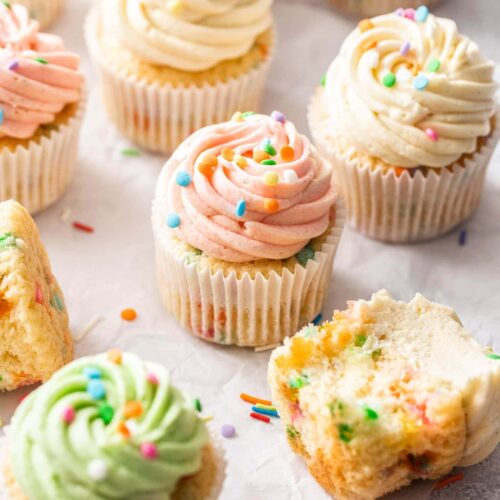
Whether you call them confetti cupcakes, funfetti cupcakes or even sprinkles cupcakes, you’re going to love these.
- A perfectly moist and fluffy texture, this vanilla cupcake is simple to make.
- The sprinkles add a little sweetness and a little crunch too.
- The creamiest, silky smooth vanilla buttercream frosting.
- So much fun to make and you can customise them to suit the occasion (choose the birthday persons favourite colour, or red white and green for Christmas).
Want more fun cupcakes? Try these Oreo buttercream cupcakes or try these elegant Vanilla bean cupcakes.

Table of contents
Never Miss a Recipe!
Get the latest recipes straight to your inbox!
Ingredients list
Who knew you could make perfect homemade funfetti cupcakes, frosting and all, from 10 simple ingredients.

Detailed quantities and instructions in the recipe card below.
- Flour: The cupcakes are made with plain flour / all-purpose flour.
- Sugar: You only need one sugar – caster sugar (aka superfine sugar). This is finer than granulated sugar. It is not powdered sugar.
- Milk: Just everyday whole milk is perfect.
- Butter: Unsalted butter = moisture + flavour.
- Oil: A little neutral flavoured vegetable oil adds moisture and tenderness.
- Eggs: I use large free-range eggs.
- Vanilla: Use pure vanilla extract for the best, natural flavour. I use a vanilla bean paste that’s lovely.
- Baking powder: Make sure to use baking powder, not baking soda.
- Salt: Always add just a little salt to your desserts. It intensifies flavours.
- Sprinkles: I use confetti sprinkles (mini round dots) but feel free to use jimmies or whatever rainbow sprinkles you can get your hands on.
How to make confetti cupcakes (step-by-step)

Detailed quantities and instructions in the recipe card below.
- Creaming the butter and sugar: Start by creaming together the butter, sugar and oil until nice and creamy and lightened (photo 1).
- Eggs and flavour: Add the eggs, one at a time, beating well after each, followed by the vanilla.
- Alternating flour and milk: Now you’ll want to alternate between the flour mixture (photo 2) and milk (photo 3) until it’s all incorporated. One third of the flour, followed by half of the milk and so on, 3 more times until it’s all mixed in.
- Add the sprinkles: Now, add the sprinkles (photo 4) and just fold them in gently.
- Portion and bake: I use a large cookie scoop / medium ice cream scoop to fill the cupcake liners to about ⅔ full (no more or they’ll overflow) (photo 5). Bake for anywhere between 18-24 minutes (see below tips section for variables and how to check they’re done).
- Let them cool on a wire cooling rack before frosting.
Cupcake tips and tricks
- Room temperature ingredients: Make sure the butter is softened (just to the point you can make a dent in it with your finger without pressing too hard) and the eggs and milk are at room temperature. This helps everything blend together nicely.
- Scrape down the sides: When creaming the butter and sugar and later when adding the eggs, it’s so important to scrape down the sides of the bowl to ensure everything combines evenly.
- Don’t overmix: After adding the flour, overmixing can cause gluten to form and hence dense or tough cupcakes so always just stir as much as required to incorporate the flour – just.
- Alternating flour and milk: The purpose behind alternating with ⅓ dry ingredients followed by ½ the milk etc is to make sure everything gets fully incorporated without overmixing.
- Baking time: The baking time depends on a number of things. First of all, all ovens vary. Secondly, whether you’re using a metal muffin tin or silicone muffin pans like I am here. Thirdly, how large your cupcake cases are. Muffin pans and cupcake cases all come in slightly varying sizes so the amount of batter will change the time they take to cook.
- Testing for doneness: Cupcakes are cooked when a toothpick inserted comes out with just a crumb or two attached.
The silky smooth buttercream frosting
The why
Known as ermine frosting or flour buttercream or boiled milk buttercream, ermine frosting is a weakness of mine. The ingredients list (including flour, milk and granulated sugar) and technique sounds bizarre but, I promise, it’s those exact things that make this buttercream so incredibly smooth.
There is no icing sugar / powdered sugar in this frosting so no chance of that grittiness you come to expect from a basic buttercream. The granulated sugar (again, I promise) dissolves completely to give a smooth consistency.
The flour (the flavour of which is cooked out) adds structure to the buttercream making it perfectly pipeable and that structure means you need less sugar, resulting in a buttercream that is not sickly sweet either.
The how

Detailed quantities and instructions in the recipe card below.
Making ermine has only one extra step than making regular buttercream but it’s definitely worth it.
- Cook the milk and flour: In a medium saucepan, over low to medium heat, mix then cook the milk, flour and half the sugar. Make sure to whisk gently but continuously so that the mixture doesn’t get lumpy. Once it’s thick like pudding (photo 6), remove it from the heat. Tip it into a wide bowl (photo 7) (so it cools quickly) and cover with plastic wrap to the surface.
- Cream butter and sugar: Once the “pudding mixture” is room temperature, beat together the butter and remaining sugar until lightened and creamy.
- Add the pudding: Add the pudding mixture a dessert spoonful at a time (photo 8), letting each beat through completely before adding the next. Beat this for 5-6 minutes until creamy and smooth.
- Add flavour: Add vanilla extract and a pinch of salt (photo 9) and beat it through.
Ermine frosting – FAQs and troubleshooting
- My buttercream is splitting! The one downside to ermine frosting is that at some point it WILL have the appearance that it is splitting. It’s ok. Just keep on beating until it becomes smooth.
- Can ermine be made ahead: You can store ermine in the fridge overnight, however before piping, you’ll need to let it come to room temperature then beat until smooth again.
- Can I colour ermine frosting? You can colour. Once it’s fully made, just add a couple of drops of gel food colouring or powdered and beat it through.
- Can I flavour ermine buttercream? Yes, you can. Try my orange ermine or raspberry ermine. You can also add flavouring extracts like peppermint, almond or other flavours, just a teaspoon or so at a time to get the desired flavour. Freeze dried fruit powders are also a great way to add flavour.
- If you don’t have caster sugar, which I use because it dissolves quicker, pulse white granulated sugar in your blender or food processor to make it fine (not powdered).

Yield and storage
This recipe makes 12 confetti cupcakes in my silicone pans but the yield will depend on the size of your pan and cupcake liners. The important thing is to fill your paper cases to ⅔ full. This will give you enough batter for them to rise to the top and dome without spilling over.
These cupcakes keep fine, in an airtight container, at room temperature (18C-22C / 65F-72F) for 2-3 days. If they need to keep longer, store them in the fridge and let them come to room temperature before eating. In the fridge, they’ll keep 4-5 days.

More recipes you’ll love
- Fairy bread lamingtons
- Funfetti Pancakes
- Chocolate doughnut cupcakes
- Passionfruit coconut cupcakes
- Vanilla cupcakes with strawberry buttercream
- Lamington cupcakes with whipped vanilla buttercream
Did you try this confetti cupcakes recipe?
Leaving a rating and comment below the recipe is so helpful!
Hungry for more? Subscribe to the newsletter for free recipes straight to your inbox. Also, follow along on Facebook, Pinterest and Instagram.

Ingredients
FOR THE CUPCAKES
- 195 g plain flour (all-purp flour) (1 ½ cups / 6.9oz)
- 1 teaspoon baking powder
- ½ teaspoon table salt
- 57 g unsalted butter, softened (¼ cup / ½ stick)
- ¼ cup neutral flavoured vegetable oil (60ml)
- 200 g caster sugar (superfine sugar) (1 cup / 7oz)
- 2 large eggs, room temp
- 2 teaspoons pure vanilla extract
- ½ cup whole milk, room temp (125ml)
- ⅓ cup confetti sprinkles
THE CREAMY VANILLA FROSTING
- 1 cup caster sugar (superfine sugar) (200g / 7oz)
- 1 cup whole milk (250ml)
- ¼ cup plain flour (all purp flour) (33g / 1.2oz)
- 226 g unsalted butter, softened (1 cup / 2 sticks)
- 3 teaspoons pure vanilla extract
- Pinch of salt
For best results, always weigh ingredients where a weight is provided
Equipment
- Regular muffin pan or silicone muffin pan
- paper cupcake cases
- Stand mixer with paddle attachment (or handheld electric beater)
- Balloon whisk and silicone spatula for mixing
- Large cookie scoop / medium ice cream scoop
- Piping bag and large star piping tip
Instructions
- FOR THE CUPCAKES: Preheat the oven to 180C / 350F / 160C fan. Line a muffin pan with cupcake cases.
- In a medium bowl, sift then whisk together the flour, baking powder and salt. Set aside.
- In a large bowl or the bowl of a stand mixer (with paddle attachment), beat the butter, oil and sugar until lightened and fluffy (2-3 minutes).
- Add the eggs, one at a time, beating until smooth – scrape down the sides of the bowl from time to time.
- Beat in the vanilla.
- Add one third of the flour mixture, carefully folding through with a spatula until just combined. Now add half the milk and stir in. Repeat 3 more times – flour, milk, flour – making sure to mix carefully each time and only just until combined.
- Tip the batter into your cupcake cases ⅔ full, then bake for 18-24 minutes (notes on baking time).
- Let them cool in the tin for 5 minutes then transfer to a wire rack to cool completely before topping with frosting.
- CREAMY VANILLA FROSTING: You can make the frosting base immediately after putting the cupcakes in the oven, then let it cool to room temperature before turning it into the frosting.
- In a small saucepan over low-medium heat, whisk together the milk, half of the sugar and the flour. Continue to heat and whisk gently but regularly for another 3-4 minutes until you have a very thick paste (like thick pudding).
- Transfer it to a plate, spread it out to about 1cm thick, then cover it with plastic wrap pressing the plastic wrap to the surface. Let it cool to room temperature before using (you can speed this up in the fridge but make sure it’s not cold when you use it).
- In a standmixer with paddle attachment, beat the butter and remaining sugar for about 5 minutes on medium-high speed or until very light and creamy – scrape down the sides of the bowl every so often.
- Now add the milk paste mixture a dessert spoonful at a time, beating on low-medium speed for about 30 seconds between each. Again, scrape down the sides often.
- Now beat for a good 5-6 minutes on medium-high, until it looks creamy, thick and smooth. If it looks like it’s splitting, just keep beating, it will come together.
- Add the vanilla and salt and beat for 20-30 seconds to combine.
- Transfer the buttercream to a piping bag with a large star tip and pipe onto your cupcakes. Feel free to colour half or two thirds of the buttercream like I have here.
- Please take a moment to leave a comment & rating. It's appreciated and so helpful.
Notes
- USE SCALES: For best results, you should always weigh ingredients like flour and sugar. Kitchen scales are relatively cheap but if you can’t weigh the ingredients, use the spoon and level method (don’t scoop).
- BAKING TIME: The baking time depends on a number of things. First of all, all ovens vary. Secondly, whether you’re using a metal muffin tin or silicone muffin pans like I am here. Thirdly, how large your cupcake cases are. Muffin pans and cupcake cases all come in slightly varying sizes so the amount of batter will change the time they take to cook.
- TESTING FOR DONENESS: Cupcakes are done when a toothpick inserted into the middle comes out with a crumb or two attached.
This post may contain affiliate links that earn me a small commission for my referral, at no extra cost to you. Thank you for supporting Sugar Salt Magic.
2 Comments on “Confetti Cupcakes”
10/10! Made these with a little help from my daughter (7yrs old and her friend). They turned out perfect – simply delicious and one to keep.
sx
So happy to hear this, Sophie. Truly appreciate you trying my recipe 🙂