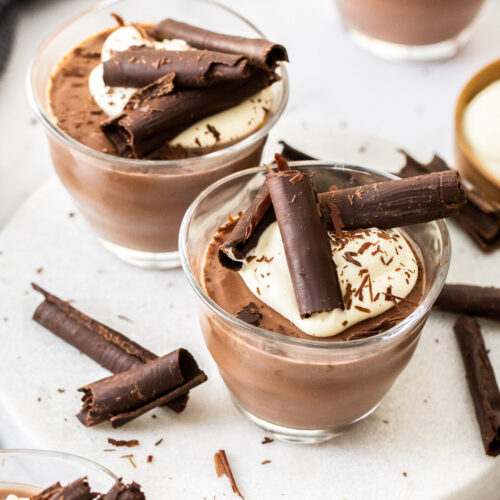
Easy chocolate pots are a no-bake chocolate pot de creme. Rich chocolate in the form of smooth eggless custard, it’s melt-in-your-mouth good. Incredibly easy to make, this recipe just requires ingredients to be heated together in a saucepan until it thickens to a glossy, dark chocolate pudding.
- 5 minutes of actual effort
- 6 ingredients
- Super simple dinner party dessert
- A make-ahead dessert
- No eggs, no baking and gluten-free too.
This recipe makes 4 little glasses of pudding, so it would also be great for a Valentine’s Day indulgence too. One now, one for later or tomorrow.
Try my classic chocolate creme brulee or these chocolate fondants. Both are great for making ahead and entertaining too.
This recipe was first published here on April 23, 2020 and has been updated with new images and information.

Table of contents
Never Miss a Recipe!
Get the latest recipes straight to your inbox!
What is chocolate pudding
Since chocolate pudding means different things in different parts of the world, I thought I’d explain further.
An American-style chocolate pudding is a creamy custard-like dessert, however, in Australia and UK and possibly other places it’s a hot cake-like dessert with its own sauce also known as self-saucing pudding. You can check out my chocolate self saucing pudding here.
Right now, we’re focused on this luscious custardy version. With a soft, creamy texture, these are like French chocolate pots de crème without baking in the oven. What are pots de crème? They’re essentially a crème brulee (French baked custard) without the crispy sugar topping. Try my salted caramel pots de crème.
Ingredients you’ll need
Just 6 ingredients is all you need for these creamy chocolate pots.

Detailed quantities and instructions in the recipe card below.
- Dark chocolate: Dark chocolate or bitter-sweet chocolate is best here – with a 70% cocoa content. You can use a lower cocoa content chocolate like 50% (semi-sweet) but milk chocolate will be too sweet. I find a bar of good quality eating chocolate works better than chocolate chips. I like Lindt smooth 70%.
- Cornflour: Cornflour (known as cornstarch in the US) is a thickening agent. It thickens the custard up without affecting the creamy texture.
- Sugar: You just need white granulated sugar for this recipe.
- Milk: I use whole dairy milk but you can use milk alternatives too like coconut milk, almond milk or oat milk. Stick to full fat versions or the custard may split. Using milk instead of heavy cream makes this a lighter indulgence.
- Butter: Just a little unsalted butter adds both flavour and silkiness.
- Vanilla: Use a pure vanilla extract for the best flavour.
How to make chocolate pudding

Detailed quantities and instructions in the recipe card below.
- Just add dark chocolate, cornflour / cornstarch, white sugar and milk to a saucepan and melt them together over low-medium heat.
- Cook until the chocolate mixture gets thick and starts to look almost bouncy.
- Stir in butter and vanilla until fully incorporated then pour it into serving dishes (ramekins or small glasses work well).
- Let them set for 3-4 hours before serving.
With no tempering eggs and no baking, these easy chocolate pots are incredibly quick to make. Now you just need to be patient while they set.
Important tips
- Stir constantly, so that it doesn’t catch on the bottom of the pan
- Heat it over fairly low heat so you don’t burn the chocolate. If you heat it too high, the chocolate may burn and become bitter.

Variations
You can add flavorings to your chocolate pots too. A little orange extract or orange zest will give that classic choc-orange flavour. Or try some peppermint extract for a choc-mint vibe. Start with ½ teaspoon of extract then taste before adding more.
How to serve chocolate pots
Serve them in little glasses with a dollop of cream on top and some fresh raspberries to cut through the richness. I served these ones with some homemade chocolate curls.
You can use any serving dish you like – coffee glasses, wine glasses, pretty teacups, mini preserving jars (these 220ml weck jars are my faves), ramekins – anything really.
Store these chocolate pots in the fridge, covered with plastic wrap for 4-5 days. You can make them ahead of time – 1 or 2 days is best so they’re at their freshest. Top them with whipped cream just as you serve them up.
Whether you want an easy chocolate dessert for the family or a luxurious treat for a dinner party or get together, these easy chocolate pots will definitely elicit the oohs and aaahs you’re after. It’s totally simple and you’ll be a hero to all involved.

Did you try this easy chocolate pots recipe?
Leaving a rating and comment below the recipe is so helpful!
Hungry for more? Subscribe to the newsletter for free recipes straight to your inbox. Also, follow along on Facebook, Pinterest and Instagram.

Ingredients
- 150 g dark chocolate (70% cocoa), roughly chopped (I like the Lindt 70% smooth blend)
- 2 tablespoons cornflour (cornstarch) (notes 1)
- ⅓ cup white sugar (70g)
- 2 cups whole milk (full cream milk)
- 2 tablespoons unsalted butter (28g / 1oz)
- 1 teaspoon vanilla extract
- whipped cream and chocolate curls to serve
For best results, always weigh ingredients where a weight is provided
Instructions
- Place the chocolate, cornflour, sugar and milk in a medium saucepan over low-medium heat. Whisk the ingredients together until melted and combined.
- Continue to heat, whisking gently but constantly until the mixture thickens. It will turn into a thick pudding / custard and start to look almost bouncy when you move it in the pan.
- Add the butter and vanilla and stir it through until it’s fully incorporated.
- Pour the pudding evenly between 4 serving glasses.
- Cover with plastic wrap pressed to the surface and chill for 3-4 hours before serving.
- Add a little whipped cream and chocolate curls right before serving.
Notes
- I use a standard Australian 20ml tablespoon, equal to 4 teaspoons. Many countries use a 15ml tablespoon so check before starting.
- These chocolate pots are cute served in coffee glasses like these
 .
. - These chocolate pots will keep in the fridge for 4-5 days and can be made ahead 1-2 days. Make sure to keep them covered with plastic wrap.
This post may contain affiliate links that earn me a small commission for my referral, at no extra cost to you. Thank you for supporting Sugar Salt Magic.
20 Comments on “Easy Chocolate Pots”
I cannot thank you enough for this recipe! I’m having all sorts of health issues and sometimes can’t eat but by golly, I can eat this pudding! And it’s easy to make when I’m sick! My nutritionist said I could eat chocolate when I’m in a flare! Added orange extract and it’s yummy too.
I’m so happy you love it, Loralyn and that it can bring you some joy when you aren’t feeling so well. Take care.
hello i need to make about 18 how much ingredients would u use
Hi Julie. It depends if you want to give your guests smaller or bigger serves. If you want to just do 3x the recipe, they’ll make slightly smaller serves or 4x the recipe to give slightly larger serves.
Super,delicious and simple
So happy you love it, Müge.
Very easy and tasty. Thank you for noting the difference in tablespoon measurements; I am in the US and would have used the wrong amount of cornstarch if you’d not mentioned there was a difference. I added a teaspoon of vanilla along with the butter when finished cooking and I split the amount into 6 ramekins. So nice to be able to have an elegant and delicious dessert.
So happy you loved them Julia. Truly appreciate you trying my recipe.
I’m not a dark chocolate fan. Could I use milk chocolate instead?
Hi there, the milk and sugar s in this balance out the dark chocolate flavour. Milk chocolate would turn out extremely sweet and sickly. You could try 50% cocoa solid chocolate though.
Easy,quick and insanely yummy. Love them! I used dark chocolate chips though. Still hit the spot. Thank yooouuuu.
Excellent! So happy you loved it Puleng 🙂
Delicious. Made a batch and ate them for the next 2 nights
Great to hear, thanks so much 🙂
I made this earlier in the week between Zoom meetings using 1% milk because that’s what I had on hand. It was still decadent, delicious and easy. Thanks for your recipes!
Thank you so much Chrystyna. Love your helpful tip on the 1% milk and also that you were able to make it between meetings 🙂
Thank you for this recipe. I was craving chocolate and didn’t want to make an unnecessary trip to the grocery store. I had all the ingredients in my pantry and frig. Also, thank you for the explanation of the Australian tablespoon vs. the one I use here in the US. Since “a pint is a pound the world around”, I wonder how we came to have different measurements when it comes to tablespoons. Wonderful recipe and just what I needed.
Hello Pat, thank you so much. I’m so happy you loved it. A worldwide measurement system would be so much easier but at least there are ways we can work it out so that we can still make recipes using different types.
These are absolutely fantastic, love those pots too!
Thanks so much Trang 🙂