Made with chocolate ripple biscuits, and vanilla whipped cream, this chocolate ripple cake is ridiculously easy to make. Being make ahead, it’s a great cake for entertaining or if you’re asked to bring a dessert along.
Want more easy no-bake desserts? Try this chocolate fridge cake and this eggless raspberry tiramisu.

Why you’ll love it
You’d be hard pressed to think of an easier dessert than this choc ripple cake. A favourite in Australia, especially around Christmas or Australia Day, this no-bake cake is just so simple.
- No-bake – great made year round and you don’t even need to turn on the oven.
- Make ahead – in fact it’s best made the day before.
- Only 4 ingredients – no weird ingredients (can’t get choc ripples? See my variations section).
- Quick to make – from start to finish, this cake takes 15 minutes to make.
- Customisable – decorate with any toppings and flavourings you like. You can make mini versions or even into a wreath shape too.
- Simple – no cake decorating skills necessary. Beginner bakers and even children can make choc ripple cake with ease.
- No special equipment – you can do this with a bowl, whisk and knife for spreading.
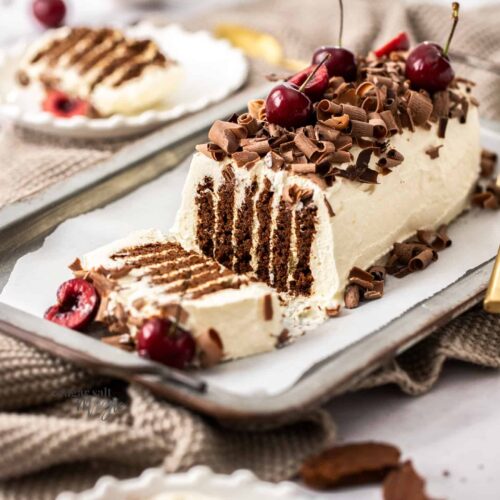
The biscuits (cookies) are coated in a vanilla flavoured whipped cream then the cake chills overnight. While it chills, the cream softens the biscuits a little so they’re easy to cut through.
Don’t worry, the biscuits don’t go soggy – they will have a cake-like texture and the whole thing is moist and luscious.
Ingredients for choc ripple cake
With just 4 basic ingredients, you’re going to love this no-bake dessert.

Detailed quantities and instructions in the recipe card below.
- Arnotts Choc Ripple Biscuits: 1 packet of Arnotts choc ripple biscuits are all you need. While this is a classic in Australia, if you can’t get these, never fear – you’re looking for a crispy (but not hard) biscuit / cookie, chocolate if possible but you could also use ginger snaps for a Christmasy ginger version.
- Whipping cream: Thickened, heavy or whipping cream are perfect. You’re looking for cream that is at least 35% fat content so that it whips up. You must use full fat cream, no light versions.
- Icing sugar: Just a touch of icing sugar (aka powdered sugar) is added for sweetness.
- Vanilla extract: Use pure vanilla extract for this, not essence. Being so few ingredients, you want the absolute best flavour from a natural flavouring not the synthetic flavouring of vanilla essence. See my variations section for other flavouring options.
Tools you’ll need
- Mixing bowl
- Balloon whisk or handheld electric beater
- Spatula or knife for spreading
How to make it
Chocolate ripple cake is beyond simple to make – you don’t even need any cake decorating skills so it’s great for beginner bakers or even children to make.
This cake does require 8 hours of chilling time, so it’s actually best made the day before.

Detailed instructions in the recipe card below.
- Whip the cream: For best results use a cold bowl. Add the cold whipping or thickened cream. Whip using a balloon whisk or an electric handheld beater until soft peaks form. Don’t overwhip the cream or it will take on a grainy texture.
- Add sugar and flavour: Add the sugar and vanilla extract (photo 1) then beat just enough to mix it through.
- Assemble: Spread 2-3 teaspoons of cream onto the back of one biscuit (photo 2). Sandwich with a second biscuit and repeat until you have a stack of 6 biscuits. Spread a layer of cream down the middle of a serving platter, then place the stack of biscuits, sideways onto the cream. Repeat another 3 times (photo 3).
- Cover: Now spread the remaining whipped cream all over the cake, covering it completely (photo 4).
- Chill: The cake needs to chill for a minimum of 8 hours for the biscuits to soften appropriately, but overnight in the fridge is best.
- Decorate: Once chilled, decorate the cake and serve. I love to sprinkle with chocolate curls and cherries but fresh berries like raspberries and strawberries are wonderful.
To make the chocolate curls
I’ve topped this chocolate ripple cake with curls of chocolate and fresh cherries.
To make the chocolate curls, just use a speed peeler or vegetable peeler and, pressing firmly, run it down the side of a block of room temperature chocolate. White and milk chocolate curl best. Dark (50%) chocolate works quite well but darker chocolate will give you more chips, than curls.

Variations
- Peppermint: Add ½ teaspoon of peppermint extract in place of the vanilla. Taste and add a touch more if you like a stronger flavour. Top it with crushed peppermint Aero or Peppermint Crisp bars.
- Caramel: Drizzle over caramel sauce before serving and top with curls of Caramilk chocolate.
- Chocolate: Add 2-3 tablespoons of unsweetened cocoa once the cream is at soft peak stage.
- Ginger snaps: Try ginger snaps (the crisp kind, not the hard kind) for a dessert even more perfect for Christmas.
- Oreos: Oreos will work too but remove the cream from them first. You may need to double up the oreo layers as they are much smaller than choc ripples. Beat the oreo buttercream into the whipped cream.
- Cheesecake: Replace 1 cup of cream with 250g of softened cream cheese and beat them together. The cream cheese must be at room temperature.
- Baileys: Add 2 tablespoons of Baileys Irish cream to the whipped cream.
- Other flavourings – try any from a large range of flavourings. The key to remember is extracts give a more pure flavour than essence. Classic flavours with chocolate are peppermint, orange, almond or coconut. You could also try some funky flavourings like salted caramel or strawberries and cream for a bit of fun.
- Shapes: While the classic version is a log shape, why not make individual chocolate ripple cakes by stacking them 5-6 cookies high and spreading over the cream. Or make it into a chocolate ripple wreath – to get the classic lined look, still stack the cookies in groups of 5, then stack batches of 5 cookies with the sides of the cookies touching, not the fronts or backs.
FAQs
Yes. Choc ripples by Arnott are the classic but if you can’t get them, what you’re after is a crunchy (but not hard) biscuit / cookie. Oreos work but they’re smaller and see my notes in the variations section for how to best use them. Ginger snaps work a treat for a ginger version.
Chocolate ripple cake will keep for 2-3 days, in an airtight container, in the refrigerator.
Chocolate ripple cake does not freeze well as the texture of the cream will change.
PIN IT:
Click to PIN this recipe for later!

If you try this chocolate ripple cake recipe, please take a moment to leave a rating and comment below. I love hearing from you and it helps other readers too! You can also take a photo and tag @sugarsaltmagic on Instagram.
More no-bake dessert recipes you’ll love
- 3 ingredient Oreo mousse
- Mini No-bake Lime Cheesecake
- Chocolate Mousse Tart
- No-bake Chocolate Salted Caramel Tart
- Eggless Easy Chocolate Mousse
Never Miss a Recipe!
Get the latest recipes straight to your inbox!
Ingredients
- 2 cups whipping or thickened cream (full fat), cold
- 2 tablespoons icing (powdered) sugar
- 1 ½ teaspoons vanilla extract
- 24 chocolate ripple biscuits (1 packet)
- Chocolate curls and cherries to decorate
For best results, always weigh ingredients where a weight is provided
Instructions
- Beat the cold cream in a large bowl to soft peaks – careful not to overwhip it or it will become grainy. You want to hold shape but the peaks will fall over.
- Add the sugar and vanilla extract and beat through.
- Spread 2-3 teaspoons of cream onto the back of one biscuit. Sandwich with a second biscuit and repeat until you have a stack of 6 biscuits.
- Spread a little cream onto a serving platter, then place the stack of biscuits, sideways onto the cream. Repeat another 3 times so you have 4 rows of 6 biscuits.
- Cover all over with cream, then let it chill overnight, covered, in the fridge for the biscuits to soften.
- Decorate as desired (I used homemade chocolate curls and fresh cherries) then slice and serve.
Notes
- To make the chocolate curls: Pressing firmly, run a speed peeler down the side of a bar of chocolate. I used milk and 50% dark chocolate.
This post may contain affiliate links that earn me a small commission for my referral, at no extra cost to you. Thank you for supporting Sugar Salt Magic.
4 Comments on “Chocolate Ripple Cake”
So tasty, so easy, its my go-to. Instead of cream though i use pot-set greek yogurt. Its thick, adds a slight tartness, is healthier, works perfectly as a substitute(as long as you dont use runny yogurt) and its PACKED full of flavour. No need to add sugar or other flavours, its delicious as is.
Such a great idea, Rae. Delicious and nutritious!
This looks stunning! I wasn’t familiar with the ripple cookies, so when I saw this cake, I immediately thought you’d baked one of those sumptuous European layered cakes. And I am surprised even more that an easy no-bake dessert can look that elegant and gorgeous. Delicious and versatile!
Thanks so much, Ben.