Why it’s so good!
Made in a food processor in mere minutes, with just 6 ingredients, this chocolate pie crust has it all: simplicity, flavour and texture. Adapted from the pastry base of my mini chocolate tarts, this chocolate pastry differs slightly with the addition of almond meal / almond flour. This adds a certain tenderness to the pie crust and makes it that much more special.
This chocolate pie crust is perfect for using for pies, hand pies and tarts, miniature or regular sized, whether the filling is baked or unbaked so it’s extremely versatile. Make it your go-to chocolate pastry and you won’t be disappointed.
While a chocolate cookie crust may be slightly quicker and often doesn’t require baking, a pastry style pie crust like this is much sturdier and holds it’s shape better without crumbling apart.

Never Miss a Recipe!
Get the latest recipes straight to your inbox!
Ingredients notes
The ingredients for this chocolate pastry dough are very basic, everyday ingredients.

Jump to the recipe for full ingredients and instructions.
Flour: You just need plain flour / all-purpose flour.
Sugar: This recipe requires icing sugar / powdered sugar. You can use granulated but you’ll need to cut it down a bit to about ½ a cup, minus 1 tablespoon.
Cocoa: I just use regular unsweetened cocoa powder but you can also use dutch cocoa powder which has a darker colour and smoother chocolate flavour.
Almond meal: You may know almond meal as almond flour. It’s just finely ground, blanched almonds. It adds tenderness to the pastry. You can leave this out if you prefer, with no other changes, however it will change the resulting texture slightly.
Butter: I use unsalted butter but you can use salted butter too. Your butter must be very cold, so chop it into cubes, then place it in the freezer for 10 minutes before starting if you have time. If not, use cold butter straight from the fridge, not softened.
Egg: Just one large egg. This also needs to be cold.
The only other thing this pastry dough requires to bring it together is 1 teaspoon of cold water or you can use some whole milk.
Optionally, you can add a pinch of salt too, or just use salted butter for salty-sweet crust. A little vanilla extract (½ teaspoon) in the dough is lovely too and actually intensifies the chocolate flavor.
How to make chocolate pie crust
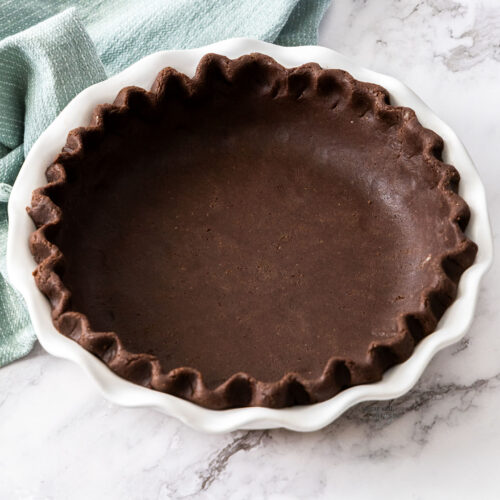
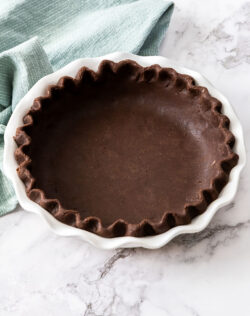
Whether you’re after a chocolate pie crust or chocolate tart crust, the method for making the chocolate pastry dough is the same. Here I’ve formed it into a pie dish with an 8 inch base and roughly 2 inch high sides but you can also use the same dough to make a 9 inch tart crust like I have with this chocolate raspberry tart.
Jump to the recipe for full ingredients and instructions.
1. Blend the dry ingredients then add butter
First, blend together the dry ingredients in a food processor just to combine them. Add cold butter and process until the largest piece is about pea sized.

2. Add egg and water
Now add the egg and water and process until the dough starts forming large clumps. You should still see specks of butter which is great as these will create steam as it bakes and help to make your pie crust flaky.

3. Roll it out
Bring the chocolate pie dough together with your hands gently into a disk. Sandwich it between two sheets of baking paper and roll it out to about 5mm / ⅕ inch. If your dough seems very soft at this point, just place it in the fridge for 5-10 minutes sitting flat.


Don’t over handle the pie crust dough: Firstly, playing with it too much can cause gluten to form, resulting in a tough pastry. Secondly, the warmth from your hands may melt the butter causing your pastry to be dense rather than flaky.
4. Lay it into your pie dish
Peel back the top layer of baking paper and lay the pastry into your pie dish or tart pan. Remove the air pockets in the corners by pulling the edges towards the middle then lowering them back into place – never push from the middle outwards or you’ll make the centre too thin.

5. Fold the edge over
To give you a neat edge, fold the top edge underneath itself (to the dish side) to hide the rough edge and give you a neat thicker top.

6. Flute the edge
This is optional but gives the edge of the pie a pretty look and it isn’t hard to do. Just press with one finger on one side of the edge of dough, between two fingers of your other hand on the other side of the dough.


You could also just crimp the edge with a fork or leave it plain. If leaving it plain, trim it along the edge of the pie dish with a paring knife after it has chilled.
7. Chill the pie crust
Do not skip this step as it helps to set the shape and prevents the pastry from shrinking too much. You need to chill this chocolate pie crust for a minimum of 2 hours or up to 3 days. This is a great thing, because it means you can break down your pie into smaller steps – helpful if you’re very busy.
How to bake your pie crust
This pie crust must be baked but the way you do that will depend on the filling.
If your filling needs to be baked, you will need to par-bake your crust first for a short time without the filling. This means you don’t need to overbake your fillings which often take less time than the pastry does to bake. Par-baking it first also helps to ward off the dreaded soggy bottom.
If your filling does not require baking, you’ll need to bake the pie crust all the way through before adding your filling.
Blind baking the pie crust
Blind baking is the process of baking pastry without a filling.
- Dock the base: Whichever type of filling you have, you’ll need to start by first docking the base; that is, pricking it all over with a fork. This will allow steam to escape rather than making the pastry lift up off the base of the dish.
- Line and fill: Next, line the pastry with baking paper and fill with pastry weights, pie weights or just rice or lentils. I’ve been using the same batch of rice for years and it still works perfectly.
- Bake: Now bake the pastry shell for 15 minutes at 180C/350F.
- Remove the weights and baking paper and set that aside.
- If your filling needs to be baked, just bake the pie crust a further 2 minutes to dry out the top before adding the filling. Now just bake for whatever time the filling needs.
- If your filling is no-bake, bake the pie crust for a further 15 minutes before removing it from the oven and allowing it to cool.

Tips and tricks
If you want flaky pastry, keep it cold! The most important tip here is to keep the dough as cold as possible – that means the butter, egg and water must be cold. In mid-summer, I will often even put the flour in the freezer for 10-20 minutes before I start. All of these little things will help keep the butter cold which will make for a flakier pastry. As it bakes, the little pieces of butter will melt and create steam which creates flaky layers in your pastry.
What to use it for
This chocolate pie crust works well with so many fillings. It can be filled with anything from chocolate ganache to brownie. Try adding a chocolate pudding filling like this chocolate meringue pie. Or make a chocolate cream pie. It’d be lovely filled with chocolate mousse and it’s perfect for a chocolate silk pie too.
Storage
The chocolate pie crust will keep in the fridge for up to 3 days before baking. It can also be frozen before or after baking. To freeze an unbaked pie crust, let it become solid in the freezer first, then remove it from the pie pan (it should slip right out) and transfer it to a sturdy air-tight container for up to 3 months in the freezer.

More recipes you’ll love
⭐⭐⭐⭐⭐
Did you try this chocolate pie crust recipe? Show it some love in the comments below.
Hungry for more? Subscribe to the newsletter for free recipes straight to your inbox. Also, follow along on Facebook, Pinterest and Instagram.
Ingredients
- 195 g plain flour (all-purp flour) (1 ½ cups / 6.9oz)
- 85 g icing sugar (powdered sugar) (3oz / ⅔ cup)
- ¼ cup unsweetened cocoa powder (25g / 1oz)
- ¼ cup almond meal (almond flour) (21g / ¾oz)
- 115 g unsalted butter, cubed and chilled (4oz)
- 1 large egg, cold
- 1 teaspoon cold water
For best results, always weigh ingredients where a weight is provided
Equipment
- 8 or 9 inch pie dish
Instructions
- MAKE THE CHOCOLATE PASTRY DOUGH:Place the flour, icing sugar, almond meal and cocoa in the bowl of a food processor. Process a few seconds to distribute evenly.
- Add the cubed cold butter and blitz until the mixture looks a bit like chocolate crumbs – there may be lentil or pea-sized pieces of butter left here and there and that’s perfect.
- Add the egg and teaspoon of water and just pulse until the mixture starts forming large clumps. Be very careful not to over-process it.
- Turn the dough out onto a clean surface and pull it together into a smooth ball with your hands (making sure not to handle it too much), then flatten slightly.
- ROLL IT OUT:Place the dough between two sheets of baking paper and roll out to about 4-5mm thick (⅙-⅕ inch), turning it often. If you need, you can peel back the paper and re-centre it on the dough again. You need the dough to be a few inches larger than your pie dish as it needs to cover the bottom and up both sides.
- If the dough feels very soft, give it 10 minutes in the fridge to chill. This will make it easier to handle and shape, plus allow it to stay cold.
- Peel off the top layer of paper and carefully but confidently flip it over onto your pie dish. Peel away the other sheet of paper.
- Transfer to an 8 or 9 inch pie dish, and press the sides down into the corners (don’t stretch the centre outwards). If there is air pockets in the corners, just pull the dough away from the sides, then lay it back down allowing it to fall into the corners.
- Trim a little of the overhang to remove large pieces and make it neat and just slightly overhanging the edge all the way round. Fold the top of the overhang over (towards the edge of the dish) all the way round, then use your thumb and fingers to crimp the edge into a scalloped design (optional).
- Chill for 2 hours (or up to 3 days) – don’t skip it.
- The pie crust can now be blind-baked or baked depending on the filling you are using.
- TO BLIND BAKE:Preheat the oven to 180C/350F.
- Dock the pastry with a fork all over the base then lay a sheet of baking paper into the dish covering the pastry completely. Fill it with pie weights or just with rice and bake for 15 minutes.
- Remove the pie weights and paper. If your filling needs to be baked, bake the pie crust just for another 2 minutes. If your filling does not need to be baked, bake the pie crust for a further 15-20 minutes until dry and the edges are firm.
- Please take a moment to leave a comment & rating. It’s appreciated and so helpful.
Notes
- This chocolate pastry will suit an 8 or 9-inch pie dish or pie pan with deep sides or a 9 inch fluted tart pan.
- You can easily double this recipe.
- The chocolate pie crust can be frozen before or after baking for up to 3 months. If freezing before baking, place it into the freezer in the pie dish until solid, then take the pie crust out of the dish and store it in a sturdy container in the freezer. It’s best not to freeze it in the pie dish as ceramic or glass dishes can then crack when going into a hot oven.
- Nutrition details are approximate only – scroll below the recipe to find the full nutritional information.
This post may contain affiliate links that earn me a small commission for my referral, at no extra cost to you. Thank you for supporting Sugar Salt Magic.
2 Comments on “Chocolate Pie Crust”
I am allergic to nuts. How much wheat flour should I use instead of the almond flour? The same weight? Thank you!
Hello Jessica. Just leave it out. The dough will still work without the almond meal, with no other changes.