This perfect all-butter chocolate pie crust takes 10 minutes to make and it's loaded with chocolate flavour. Great for all your favourite pies and hand pies.
Ingredients
- 195 g plain flour (all-purp flour) (1 ½ cups / 6.9oz)
- 85 g icing sugar (powdered sugar) (3oz / ⅔ cup)
- ¼ cup unsweetened cocoa powder (25g / 1oz)
- ¼ cup almond meal (almond flour) (21g / ¾oz)
- 115 g unsalted butter, cubed and chilled (4oz)
- 1 large egg, cold
- 1 teaspoon cold water
For best results, always weigh ingredients where a weight is provided
Equipment
- food processor
- Rolling Pin
- 8 or 9 inch pie dish
Instructions
- MAKE THE CHOCOLATE PASTRY DOUGH:Place the flour, icing sugar, almond meal and cocoa in the bowl of a food processor. Process a few seconds to distribute evenly.
- Add the cubed cold butter and blitz until the mixture looks a bit like chocolate crumbs – there may be lentil or pea-sized pieces of butter left here and there and that’s perfect.
- Add the egg and teaspoon of water and just pulse until the mixture starts forming large clumps. Be very careful not to over-process it.
- Turn the dough out onto a clean surface and pull it together into a smooth ball with your hands (making sure not to handle it too much), then flatten slightly.
- ROLL IT OUT:Place the dough between two sheets of baking paper and roll out to about 4-5mm thick (⅙-⅕ inch), turning it often. If you need, you can peel back the paper and re-centre it on the dough again. You need the dough to be a few inches larger than your pie dish as it needs to cover the bottom and up both sides.
- If the dough feels very soft, give it 10 minutes in the fridge to chill. This will make it easier to handle and shape, plus allow it to stay cold.
- Peel off the top layer of paper and carefully but confidently flip it over onto your pie dish. Peel away the other sheet of paper.
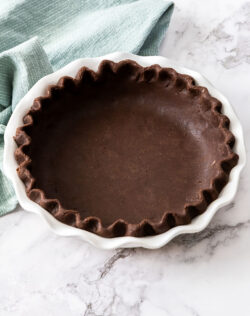
- Transfer to an 8 or 9 inch pie dish, and press the sides down into the corners (don’t stretch the centre outwards). If there is air pockets in the corners, just pull the dough away from the sides, then lay it back down allowing it to fall into the corners.
- Trim a little of the overhang to remove large pieces and make it neat and just slightly overhanging the edge all the way round. Fold the top of the overhang over (towards the edge of the dish) all the way round, then use your thumb and fingers to crimp the edge into a scalloped design (optional).
- Chill for 2 hours (or up to 3 days) – don’t skip it.
- The pie crust can now be blind-baked or baked depending on the filling you are using.
- TO BLIND BAKE:Preheat the oven to 180C/350F.
- Dock the pastry with a fork all over the base then lay a sheet of baking paper into the dish covering the pastry completely. Fill it with pie weights or just with rice and bake for 15 minutes.
- Remove the pie weights and paper. If your filling needs to be baked, bake the pie crust just for another 2 minutes. If your filling does not need to be baked, bake the pie crust for a further 15-20 minutes until dry and the edges are firm.
- Please take a moment to leave a comment & rating. It's appreciated and so helpful.
Notes
- This chocolate pastry will suit an 8 or 9-inch pie dish or pie pan with deep sides or a 9 inch fluted tart pan.
- You can easily double this recipe.
- The chocolate pie crust can be frozen before or after baking for up to 3 months. If freezing before baking, place it into the freezer in the pie dish until solid, then take the pie crust out of the dish and store it in a sturdy container in the freezer. It's best not to freeze it in the pie dish as ceramic or glass dishes can then crack when going into a hot oven.
- Nutrition details are approximate only - scroll below the recipe to find the full nutritional information.
Have you tried this recipe?Don't forget to leave a rating and comment below and let me know how it was! I love hearing from you. Nutrition information is approximate and derived from an online calculator. The brands you use may cause variations.