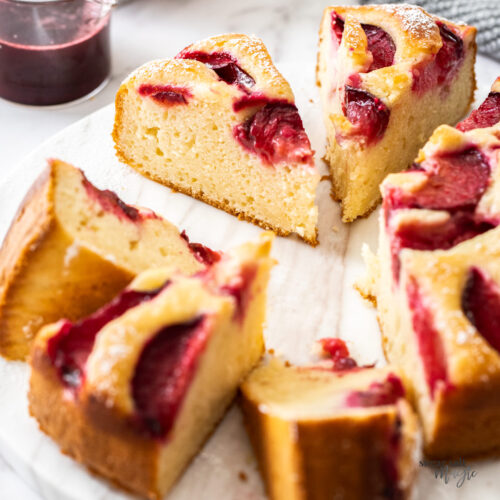
Yogurt plum cake. It’s a super easy batter made in one bowl with a slight tang from yogurt and lemon. It has the most tender texture and stays moist with thanks to oil and yogurt. Of course, that splash of colour across the top from gorgeous fresh plums that get all soft and lovely is yet another reason you need this cake in your life.
If you love a quick cake and just so happen to love a beautiful cake, then this easy plum cake is where it’s at. Of course, I went one step further and added a little drizzle of plum syrup but just serving this with a scoop of vanilla ice cream or even a little cream poured over would turn any day into amazing.
If you love this, you’ll love my strawberry crumb cake too.

Never Miss a Recipe!
Get the latest recipes straight to your inbox!
Ingredients you’ll need
What a way to celebrate plum season – with a light and soft cake topped with them. The plums add a slight sharpness that goes beautifully with the lightly sweet cake. Great for those who don’t like super-sweet desserts and it’s a winner for morning tea or afternoon tea.

Detailed quantities and instructions in the recipe card below.
With all the usual suspects like plain flour (all purpose), sugar, eggs, vanilla and baking powder this homemade plum cake recipe starts off like many.
Then we add a few ingredients that truly make this recipe spectacular. The combination of yogurt (either Greek yogurt or plain yogurt) and a light-flavoured olive oil (or other neutral-flavoured oil) is what both makes the crumb unbelievably tender and keeps the cake moist.
Plums are a must but any type will work (black plums like I’ve used have a stunning colour, though red plums with the golden flesh are beautiful too). I find plums that are slightly firmer will hold their shape best. For that matter, you could make this cake using other stone fruits too, like peaches, necatarines and apricots.
How to make plum cake (step-by-step)
You don’t need a stand mixer to make this delightful cake, and you could technically just make it using a balloon whisk and spatula, though I find an electric beater best.

Detailed quantities and instructions in the recipe card below.
- The plums: Start by cutting plums in half, twist the halves apart gently, then take out the pit/seed. If the pit is in there too tight, just use a melon baller to scoop it out (photo 1). Slice each plum half into 4 pieces.
- The lemon sugar: Start by massaging together lemon zest and sugar (photo 2). Doing this releases the oils in the zest and intensifies the lemon flavour.
- The wet ingredients: Add the eggs and vanilla and use an electric beater to beat for 1 minute (photo 3). Drizzle in the oil slowly while beating (photo 4) then, finally, beat in the yogurt.
- The dry ingredients: Sift over the dry ingredients then beat those until just combined as well.
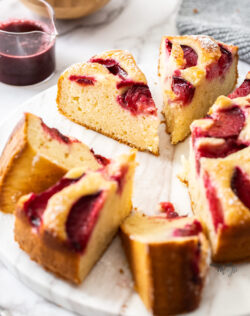
- Assemble & bake: Pour the batter into the cake pan, then arrange the plums around the top (photo 5) in any pattern you like – you can make a ring, like mine, or just randomly dot them all over. Now bake!
Tips and tricks
- Weigh ingredients: Make sure to weigh the ingredients (especially the flour and sugar) for the best results. If you don’t have a kitchen scale, spoon the ingredient into the cup measures before levelling off with the back of a knife. Just don’t scoop with the cup measure straight into the flour.
- Don’t overmix: While this plum yogurt cake is super simple with an electric mixer, be very careful not to overbeat it once you’ve added the flour. This can cause the cake to become dense and tough since the more you beat, the more gluten forms.
- All ovens vary: The exact baking time will depend on your oven. Many oven thermostats are out of whack and don’t actually match the temperature you’ve set so I always recommend using a separate oven thermometer inside your oven. Also, baking time will vary if you’re baking more than one thing at a time.
- Don’t overbake: If you overbake, you’ll end up with dry cake so just bake until the top’s golden and a toothpick comes out with just a crumb or two attached.

Frequently asked questions
Adding yogurt to a cake has an amazing effect of keeping the cake moist and also making the crumb tender. On top of that, it adds a lovely tang to the flavour.
Either Greek yogurt or plain yogurt is best for baking. These will impart tang and the moisture and tenderising properties without flavouring it. You can use a flavoured yogurt in your baking but make sure it complements the bake. It’s best to use full fat yogurt for the maximum flavour.
Any plum variety will work in this recipe (as will other stone fruits, like peaches, nectarines and apricots). A firm plum is best as it will hold it’s shape in the cake.
There is no need to peel the plums. The skin softens as it bakes making the cake easy to cut into.
You can swap the flour and baking powder in this recipe for the same amount of self raising flour. It may not rise quite as high as the ratio of baking powder to flour in self-rising flour is slightly less than my recipe.
Storage and freezing
This cake is best kept in a cool place, like the pantry, at room temperature for around 3 days. The flavour actually improves on day 2 and it will remain moist the whole time. Don’t chill it in the fridge.
While best fresh, it can be frozen for up to 3 months. If freezing, cut it into slices first, so you can thaw just as much as you need at a time.

Did you try this moist plum cake recipe?
Leaving a rating and comment below the recipe is so helpful!
Hungry for more? Subscribe to the newsletter for free recipes straight to your inbox. Also, follow along on Facebook, Pinterest and Instagram.
Ingredients
- 3-4 medium plums
- ¾ cup white granulated sugar (150g / 5.3oz)
- Zest of one medium lemon
- 3 large eggs, room temperature
- 1 teaspoon vanilla extract
- ½ cup light flavoured olive oil (or other neutral flavoured oil)
- 1 cup whole plain yogurt (or Greek yoghurt), room temperature
- 225 g plain flour (all-purp flour) (1 ¾ cups / 7.9oz)
- 2 teaspoons baking powder
- ¼ teaspoon salt
For best results, always weigh ingredients where a weight is provided
Equipment
- electric mixer
- Large mixing bowl
- 8 inch spring form pan
Instructions
- Preheat the oven to 180C (160C fan) / 350F. Grease and line an 8 inch springform tin with baking paper.
- Slice the plums in half then remove the pit (if it’s tight, you can use a melon baller to cut it out). Slice each plum half into 4 wedges. Set aside.
- In a large bowl, massage the lemon zest into the sugar.
- Add the eggs and vanilla and beat for 1 minute.
- With the beater on low, drizzle in the oil then add the yoghurt and beat that in too.
- Finally, sift over dry ingredients (flour, baking powder and salt) and beat on low until just combined. 6-8 seconds.
- Pour the cake batter into the prepared pan. Arrange the sliced plums in a circle on top.
- Bake for 50-60 minutes until a toothpick comes out with just a crumb or two attached, but not wet batter.
- Let it cool in the tin for 5 minutes, carefully transfer to a wire rack.
- Please take a moment to leave a comment & rating. It's appreciated and so helpful.
Notes
- Plum syrup: To make the syrup I’ve used here, combine 5 plums (cut in half), 1 tablespoon brown sugar, 1 teaspoon vanilla and 1/4 teaspoon of cinnamon on a baking tray. Mix well, then bake for 30 minutes at 180C (160C fan) / 350F. Strain off the syrup that’s created and you can discard the mushy fruit.
- Which yogurt? Use full fat yogurt for the best flavour. Greek or plain yogurt are best.
- Weigh ingredients: I always recommend weighing ingredients like flour and sugar. Weighing will give you the most accurate mixture and the best result. Kitchen scales are cheap and last a lifetime. Plus, less cups to wash up!
- All ovens vary: What takes 55 minutes in my oven may take 50 or 60 in yours.
Baking pan: If using a 9-inch cake pan, it will take slightly less time to bake.
More Information
These links will take you up to the post – just scroll down to get back to the recipe card.MORE CAKE RECIPES!
This post may contain affiliate links that earn me a small commission for my referral, at no extra cost to you. Thank you for supporting Sugar Salt Magic.
2 Comments on “Yogurt Plum Cake”
Thank you!!!
You’re welcome