

I just love Wagon Wheels and eating these Mini Wagon Wheels reminds of my childhood. They were a little bit bigger back then however they do seem to be shrinking ….. or is it just because I’m bigger?
For a more simple cookie recipe, try these Chocolate Marshmallow Cookies too.

Why you’ll love these Mini Wagon Wheels
Because marshmallow, jam, biscuit / cookie and chocolate are like family and family is good.
DIFFICULTY – Easy. The biscuit is just a simple sugar cookie recipe. The marshmallows and jam are store bought. You put them together and then dunk it in chocolate.
MAKE AHEAD – Yes. These can be made days ahead of serving and kept in the fridge.
STORAGE – These will keep well in the fridge in an airtight container or zip lock bag for 7-10 days.
TOOLS USED IN THIS RECIPE
- A basic cookie tray
- A wire cooling rack to cool them on
- A small round fluted cookie cutter
- A small offset spatula helps with the chocolate coating
So, it’s fair to say I love Wagon Wheels but I was recently watching a show on the cooking channel where the lady wondered why anyone would keep Wagon Wheels in the house. What the?? Has she tasted them? Well I’m guessing you’re here because you like Wagon Wheels too, so we can be friends ?

I’ve decided that each year around this time (aka the lead up to Australia Day) I’m going to make a new version of Wagon Wheels. Why? I’m glad you asked
- They’re yum and they deserve as many interpretations as I can come up with
- They’re kind of Australian (some Aussie guy invented them in the UK – so I’m claiming them for Aussies everywhere)
My first Wagon Wheel foray was this Giant Homemade Wagon Wheel Biscuit. So amazing. Well these Mini Wagon Wheels are basically the same thing in miniature form. Because they’re so similar, this is not technically my Wagon Wheel post for 2019, but instead a brief introduction into what’s coming next week. Keep your eyes peeled for my Wagon Wheel Cake that was a bunch of fun to create.
How to make Mini Wagon Wheels
Anyhoo, let’s get to making these little babies.
You’ll start by making a basic sugar cookie dough. I love this recipe so so much that I use it even though it makes 36 of these little cookies. I haven’t tried cutting it down, mainly due to the fact that it takes 1 egg (not so easy to cut in half). One day I’ll create a small batch recipe but for now you’ll either have to make 36 cookies, or freeze half of the dough for another recipe, ooooooor if you really want to you could beat the egg, weight it and only add half to half of the rest of the ingredients. Ummm, just make a full batch.


First, beat together the butter and sugar. Add the egg, then the dry ingredients and you’ll be left with a crumbly dough. Pull it all together into a ball.

Roll the dough out (I find it easier to half at a time) and cut out small rounds using a fluted cookie cutter. Bake these for around 7 minutes.
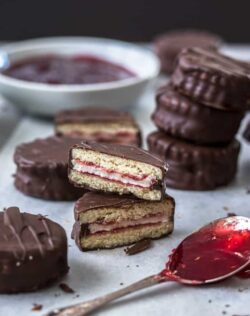
The classic wagon wheel filling


The filling of a wagon wheel is jam and marshmallow, so you’ll spread a little raspberry jam onto each cookie. Now take regular sized marshmallows and roll them out until they’re flat then use the same cookie cutter to cut them to the same size as the cookies. Top 36 cookies with the flattened marshmallows, then top them with the remaining 36 cookies.
At this point, it’s best to put them in the fridge. This not only firms them up a little but also makes them nice and cold, so that when you dip it in the chocolate it sets more quickly.
How to coat the cookies in chocolate
I am by no means a chocolatier and I don’t do tempered chocolate. Regular chocolate (the chocolate that comes in bar form that I enjoy eating) is what I use to melt and coat things.

I have some quick tips to make this process easier.
- Melt more chocolate than you need – it makes the pool of chocolate deeper and easier to dip in. The excess can be reset and kept in the fridge for next time
- Use two standard dinner forks
- drop one biscuit into the chocolate and press it down.
- Now scoop it out with one fork and use a small offset spatula to scrape the excess chocolate off the top, leaving just a thin coating.
- Use a second fork and carefully flip it from the first to the second so that it’s now sitting on the side you smoothed off (this will become the bottom of the biscuit)
- Use your spatula again to smooth off the top and remove excess chocolate, then use the spatula to run around the edge gently to remove the excess from their too.
- Now set the biscuit down on its front edge onto the lined baking tray and pull the fork out to let it drop down. Done
Click here to Pin this recipe for later!

Let the chocolate set, then devour these Mini Wagon Wheels at will.
You just can’t go wrong with these flavours and there’s a reason they’ve been around for so long. Get baking, friends.
More delicious treats you’ll love
- Giant Wagon Wheel Biscuit
- Raspberry Coconut Marshmallow Slice
- Chocolate Marshmallow Brownies
- Wagon Wheel Cake
- Chocolate Marshmallow Cookies
Ingredients
- 113 g (1/2 cup / 1 stick) unsalted butter, softened
- 200 g (1 cup / 7 oz) white sugar
- 1 large egg
- 1 teaspoon vanilla extract
- 295 g (2 1/4 cups / 10.5oz) plain (AP) flour
- ¼ teaspoon salt
- ½ teaspoon baking powder
- 1/2 cup raspberry jam
- 36 regular size marshmallows (not mini or jumbos)
- 300 g (14oz) dark chocolate
For best results, always weigh ingredients where a weight is provided
Instructions
- Preheat the oven to 180C / 350F / 160C fan forced. Line 2 cookie trays with baking paper.
- Roll the marshmallows with a rolling pin until flat and about 3-4 mm thick. You can do these 4-5 at a time. Use the same cookie cutter you'll use for the cookies to cut them to the same size. Set aside.
- Cream together the butter and sugar until pale and fluffy. This will take a few minutes, so while that’s happening, in a separate bowl mix the flour, salt and baking powder until it is all well mixed through. Add the egg and vanilla to the butter / sugar mix and beat until well combined.
- Add the flour mix to the wet mix and beat until just combined. It will start to come together into a dryish, crumbly dough. This is good.
- Pull it together into a ball with your hands, then roll the dough out on a very lightly floured surface to about 4mm thick. Use a 4cm fluted cookie cutter to cut rounds. Sit the rounds on the baking trays at least 1 inch apart. Bake for 7 minutes or until just golden at the edges.
- Spread each biscuit with a little jam, then place one of the marshmallows on top. Press another biscuit down on top. Repeat with the rest of the biscuits.
- Place the biscuits in the fridge for half an hour (being cold will help the chocolate to set quickly).
- Melt the chocolate in 30 second increments in the microwave, stirring well between each until just melted. Line a large baking tray with baking paper.
- Dip each biscuit into the chocolate and press down with your finger. Use a fork to turn it over, then lift it out. Use a small palette knife to scrape off the excess chocolate and just leave a thin layer.
- Use a second fork and flip it from the first to the second. Use the palette knife again to scrape off the excess chocolate, then run the knife around the edge as well. Carefully set the biscuit down onto the baking paper on it’s flat side and repeat with the rest.
Notes
- For best results you should always weigh ingredients like flour and sugar. Kitchen scales like these are relatively cheap but if you can’t weigh the ingredients, use the spoon and level method (don’t scoop).
TOOLS USED IN THIS RECIPE
- A basic cookie tray
- A wire cooling rack to cool them on
- A small round fluted cookie cutter
- A small offset spatula helps with the chocolate coating

This post may contain affiliate links that earn me a small commission for my referral, at no extra cost to you. Thank you for supporting Sugar Salt Magic.
6 Comments on “Mini Wagon Wheels”
I absolutely love this recipe! I made this for my family.
I’m so happy you love it Blitzo.
I absolutely love this recipe! I was intimidated going into it, but the recipe was easy to understand. I wish I could post pictures of how they came out. This is a recipe I will be making again for sure 🥰🥰🥰
So happy you love them, Amber 🙂
I love your giant wagon wheel, it reminds me of these chocopie I used to eat as a kid. But these mini ones are so cute and perfect to pack for snacks.
Thanks so much Trang