Just like most panna cotta recipes, this buttermilk panna cotta is quick and simple to make. Relatively so, since it has an additional jelly and syrup but I promise all parts are super easy.
- The texture is silky smooth.
- It’s tangy, sweet and vibrant.
- It feels totally luxurious.
- Panna cotta can be made ahead of time so it’s perfect for dinner parties.
- 3 easy and delicious components make this a showstopper.
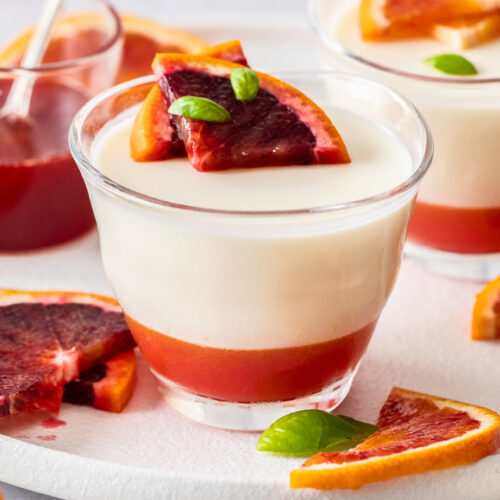
Panna cotta is a 10 minute dessert. This one has a slight tang from the buttermilk and sweet zestiness from the blood orange and they really are the perfect combination.
Want to go back to panna cotta basics? Try this classic vanilla panna cotta which also happens to have an orange syrup.
This recipe was first published here on August 28th, 2018. It has been updated with new photos and information.
")
Table of contents
Never Miss a Recipe!
Get the latest recipes straight to your inbox!
Ingredients you’ll need
")
Detailed quantities and instructions in the recipe card below.
- Buttermilk: You must use real buttermilk (not the simplified homemade version) and you should stick to full fat (or the panna cotta may separate into layers).
- Gelatine powder: Gelatin powder is my setting agent of choice here. I have not tested sheets so can’t tell you the quantity you would need.
- Sugar: Just regular granulated white sugar is all you need in this recipe.
- Cream: You’ll need to use thickened cream / heavy cream here for the best and most luxurious flavour.
- Pure vanilla extract: Always use vanilla extract as opposed to vanilla essence as the latter is a synthetic flavouring.
- Oranges: I use blood oranges here for their gorgeous vibrant colour and slight hint of berry flavour. Other oranges – like cara cara, navel or Valencia – will work too. Even mandarins and tangerines could be used.
My panna cotta recipes are only lightly sweetened. This keeps them lighter and perfect for the end of a meal but also allows you to add other sweet flavours or fruits to balance them. For this one, you don’t need to make both the jelly and the syrup but I recommend at least one of those. If only making the syrup, double the recipe.
How to make buttermilk panna cotta (step-by-step)
Making panna cotta is extremely simple. It takes less than 10 minutes and while this one has 3 separate components, each one will take the same amount of time.
")
Detailed quantities and instructions in the recipe card below.
- The blood orange jelly: Starting with the jelly, you’ll want to dissolve powdered gelatine and sugar into blood orange juice (photo 1) in a saucepan over low-medium heat. Pour that evenly into 6 small glasses (photo 2) or ramekins and place them in the refrigerator to chill for 1-2 hours.
")
- The buttermilk panna cotta: Now in a clean saucepan, let the gelatine soften over the buttermilk for few minutes (photo 3) then heat on low, stirring until it’s all dissolved. Add the sugar (photo 4) and dissolve that in too. Remove it from the heat and add cream, vanilla and a pinch of salt (photo 5). Pour the buttermilk mixture over the set jellies (photo 6) and let that set for 3-4 hours (overnight is even better).
- The blood orange syrup: The syrup is a simple case of reducing blood orange juice with sugar and water until thick and syrupy (photo 6). Pour that into a small jar or jug and chill until needed. I like to warm it ever so slightly to make it easier to pour onto the buttermilk panna cotta at the end.
Important! At no point should the buttermilk mixture or jelly mixture even come to a simmer. They should steam at most. This will be enough heat to dissolve everything.
The blood orange jelly you see on these little buttermilk panna cotta has not been enhanced in any way. That’s the genuine colour of blood orange juice. I think they are redder at different times during the season but these are the ones I found, right at the start of the season.
")
Tips and tricks
- Don’t boil: I already mentioned it above but it’s very important not to simmer or boil the jelly or buttermilk mixtures with the gelatine in them – this could reduce the gelatines ability to set. If you find it starting to bubble, remove it from the stove, keep stirring and turn the heat down before returning it again.
Options and variations
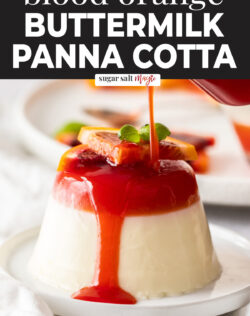
- Style: You can put your jelly on the top or bottom, it’s totally up to you. You can also make the panna cotta so that you can turn it out onto a plate or remain in the glass (both style shown in these pictures. Here’s some more ideas;
- In tart form
- Don’t feel like blood orange? If you don’t feel like blood orange, you can do some thing different. The panna cotta is only slightly sweet but it will need something extra for sweetness. Try these options;
- Maple syrup or honey
- Fruit compote – like blueberry, raspberry, blackberry, cherry or strawberry.
Yield and storage
This recipe makes 6 panna cottas roughly 1 cup in volume (including the jelly).
Your buttermilk panna cottas should be stored in the fridge until ready to serve. They can be made 2-3 days ahead but make sure they are in an airtight container or covered tightly with plastic wrap.
")
More panna cotta recipes
- Almond Honey Panna Cotta
- Coffee Panna Cotta with Coffee Syrup
- Strawberry Panna Cotta
- Chai Panna Cotta
- Coconut panna cotta
- Mango Panna Cotta Coconut Cheesecake
Did you try this buttermilk panna cotta recipe?
Leaving a rating and comment below the recipe is so helpful!
Hungry for more? Subscribe to the newsletter for free recipes straight to your inbox. Also, follow along on Facebook, Pinterest and Instagram.
Ingredients
For the Blood Orange Jelly
- 1 cup blood orange juice (from about 5 blood oranges)
- 1 teaspoon powdered gelatine
- 1 tablespoon caster (superfine) sugar (notes)
For the Buttermilk Panna Cotta
- 2 cups buttermilk (500ml)
- 3 ¼ teaspoons powdered gelatine
- ¼ cup sugar (50g / 1.8oz)
- 300 ml thickened pourable cream (heavy cream) (1 cup + ¼ cup / 10 floz)
- 1 teaspoon vanilla extract
- Pinch of salt
For the Blood Orange Syrup (optional)
- ¾ cup blood orange juice (180ml)
- ¼ cup water (60ml)
- ¼ cup sugar (60ml)
For best results, always weigh ingredients where a weight is provided
Instructions
- BLOOD ORANGE JELLY: See notes if you're planning on turning the panna cotta out of the moulds.
- Place 6 glasses, ramekins or moulds in a baking pan (this just helps to transport them in and out of the fridge easily).
- Pour the blood orange juice into a small saucepan and sprinkle gelatin evenly over the top. Let it sit for 2 minutes then turn the heat on low and stir until the gelatin dissolves.
- Add the sugar and stir for another minute until dissolved.
- Turn the heat off and divide mixture evenly between your ramekins. Place in the fridge to set for one to two hours. It’s best to make the panna cotta when the jelly has a set texture but you can make it before if needed (see notes).
- BUTTERMILK PANNA COTTA: Pour the buttermilk into a small saucepan and sprinkle the gelatine evenly over the top. Let it sit for 5 minutes until wrinkly then turn the heat on low, stirring until the gelatine has dissolved.
- Add the sugar and stir for another minute until dissolved. Do not ever let it simmer or boil.
- Turn the heat off and add the cream, vanilla and salt and stir well. If you like, you can pour it through a fine-mesh strainer to remove any bits of gelatine that may not have dissolved.
- It’s easiest to pour the mixture into the ramekins from something that has a spout. Pour the cream mixture evenly into your ramekins over the jelly. Place in the fridge to set for 3-4 hours or until set.
- BLOOD ORANGE SYRUP: Pour the blood orange juice, water and sugar into a small saucepan.
- Stir over low heat until the sugar dissolves, then simmer on low for around 20 minutes until thickened.
- Allow the syrup to cool to room temperature before serving with the panna cotta.
- The syrup can be made ahead and stored in the fridge. Warm in microwave for 10 seconds to make it more pourable.
- Take the panna cottas out of the fridge 10 minutes before serving.
- TURNING OUT THE PANNA COTTA: If you want to turn the panna cottas out onto plates start by dipping the ramekin into a bowl of hot water for 10-20 seconds.
- Now, gently press down all around the top with your fingertip to release it. Holding the glass on a slight angle, press down on the part closest to the top edge of ramekin until you see the vacuum release.
- Place an upturned serving plate on top of the glass then turn it over to invert panna cotta onto the plate. Remove the glass and it’s ready.
- Please take a moment to leave a comment & rating. It's appreciated and so helpful.
Notes
- Tablespoons: I use a standard Australian 20ml tablespoon (equal to 4 teaspoons).
- If you plan on turning the panna cotta out onto your serving plates, start by lightly oiling 6 moulds or ramekins.
- You can make the panna cotta mixture right after the jelly mixture, then just place it back over low heat and stir until it becomes fluid enough to pour over the jelly when they’re ready.
- Don’t fee like blood orange? You could simply add a drizzle of honey, maple syrup or caramel and some fresh raspberries, strawberries or blackberries. Remember, the buttermilk panna cotta itself is only slightly sweet so it will need a little sweetness in the from of some kind of syrup. See variations in my post above for more ideas.
- Serving style: What can you serve panna cotta in? Pretty much anything is the answer. Ramekins, pretty glasses, even mason jars or jam jars.
- Yield: This recipe makes 6 panna cottas roughly 1 cup in volume (including the jelly).
- Storage: Your buttermilk panna cottas should be stored in the fridge until ready to serve. They can be made 2-3 days ahead but make sure they are in an airtight container or covered tightly with plastic wrap.
This post may contain affiliate links that earn me a small commission for my referral, at no extra cost to you. Thank you for supporting Sugar Salt Magic.
10 Comments on “Buttermilk Panna Cotta with Blood Orange Jelly”
i love panna cotta; and this recipe looks fantastic.
my mango panna cotta is famous; i love to make it with buttermilk which gives it a tangy/sweet delicious taste. I’m from Miami/Florida we have oranges and mangoes galore!!! thanks for sharing your delicious recipes !!!
Sounds delicious with mango. thanks Edye.
I’m working on this recipe, and when I went to pour the jelly (I did it on top instead of below because I’m serving them in glasses) it picked up chunks of the panna cotta. Is this because it wasn’t set enough? Should I freeze the panna cotta?
Hi Mae, there could be a couple of reasons for this and one of them is as you’ve mentioned – the panna cotta may not be set enough. The second reason is that the acidity in the jelly can affect the delicate panna cotta layer. It works well when used at the bottom as the jelly is fully set before adding the panna cotta. What I’d suggest is letting the panna cotta set for 2-3 hours before adding the jelly on top. If you’ve already made the jelly, it may set but all you need to do is heat it just a little to melt it again. Hope that helps
In the directions is says to add water in the jelly but it doesn’t state how much.
Hi Sheryl, please ignore that. There is no need to add water to the orange juice. I’ll amend the recipe card. Thanks for letting me know.
What a gorgeous elegant dessert! Perfect for entertaining guests! Pinning! xo
Thank you so much Kim. Great for entertaining as it’s so quick to make but looks fancy 🙂
These look so creamy! And I love the layers too, the color is beautiful. Love love love them 🙂
Thanks so much Trang. The flavour is just beautiful too 🙂