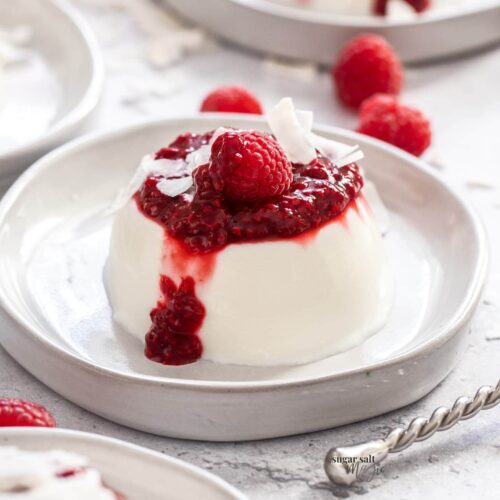
Coconut panna cotta – it’s so creamy but light all at once. This easy panna cotta recipe takes minutes to make and is so simple so serve it during the week or serve it as an elegant dinner party dessert.
Want to try more panna cotta flavours? You must try my favourite chai panna cotta or this stunning fresh peach panna cotta tart.

Why you’ll love it
Panna cotta is in my top 5 desserts – it has a simplicity, elegance and texture that just can’t be beat.
- It’s all at once creamy but light
- Sweet but not sickly
- It takes minutes to make – I promise
- Great make ahead dessert
- My fail-proof method so you don’t need to be intimidated by gelatine anymore
- Can be made dairy free and is naturally gluten-free
- Easily scalable so you can make a batch to suit any number of guests
This coconut panna cotta is a tropical spin on the classic vanilla panna cotta and has a lovely tart raspberry topping.
What is panna cotta?
Panna cotta is a no-bake Italian dessert made with milk, cream, sugar and gelatine. This set dessert needs to be chilled until set before serving and has a soft, smooth, melt-in-the-mouth texture.
Numerous flavourings can be added and though it’s traditionally served unmoulded (released from the mould it was set in), it can actually be served in so many more ways. See my variations below
Ingredients in panna cotta

Detailed quantities and instructions in the recipe card below.
- Milk: You’ll get best results and flavour from full-cream milk. Sometimes low-fat milks will separate as the panna cotta sets, though there are some brands that seem to work fine. You can swap it for coconut milk to make this dessert dairy free, however the texture isn’t as smooth.
- Powdered gelatine: Don’t be intimidated by powdered gelatine. It’s very easy to use and, made this way, it works every time. Agar agar powder is a vegan setting agent but results in a different texture. I don’t use gelatine sheets so I can’t say how many or the strength you’d need.
- Sugar: Use regular white granulated sugar or caster sugar (superfine sugar) is even better as it dissolves quicker.
- Coconut cream: This is where your coconut flavour comes from. Use tinned full cream coconut cream and give it a good shake before you use it. For this recipe we want it all, not just the solids or liquids.
- Coconut extract: This is an optional ingredient that you might like if you want a strong coconut flavour and you’re using regular dairy milk. Leave the extract out if using coconut milk. Also, make sure to use extract and not essence. The latter is a synthetic flavouring.
Dairy milk vs coconut milk
I tested this recipe with both types of milk and here are my thoughts
- Flavour: With dairy milk, the flavour of the coconut still definitely shines through, though it is obviously more subtle than if you were to use coconut milk. You can add the coconut extract to the dairy milk version if you want the flavour to be more bold.
- Texture: Dairy milk gives a much smoother texture than coconut milk. The coconut milk version was ever so slightly grainy and doesn’t give that gorgeous smoothness panna cotta is known for.
- Ease of use: Both variations are just as easy to use though you’ll want the coconut milk to be at room temperature and give the can a good shake.
The winner in my eyes (and mouth) is definitely dairy milk. It results in a smoother coconut panna cotta with still a good coconut flavour.
Tools you’ll need
- A heavy based small or medium saucepan allows the mixture to heat slowly and evenly. If your pan is not heavy based be careful to have it on low heat and make sure to keep stirring so it doesn’t overheat.
- Silicone spatulas – my favourite for make sure to get every last bit out of the pan.
- Ramekins, jam jars, preserving jars, glasses or even a pie dish will work for setting the panna cotta. In a pie dish, your guests can scoop out their own panna cotta.
How to make coconut panna cotta
You are going to love how truly easy panna cotta is to make and this coconut panna cotta works the same way as an all dairy version.

Detailed quantities and instructions in the recipe card below.
- Bloom the gelatine: Sprinkle the gelatin powder over the milk and let it sit for 5 minutes to soften.
- Heat and dissolve: Turn the heat on under the saucepan to low and stir the mixture until the gelatine dissolves. If you use a dark coloured spatula to stir, you’ll easily be able to see if there are any gelatine lumps left when you lift it out.
- Add sugar: Now add the sugar and keep stirring until that dissolves too. Take it off the heat.
- Add coconut cream: Now add the coconut cream (and extract if using it) and stir it well to combine.
- Decant: Pour the panna cotta into very lightly greased ramekins, then chill in the fridge to set. They’ll take around 4 hours to set (or make them the night before).
- Make the raspberry sauce: Cook everything together in a saucepan until it’s the consistency you like. Pour into a preserving jar and chill until needed (you can make this up to 2 days ahead if stored properly).
Tips and tricks
- Don’t overheat the mixture: Gelatine will lose it’s setting ability if it boils so make sure you’re only gently heating the mixture. It should only ever start to steam, not boil at all.
- Greasing the ramekins / moulds: If you want to turn your panna cotta out onto serving plates (as opposed to serving it up in the ramekins) make sure to grease the ramekins but only lightly. Rub a little oil all around the inside of the ramekin, then use a paper towel to wipe most of it out so you’re left with just a thin coating.
- Make it ahead: The wonderful thing about panna cotta is it can be completely made ahead. As it takes around 4 hours to set, you can certainly make it the morning of the day you want to serve but you can also make it 2 days ahead and store it in an airtight container in the fridge.
- Turning out the panna cotta: This is a light set panna cotta and I find it doesn’t need any heat applied to help it release.
- First gently press around the edge with your finger until you see it come away from the side.
- Place a dessert plate over the top and flip. You should here a satisfying “plop” sound as it releases and drops onto the plate.
- If you don’t, just lift one edge and use your finger to carefully press one side away from the edge of the ramekin – this will allow air in, releasing the vacuum and the panna cotta will slide out. You can very gently reposition it on the plate as required.
Variations
Panna cotta is extremely versatile in regards to flavours and serving method.
For instance I’ve created around 11 different flavoured recipes here on the blog. You can type panna cotta in the search bar, but my favourites are my chai panna cotta, oh and the coffee panna cotta and this rose pistachio panna cotta tart is extremely popular because of how pretty it is.
As for serving styles, you can turn it out onto a plate, the way these are. Serve it in pretty jars or glasses (like my coffee panna cotta above and my boozy eggnog panna cotta). Serve it in a tart like my rose pistachio panna cotta above or in a pie dish or baking dish, like this strawberry panna cotta.
You can even serve panna cotta as a topping on cheesecake like my coconut mango panna cotta cheesecake.
This coconut panna cotta would also be lovely served with other fruit flavours. Try this blueberry topping or pour over some passion fruit pulp. You can also use fresh strawberries or any berries you like.
Storage
Once made, panna cotta should be stored in the vessel you plan on serving it in, either in an airtight container in the fridge or covered with plastic wrap. They can be made up to 2 days ahead.
Can panna cotta be frozen?
Unfortunately panna cotta doesn’t freeze well as the texture changes completely.
PIN IT:
Click to PIN this recipe for later!

IF YOU TRY THIS coconut panna cotta recipe, please take a moment to leave a rating and comment below. I love hearing from you, and it helps other readers too!
More recipes you’ll love
- Passionfruit panna cotta
- Buttermilk panna cotta with blood orange jelly
- Almond and honey panna cotta
- Mango panna cotta Coconut Cheesecake
- Coffee panna cotta
- Strawberry panna cotta
Never Miss a Recipe!
Get the latest recipes straight to your inbox!
Ingredients
- 1 ½ cups whole milk (dairy)
- 2 ½ teaspoons gelatine powder
- ⅓ cup caster sugar (superfine sugar or granulated sugar)
- 1 ½ cups coconut cream room temp
- ½ teaspoon coconut extract, optional
- 1 batch raspberry compote
For best results, always weigh ingredients where a weight is provided
Instructions
- If you plan on turning your panna cotta out onto dessert plates, start by lightly greasing the ramekins with oil. Wipe around with a paper towel so that you’re left with just a light film of oil.
- In a small saucepan (heavy based is best) pour the milk, then sprinkle the gelatine over the top. Let it sit for 5 minutes for the gelatine to soften.
- Put the saucepan over low heat and stir continuously to dissolve the gelatine making sure to rub all around the bottom of the pan. Check it’s dissolved by taking out the spatula and checking to see if there are little clear specks of gelatine there – if there is, keep stirring.
- Once the gelatine has dissolved, add the sugar and again, stir until it dissolves completely.
- Take it off the heat. Give the coconut cream a good shake before pouring it into the saucepan. Add the coconut extract too if you’re using it and stir well to combine.
- Pour the panna cotta mixture into your ramekins then sit them in a deep tray to make them easier to move around. Cover well with plastic wrap and chill for 4-6 hours until set.
- Make the raspberry sauce or you can also try this blueberry sauce.
- To turn them out, gently press around the edges of each panna cotta with your finger to release the vacuum seal. Place a dessert plate on top and flip. Give it a wiggle until you hear it “plop” down onto the plate. If it isn’t budging, just lift one side, press the edge of the panna cotta with your finger again and it should be enough to release it.
- Pour raspberry sauce on top of each one and serve.
- Please take a moment to rate this recipe. I really appreciate it and it helps me create more recipes.
Notes
- You can swap out the milk and coconut extract for coconut milk, however the texture won’t be so smooth. Still tastes lovely though and it will be dairy-free.
- This panna cotta sets with a beautiful wobble but is a soft set. Don’t take it out of the fridge until ready to serve. If you are doing lots of them, place them back into the fridge once they’re on their serving plates.
- You should not require any heat to release these panna cotta from their moulds.
- The number of servings you get from this recipe will depend on your ramekin size. While technically (and in any of my other ramekins or molds) this recipe will make approximately 6 serves of ½ cup volume, the ramekins you see in this post made 10 as they are very small – closer to ⅓ cup.
This post may contain affiliate links that earn me a small commission for my referral, at no extra cost to you. Thank you for supporting Sugar Salt Magic.
2 Comments on “Coconut Panna Cotta with Raspberry Sauce”
This is a truly elegant and beautiful dessert. Needless to say, the combination of coconut and raspberries is so lovely and fresh.
Thanks so much Ben.