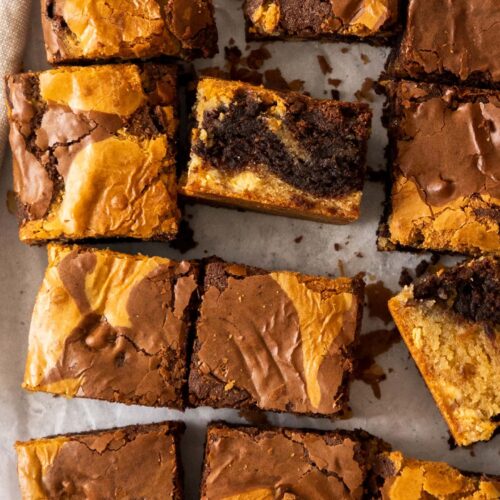

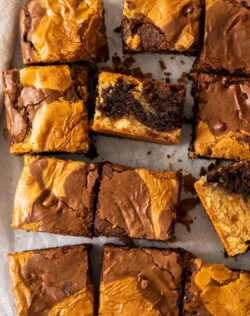
Can’t choose between blondies and brownies? Brownie blondies give you the best of both in one irresistible bar: rich, fudgy, chocolate brownie batter swirled with sweet, chewy blondie batter for the ultimate 2-in-1 dessert. Every bite has deep, cocoa flavour, buttery caramel notes, melty chocolate chips and that gorgeous crackly, flaky top brownie lover’s dream about.
The best part? You don’t need to make two separate recipes. This easy brownie blondies recipe starts with one simple batter, then it’s split into a dark chocolate brownie layer and a white chocolate blondie layer before being swirled and marbled together with loads of chocolate chips. They’re baked until fudgy in the middle and lightly chewy on the edges.
Serve them with ice cream for a decadent dessert or let them cool completely for a perfect lunchbox treat!

Never Miss a Recipe!
Get the latest recipes straight to your inbox.
What’s the difference between blondies and brownies
Brownies and blondies are both sweet, chewy dessert bars – the main difference is in the flavour base.
Brownies are chocolate-based, usually made with cocoa or melted chocolate (sometimes both), which gives them a rich, fudgy, deeply chocolatey flavour. Depending on the recipe, they can be cakey, chewy, fudgy or gooey.
Blondies are often described as “brownies without chocolate”, but they’re really more of a buttery, vanilla, caramel bar. Instead of cocoa or dark chocolate, blondies generally rely on butter, brown sugar, vanilla and sometimes white chocolate for their flavour and texture. They tend to taste buttery, slightly caramelly and chewy.
Brownie blondies are the perfect combination of the two. You get the deep chocolate flavour as well as the buttery, caramel flavour in a fudgy, chewy bar.
❤️ Why this recipe works
- One simple batter keeps the process quick and easy.
- The perfect crackly top that everyone loves.
- Perfectly fudgy inside for that winning brownie texture, and slightly chewy edges.
- Customise them your way with other add-ins like Reese’s chips, M&Ms, or nuts.
Ingredients you’ll need

- Butter: Use unsalted butter here so you can control the salt level. Dairy-free or vegan butter will work too.
- Flour: You’ll need just plain flour / all-purpose flour. You can also use a gluten-free 1:1 flour blend.
- Eggs: Use whole, large eggs at room temperature.
- Sugar: Two types of sugar go to work here. White sugar gives us general sweetness and that flaky top while brown sugar gives us a caramel edge and unbeatable chewiness. I generally use light brown sugar but dark brown sugar will also work.
- Baking powder: Technically this is optional. They’ll bake up fine without baking powder but I just like the tiniest bit of lift in my brownies.
- Oil: Yes, oil in place of some butter because it adds moisture. You can use all butter if you prefer.
- Vanilla extract: It’s important to use vanilla extract and not essence – the latter is synthetic and not natural so the flavour is not so good.
- Chocolate: With 4 types of chocolate, these brownie blondie bars are decadent in all the best ways. White chocolate and dark chocolate are melted, and each is mixed into half the batter. Then, chocolate chips – white and milk – take these bars to the next level. You can also use chocolate chunks in place of the chips.
- Dutch-processed cocoa powder is best here for its deep, intense chocolate flavour. You can swap it for regular unsweetened cocoa powder.
Tools you’ll need
- Mixing bowls
- Silicone spatula – the best kind for scraping every last bit of batter out.
- Handheld electric beater – you could use a balloon whisk but it’ll take a little elbow grease.
- 8×8 inch square baking tin
How to make blondies brownies
You make one batter! Just one. The blondie recipe is created by adding chocolate to half of the batter while the brownie recipe is created by adding dark chocolate and cocoa to the other half. Whether you’re a brownies blondies person or a blondies brownies person, there’s no judgment here. Let’s get baking!
⬇️Jump to the recipe for full ingredients and instructions.

2. The one base batter!
Add the wet ingredients to the bowl and beat to combine.

3. The blondie batter
Divide the batter evenly between two bowls. To the first one, add the melted white chocolate and white chocolate chips.

4. The brownie batter
To the second bowl, add the melted dark chocolate, cocoa, a little more oil and milk chocolate chips and mix

5. Assemble and bake
Dollop scoops of each batter randomly into a prepared pan (one lined with baking paper). Give them little swirl if you like. Bake for 40-50 minutes until a toothpick comes out looking sticky but not with wet or uncooked batter.

Let them cool for at least 35 minutes in the tin before trying to transfer to a wire rack. From there, you can serve them still warm with ice cream or let them set up fully to be more portable.
If you try to cut them when they’re still too warm, you may end up with a gooey mess, so give them time to set up.
Tricks and tips
- Please weigh ingredients like flour and cocoa (when a weight is given) using a kitchen scale. They’re cheap and will make sure all your bakes are perfect. A little too much or too little of these ingredients can make a huge difference to the result.
- Eggs should be at room temperature: Make sure to bring your eggs up to room temperature before starting so everything blends together well. If you forgot to take them out of the fridge, just leave them in a bowl of warm (NOT hot or boiling) water for 10 minutes.
- Butter should be melted but not hot: Once you’ve melted the butter, give it a chance to cool a little if it feels hot to the touch. If you just melt it in 20 – 30 second increments in the microwave, it likely won’t get hot enough to be of any concern.
- Different pans will give different results: A metal pan will cook your brownie blondies quicker than a glass or ceramic pan. A metal pan will also give you a more cooked edge. In addition, a lighter-coloured metal pan will give you a lighter, chewier edge than a dark metal pan.
- All ovens vary: This is really important as all ovens are different. Many run hotter or colder than the temperature gauge suggests. This means that what takes 45 minutes in my oven may take 40 or even 50 in yours. I always recommend keeping an oven thermometer inside your oven (2 if it’s a large one) so you can confirm the interior is at the right temperature. They’re very cheap.
- How to know when they’re ready: It can be tricky to work out when brownies and blondies are ready so there are a few signs to look out for.
- Top is dry and crackly
- They don’t wobble when you shake the pan but aren’t hard
- Stick in a toothpick – it should come out with moist crumbs or looking a little sticky but never with wet or unbaked batter.

Variations
- Chocolate chips: You can swap the white chocolate chips and milk chocolate chips for chocolate chips all of one type. You can also swap them for butterscotch chips or peanut butter chips. Dark chocolate chips are lovely too.
- Other add-ins: Leave out or halve the chocolate chips and add in some nuts (like almonds, peanuts, pecans, walnuts) or M&Ms.
Storage
Room temperature
Brownie blondies will keep well at room temperature for 2-3 days. This is great because it keeps them perfectly portable for potlucks and picnics.
Fridge
The brownie blondie bars will keep well in the fridge for 4-5 days in an airtight container.
Freezer
You’ll be happy to know they freeze beautifully. Simply cut the cooled brownie blondies into squares, then freeze them in an airtight container for up to 3 months.
Make ahead
You can also make these ahead of time and freeze the whole pan for up to 3 months. Let them cool completely to room temperature before wrapping the whole pan 2-3 times in plastic wrap, then freeze. Let them thaw in the fridge overnight.
FAQs
Brownie blondies are a dessert bar made up of chewy blondies and fudgy brownies. The batter is marbled together and then baked up into a 2-in-1 dessert.
No. Brownie blondies are a blondie batter and brownie batter combined into a bar, whereas brookies are a brownie batter and cookie dough combined.
You’ll know they’re baked when the top looks dry and crackly and should be a little puffed up, not sunken. A toothpick inserted into the centre will come out with sticky crumbs attached (not wet better but very sticky batter) – you should be able to wipe it off the toothpick with your fingers and form a small gooey ball.
Sinking is normally a sign the brownie blondies are underbaked.
You can use a larger pan, however, the baking time and the thickness of the blondie brownies will differ.
Yes, you can. They freeze well in an airtight container for up to 3 months.

More brownies and blondies you’ll love
- Biscoff Brownies
- Biscoff Blondies
- Ferrero Rocher Brownies
- How to make Perfect Brownies
- Oreo Blondies
- Brown butter blondies
If you made this brownie blondies recipe,
be sure to leave a ⭐⭐⭐⭐⭐ rating below. Thank you!
Hungry for more?
- Subscribe via Email, Facebook, Pinterest and Instagram.
- Add Sugar Salt Magic as a Google Preferred Source.
Ingredients
- ¾ cup granulated sugar (150g / 5 ⅓oz)
- ¾ cup light brown sugar, packed (150g / 5 ⅓oz)
- 1 ½ cups plain flour (all-purose flour) (195g / ~7oz)
- ¼ teaspoon baking powder
- ½ teaspoon salt
- 3 large eggs
- 85 g unsalted butter melted, (3oz)
- ⅓ cup oil + 2 tablespoons extra (notes 1)
- 2 teaspoons vanilla extract
- 75 g white chocolate melted, (1 ¾oz)
- ⅓ cup white chocolate chips
- 75 g dark chocolate (50% cocoa solids) melted, (1 ¾oz)
- 2 tablespoons unsweetened cocoa powder (notes 1)
- ⅓ cup milk chocolate chips
For best results, always weigh ingredients where a weight is provided
Instructions
- Preheat your oven to 180C / 350F / 160C fan forced. Line an 8×8 inch square baking pan with baking paper
- Combine the flour, baking powder, salt in a medium bowl and mix well until there are no lumps left.
- In a large bowl, using an electric beater, beat the eggs and both sugars for one minute.
- Add the melted butter, ⅓ cup of oil and vanilla and mix to combine.
- Add the flour mixture and beat through until just combined.
- Tip half the batter into a second bowl (or the bowl you mixed the flours in).
- Add the melted white chocolate to one bowl and mix through then fold in the white chocolate chips.
- To the other bowl add the melted dark chocolate, cocoa and remaining tablespoon of oil and beat in. Fold in the milk chocolate chips.
- Dollop big spoonfuls of each batter randomly into the prepared tin.
- Bake for 40-50 minutes until a toothpick comes out with some sticky crumbs attached.
- Cool in the tin for around 35-40 minutes before removing to cool further.
- Can be served warm and gooey, or let them cool completely for the chocolate chips to re-set.
- Please take a moment to rate this recipe. I really appreciate it and it helps me create more recipes.
Notes
- Tablespoon: I use a standard Australian 20ml tablespoon (equal to 4 teaspoons). Many countries use a 15ml tablespoon – check yours before measuring.
- Baking powder is not the same as baking soda.
- All ovens vary – always test for doneness 3-5 minutes before the recipe suggests.
- Different pans will give different results: Ceramic and glass pans will give softer edges than metal pans but also take longer to bake.
- For best results, you should always weigh ingredients like flour and sugar. Kitchen scales are relatively cheap but if you can’t weigh the ingredients, use the spoon and level method (don’t scoop).
This post may contain affiliate links that earn me a small commission for my referral, at no extra cost to you. Thank you for supporting Sugar Salt Magic.


6 Comments on “Brownie Blondies”
Worked well although a bit overcooked at 40 min in my oven. Chewy edges were amazing! Totally mystified where the second extra tablespoon of oil was meant to go though.
I’m so happy you love them, Daisy. Thanks so much for dropping back to leave a review.
Made these and they were great, ate them warm with ice cream. Delicious. Thanks Marie another winner
So great to hear, Kim. So happy you love them.
When in doubt, choose both options – I love this approach! (I would also add a swirl of dulce de leche, well, because that’s me LOL). This looks and sounds stunning!
Oh, now I need to try them with Dulce de leche. thanks Ben.