

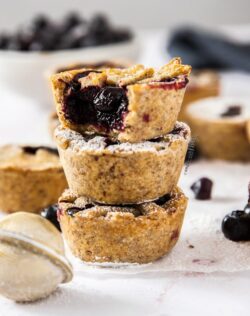
If you saw my last post (Blueberry Topping) you’ll know I had something planned to make with it and here they are – Mini Blueberry Pies.
 These little pies are not only the perfect handheld treat, they’re also super delicious and made using a buttery and nutty pie crust for something a little different.
What sort of filling to use
- As I mentioned, I use my blueberry topping recipe for this which also works as a filling, compote and sauce.
- If you wanted a different flavour you could use my blackberry compote, the cherry sauce from this cheesecake recipe or even my strawberry topping.
- You can also use store-bought filling or jam if you prefer. All will work well in these little pies.
Making pie crust from scratch
If you’ve never made your own pie crust from scratch, don’t be nervous as it’s actually incredibly easy.
This hazelnut pie crust is a take on my pistachio crust, using hazelnuts in place of the pistachios. The nuts make the crust a little softer and not so crunchy but they also impart a really delicious nutty flavour.
Of course, you could use a regular pie crust and, if you prefer that, just use the same recipe as my Nutella Hand Pies, which turns out super flaky and crispy but it’s worth trying this unique one.


How to make the crust
Making pie crust from scratch is relatively quick, since it’s better when it’s handled as little as possible anyway.
- Start by toasting the hazelnuts or the ground hazelnut – this is an optional step but it enhances their distinct flavour and gives a toasty note. It takes just a few minutes in a dry pan over low-medium heat. Careful not to burn them though. (images 1&2)
- Combine the crust ingredients – you’ll use a food processor to blitz all the ingredients together until It looks a bit like wet sand. Don’t over process, since you want to be able to still see little bits of butter. (images 3&4)
- Pull the dough together – and when I say pull it together, I literally mean just pull it together. You’ll get the best results from a pie dough which still has those little bits of butter as opposed to it all melting into the dough. (images 5&6)
- Chill the hazelnut crust dough – Those last 3 steps will take no more than 10 minutes and now you just chill the dough for at least 45 minutes. It’s best to always work with cold dough (aka keeping the butter cold)
- Roll the dough & cut shapes – Roll it out to about 4mm or 1/6 inch thick then cut out circles with a large round cutter. Test one to see how it fits in your muffin tin before cutting them all out.

Now to assemble the pies
- Press the dough circles into the holes of a greased muffin tin, then reroll the rest and cut out tops or decorations for the tops. (image 7)
- Fill each pie with your filling then add your decorations to the top. If you cover the tops completely, just make sure to cut a little slit so that steam can escape. (image 8)
- Now bake them for 25-30 minutes or until they’re getting golden.
I like to dust the tops with a little icing (powdered) sugar before serving.
How to serve mini blueberry pies
One of the things I really love about these pies is their versatility. You can serve them warm, room temperature or cold so they’re just as great for a mini dessert at home as they are for a picnic.
You can serve them with a nice big dollop of cream or ice cream or if you’re after a warm dessert, try a hot runny custard – yum! They reheat well too, if you don’t eat them all at once.
How to store them
Store these blueberry pies in an airtight container in the fridge for 4-5 days. You can also freeze them, again making sure they’re in an airtight container.
Click here to Pin this recipe for later!

You really should give these mini blueberry pies a try. Cute, delicious and perfect for so many different occasions from dessert after family dinners to picnics. If you try them or even if you try a different flavour combo, let me know in the comments below.
More recipes you’ll love
Ingredients
- 1 batch Blueberry Topping
- 100 g ground hazelnuts (hazelnut meal) (3.5oz)
- 163 g plain (all purp) flour (1 ¼ cups / 6oz)
- ⅓ cup icing (powdered) sugar (45g / 1.7oz)
- ½ teaspoon salt
- 113 g unsalted butter, chilled, cut into cubes (1 stick / ½ cup)
- 1 - 1.5 tablespoons ice cold water (20-30ml)
For best results, always weigh ingredients where a weight is provided
Instructions
- If making your Blueberry topping using this recipe, do that first, then set aside to cool.
- In a frying pan over low heat, toast the hazelnut meal. Keep stirring or tossing for a few minutes just until it's looking more golden in colour.
- Add the ground hazelnuts, flour, sugar and salt to a food processor and blitz until well combined.
- Add the butter and blitz for only 5-10 seconds until the mixture is like large breadcrumbs.
- Slowly drizzle in the water while the processor is running on low and stop as soon as it starts forming large clumps.
- Tip the dough out onto a piece of baking paper and use the paper to help you pull it together into a flat disk. Wrap in the baking paper and place in the fridge for 45 minutes.
- Preheat the oven to 180C / 350F / 160C fan forced. Grease the holes of a 12 hole muffin tin
- Roll out the pastry between 2 sheets of lightly floured baking paper to about 4mm / ⅙ inch thick. Use a large round cookie cutter to cut out circles from the pastry. Check the first to make sure it fits into the muffin tin hole and reaches the top.
- Gently push each circle into the hole of a 12 hole muffin tin. Chill for 10 minutes. Spoon in the blueberry filling to about ¾ full.
- If using, top the pies with more pie dough. If you cover the whole top, make sure to cut at least a small hole or cross in the top for steam to escape.
- Bake for 25-30 minutes until they look golden and crisp. Let them cool a little before dusting with icing / powdered sugar to serve.
Notes
- I use a standard Australian 20ml tablespoon (= 4 teaspoons worldwide)
- All ovens vary – always test for doneness 3-5 minutes before the recipe suggests
- For best results, you should always weigh ingredients like flour and sugar. Kitchen scales are relatively cheap but if you can’t weigh the ingredients, use the spoon and level method (don’t scoop).
- Hazelnuts: You can use already ground hazelnuts, also known as hazelnut meal, or you can use whole hazelnut kernels and grind them in the food processor.
- You could also use my blackberry compote for the filling in these pies.
- If you'd like a plain crust, use the on from this recipe

This post may contain affiliate links that earn me a small commission for my referral, at no extra cost to you. Thank you for supporting Sugar Salt Magic.
6 Comments on “Mini Blueberry Pies with Hazelnut Crust”
These are so cute and a great way to use up some leftover blueberry sauce. I would love to make it with different fruits for different seasons. Such a versatile recipe!
They’d be lovely with other fruits. This would work with apples, other berries, peaches – so many options.
loving everything in these mini pies – from this luscious blueberry filling and hazelnut crust (Awesome idea. And I need that pistachio crust to happen in my life soon, too!) to their cute and very neat look
Great job!
Thanks so much Ben
Hi Marie
Just love the muffin tray you have used. The link to the Amazon site goes to a basic muffin tray. Do you have a link to the exact one you have used please? Love the holes in the base …..no soggy bottoms !
Pamela
Hi Pamela, of course, it’s this one from Wiltshire. I’ve just started playing with this new range.