

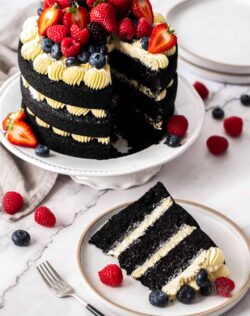
I was planning this black velvet cake for a while, thinking of it as a perfect Halloween cake. Now that she’s here, she may not look too scary but this deep, dark chocolate cake is pretty special!
Inspired by the classic red velvet and my own layered chocolate and blackberry cake, this one has the most wonderful texture and frosting you could eat off the spoon.
Try this gorgeous chocolate salted caramel cake too.

Why should you make this recipe?
The cake portion of this recipe is incredibly simple – just mix in two bowls, no special equipment, then bake. That simplicity gives you the time to focus on the super smooth and fluffy buttercream which is a little more involved than a standard buttercream – but so so much better!
- It’s moist and rich, yet still light and fluffy
- A stunning colour you can’t ignore
- A unique chocolate flavour
- Perfect for serving up at Halloween
- The cake batter is just mixed up in two bowls
- … giving you time to make the spectacular frosting
What is black velvet cake
Aside from it’s colour, black velvet cake has a lot in common with the classic red velvet cake. It gets it’s colour from black cocoa and that same cocoa has a much lighter chocolate flavour than a regular cocoa, so it has a very unique, milder chocolate flavour.
Just like red velvet cake, this black cake has vinegar and buttermilk helping to keep the crumb super tender.
Chocolate cake vs black velvet
While this black velvet has a similar amount of cocoa to a regular chocolate cake, the chocolate flavour is smoother. Black cocoa is twice-dutched which means it’s processed to remove acidity. Since all the acidity is remove, the flavour is smooth and not bitter at all.
Compared to a chocolate cake with regular cocoa powder, this one smoother and lighter.
What makes a velvet cake velvet?
Velvet cakes generally contain vanilla and cocoa for flavouring and colour (respectively) and vinegar and buttermilk, which gives them a tender and light crumb.
Ingredients for black velvet cake
This cake contains all very common ingredients except for that black cocoa which you can find online or at cake decorating shops.

Detailed quantities and directions in the recipe card below.
- Flour: You just need plain / all-purpose flour for this cake.
- Sugar: Granulated sugar is fine for the cake, but I prefer caster (superfine) sugar for the buttercream.
- Black cocoa: This is a heavily “dutched” process cocoa which means it goes through a process that neutralises the acid in cocoa. It is naturally black in colour and makes any baked goods black also.
- Baking powder and soda: We use a little of each of baking powder and baking soda to get the perfect rise.
- Salt: Always a little salt adds balance and intensifies flavours
- Vanilla: It may be a chocolate cake at heart but vanilla actually intensifies the chocolateyness.
- Eggs: Use large eggs – free range if you can.
- Butter: I recommend using unsalted butter so that you can control the amount of salt in the cake.
- Oil: A neutral flavoured vegetable oil like sunflower or avocado is perfect.
- Buttermilk: Use full fat, real buttermilk. It will give a better result than a homemade version.
Where to find black cocoa powder
You can find black cocoa powder either online or in cake decorating supplies stores. It’s worth finding, if only to taste it’s unique flavour and get the natural black colouring.
Can I use normal cocoa powder
If you don’t want to use black cocoa powder, you can substitute with either dutch process cocoa powder (best) or regular unsweetened cocoa powder. I tested all 3 while testing this recipe and, while all 3 worked, the dutched and black cocoas gave the best result.
Can I use black food colouring
If you choose to use one of the more common cocoa powders, you can add a little black gel food colouring to help get a black colour though you’ll have to add quite a bit. If you do, again you’ll get best results for dutched process cocoa powder.

Tools you’ll need
- Mixing bowls x2
- 3×8 inch sandwich tins (these are small round cake pans with sides about 2 inches high – perfect for layer cakes). Regular 8 inch cake tins will also work.
- A stand mixer works best for the buttercream, though you can use a handheld beater.
- Balloon whisk and silicone spatulas
How to make black cake
These black velvet cake layers are unbelievably easy to make. The buttercream you see on this one is my Swiss meringue buttercream which takes a little more time but it is divine. Or you can choose whatever buttercream you prefer.

See the recipe card below for the full recipe details.
- Combine the dry ingredients: Start by sifting all the dry ingredients together into a large mixing bowl, then whisk gently until fully combined (photo 1).
- Combine the wet ingredients: In a separate bowl, whisk together the wet ingredients until fully combined (photos 2&3).
- Add them together: Now add the wet ingredients into the flour mixture and use a spatula to carefully fold them together (photo 4).
- Bake: Divide the black batter evenly between 3 greased and dusted cake tins then bake for around 20 minutes until a toothpick comes out with a crumb or two attached.
- Let the cakes cool 5 minutes, then turn them out onto a wire rack to cool completely before frosting.
- Get onto making the buttercream while the cakes cool.
The Swiss buttercream frosting
I toyed with a cream cheese frosting, just like a classic red velvet cake, but I landed on Swiss meringue buttercream for its creamy, silky smoothy qualities and perfect pipability.
The Swiss buttercream frosting only uses 5 ingredients but it’s quite different from making a normal buttercream as it’s starts with a meringue base. It’s not as tricky as it sounds but it does require a little more attention. I promise you’ll be richly rewarded.
I have a whole post dedicated to Swiss meringue buttercream and you can get all the tips and step by step photos there.
As the cake itself is not super sweet, it could also be amazing with a rich chocolate buttercream and you could make it a little more traditional velvet cake with this chocolate cream cheese frosting.
Frosting the cake
The best way to frost this cake is by frosting the individual layers first, before stacking them up. I like this way best as piping or especially spreading frosting onto the second and third layers, while it’s all assembled will squish the buttercream out the sides.
The buttercream is firm enough to hold these layers, but to save it squishing out, frost each layer, then stack them.

Another good tip is to chill the layers until the buttercream is firm, then stack them up. This way you can make adjustments if necessary without messing up any beautiful piping.
How to store it
- Room temp: This cake will be fine at room temperature (room temp being around 20C / 68F) for a couple of days.
- Fridge: It will keep well in the refrigerator for 3-4 days.
- Freezer: This cake can be frozen too, in slices, layers or whole (if you have the room). Whichever way you freeze it, make sure it is wrapped well in plastic wrap – you can freeze it first until solid, then wrap so the buttercream is not damaged. It will take a couple of hours to fully come to room temperature.
PIN IT:
Click to PIN this recipe for later!

If you try this black velvet cake recipe, please take a moment to leave a rating and comment below. I love hearing from you and it helps other readers too! You can also take a photo and tag @sugarsaltmagic on Instagram.
More cakes you’ll love
- Chocolate salted caramel cake
- Monster Cupcakes (Black Cocoa Cupcakes)
- Chocolate Mud Cake
- Black Magic Cake
- Chocolate Roll Cake
- Blackberry Chocolate Cake
- Chocolate Meringue Brownie Cake
Never Miss a Recipe!
Get the latest recipes straight to your inbox!
Ingredients
FOR THE BLACK VELVET CAKE
- 355 g plain (all-purp) flour (2 ¾ cups)
- 105 g black cocoa powder (1 cup / 3.7oz)
- 1 ½ teaspoons baking powder
- 1 teaspoon baking (bicarb) soda
- 500 g white granulated sugar (2 1/2 cups / 1.1lb)
- 1 teaspoon salt
- 113 g unsalted butter, melted (1/2 cup / 4oz)
- ½ cup vegetable oil (125ml)
- 1 ½ cups buttermilk, room temp (375ml)
- 3 large eggs, room temp
- 2 teaspoons vanilla extract
- 2 teaspoon white vinegar
FOR THE VANILLA SWISS MERINGUE BUTTERCREAM
- 180 g egg whites (roughly 6 eggs, notes)
- 336 g caster (superfine) sugar (1 ⅔ cups)
- 340 g unsalted butter, cool but slightly softened (3 sticks / 1 ½ cups)
- 2 teaspoons vanilla
- ¼ teaspoon salt
For best results, always weigh ingredients where a weight is provided
Instructions
FOR THE BLACK VELVET CAKE
- Preheat the oven to 180C / 350F / 160C fan forced.
- Grease 3 round 8 inch sandwich tins (cake pans). Dust all over with cocoa, tapping out the excess.
- In a very large bowl, sift the flour, black cocoa, baking soda and baking powder together. Add the sugar and salt and use a balloon whisk to gently whisk it all together.
- In a medium bowl, add the butter, oil and buttermilk. Whisk to combine.
- Add the eggs, vanilla and vinegar, then whisk those in too – just until combined.
- Make a well in the centre of the flour mixture and pour in the wet ingredients. Use a spatula to gently fold and stir together just until smooth. Be careful to dig right to the bottom of the bowl to make sure all the flour is combined.
- Evenly divide the batter between the three tins (you can weigh it to be extra sure but eyeballing is fine). Level out on top.
- Bake for 22-24 minutes, turning the trays at about the 15 minute mark, until a toothpick comes out just clean.
FOR THE VANILLA SWISS MERINGUE BUTTERCREAM
- Check out my swiss meringue buttercream post for all the tips, tricks and troubleshooting.
- Rub vinegar around the inside of your mixing bowl, rinse out and dry.
- Heat about 1 inch of water in a medium saucepan until simmering.
- Add the egg whites to the mixing bowl, then the sugar. Whisk together with a balloon whisk until combined.
- Place the bowl over the simmering water and continue to gently whisk and stir for around 5 minutes, until the temperature of the mixture reaches 71C / 160F. Rub a little of the mixture between your fingers to make sure there are no sugar granules left. If there are still granules, remove from heat and keep stirring until they’re gone.
- While still hot, place the bowl in your stand mixer and fit a whisk attachment. Whisk on medium-high speed to stiff peaks, making sure the bowl and meringue have cooled to at least room temperature. If not, you may set it aside until it does.
- Swap to the paddle attachment, then add the butter about 1 tablespoon at a time and beat at medium-high, until it’s mixed in before adding the next tablespoon. Continue like this until it’s all combined.
- It should be looking thick, smooth and creamy. Add the vanilla and salt and mix for a good 20 seconds to make sure it’s all combined.
- Transfer the buttercream to a piping bag, if using.
- Place one of the cake layers onto a cake plate and pipe or spread 1/3 of the frosting over it. Repeat with the second and third layers, only placing them on top of the previous layer once piped – this will stop your buttercream from squishing out the sides.
- Make sure to use a very sharp knife for cutting. Being a 3 tiered cake, you may find it easier to chill the cake so that it’s firm before cutting too.
Notes
- For best results you should always weigh ingredients like flour and sugar. Kitchen scales are relatively cheap but if you can’t weigh the ingredients, use the spoon and level method (don’t scoop).
- All ovens vary – check for doneness 2-3 minutes before the recipe suggests.
This post may contain affiliate links that earn me a small commission for my referral, at no extra cost to you. Thank you for supporting Sugar Salt Magic.
6 Comments on “Black Velvet Cake”
This cake might not be spooky, but I think this is still a perfect Halloween treat. Great colour and textures!
Thanks so much Ben.
Rich, moist and decadent, though I used only 200 gr sugar instead of tbe 500 gr that the recipe calls for. It was sweet enough for me and the filling already adds sweetness. Used it for a number cake and it was a hit.
So happy you love it Yvonne.
Can I bake it in a 13×9 pan instead? If yes, for how long?
I haven’t tested this and I think it would be a lot of batter in the tin. You’d just have to cook until a toothpick in the centre comes out with a crumb or two attached.