Once you try this red velvet bundt cake, you’ll want an excuse to make it again and again. It has it all from being very simple to make, to being chocolatey and rich, to it’s cream cheese filling, to being still perfectly moist days after baking.
Love bundt cakes? Try this Chocolate Coffee Bundt Cake or this Chocolate Bundt Cake with Cheesecake filling.

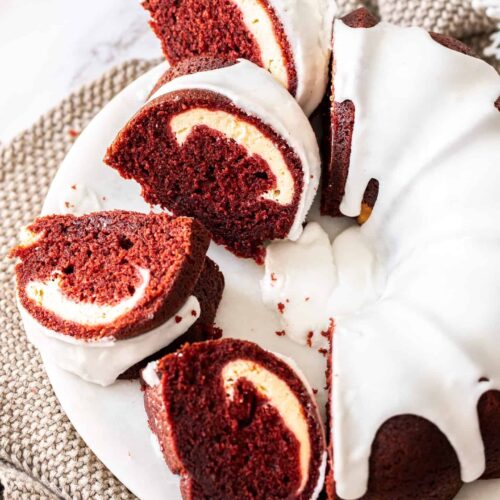
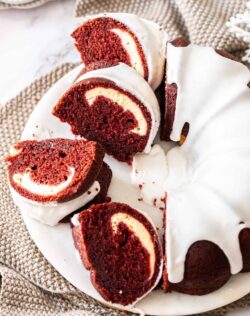
I decided a rich red velvet cake with snowy white icing on top would make the perfect Christmas cake, and what is red velvet without cream cheese, so that’s stuffed in the middle. It truly is perfect for Christmas.
- Easy to make when you have other things to do
- Rich and luxurious
- Fluffy and moist
- Make it ahead – it’s still good days after making it.
- No special equipment needed
What is a bundt cake
A bundt cake is not so much a type of cake but instead the name of the tin it is baked in – it’s a cake tin, with a funnel in the centre and they come in many different designs.
With something of a bundt tin obsession, I currently have 5 bundt tins, including this fluted bundt tin that this cake was cooked in, to my gorgeous Heritage Nordicware Bundt tin (which I’ve also used for this cake in the past).
The fact that there is a funnel in the centre of the cake tin means that more of the cake is touching the sides of the tin where it is hottest. This means you tend to get a firm crust all over the cake, rather than just around the outside edge. For the same reason, the recipe needs to compensate for the added heat so that it doesn’t dry out.

What is red velvet cake made of?
Red velvet cake is made using a combination of unsweetened cocoa, vanilla, vinegar and normally buttermilk. When they were first created, the acid in the buttermilk combined with the cocoa to create a lovely red colour. These days, the red colour is intensified by using red food colouring making it indeed a very red cake.
I love using gel food colouring normally as you don’t need quite so much as a liquid food colouring but both will work fine.
Ingredients in red velvet bundt cake

Full recipe ingredients and directions in recipe card below.
- Cream cheese: Make sure to use full fat cream cheese for this one.
- Sugar: I use regular white granulated or caster sugar (superfine) for this recipe. Both work fine. I also use icing (powdered) sugar in the icing on top.
- Egg: Use large eggs for this recipe.
- Pure vanilla extract: A classic part of a red velvet cake, there is a fair amount in this recipe. Please make sure to use extract, not essence.
- Sour cream: You can use light or full fat sour cream in the cream cheese filling.
- Flour: All you need is plain flour (all-purpose flour) for this cake.
- Cocoa: Just regular unsweetened cocoa powder is what you need for the traditional red velvet cake flavour.
- Baking powder and baking soda: A combination of baking powder and baking soda (bicarb soda) is what gives this cake lift and makes it fluffy.
- Salt: Just a little salt intensifies all the flavours.
- Butter: Stick to unsalted butter so you can control the salt level or skip adding the salt to the recipe if using salted butter.
- Oil: The oil in this is what keeps it so moist. I use an extra virgin olive oil but a good vegetable oil will do the trick.
- Buttermilk: Another classic part of red velvet is buttermilk. Use a full fat buttermilk. It keeps the cake very tender.
- Vinegar: The vinegar will assist in keeping this cake tender.
- Red food colouring: It’s better to use a gel food colouring rather than liquid as they are more concentrated. A liquid colouring will require adding much more which will mean adding more liquid to your batter so it may need to bake a little longer.
Handy tools
- Mixing bowls
- Balloon whisk
- Handheld mixer
- Bundt pan – the cake pictures was made in a Nordicware Original Bundt Pan, but I’ve also made this one in the Nordicware Heritage Bundt Pan.
How to make red velvet bundt cake
Instead of the traditional cream cheese frosting, which doesn’t sit as nicely on a bundt cake, I instead decided on a cream cheese filling. I love it because it’s like a hidden surprise and so delicious. It’s simple to make too.

Full recipe ingredients and directions in recipe card below.
- Beat together cream cheese and sugar in a large mixing bowl. Now beat in the egg followed by the sour cream and vanilla. It takes all of 2 minutes and it’s ready (photo 1). Just set this aside for now.
The batter is simple as well.
- Start by sifting and whisking together the flour, cocoa, baking powder, baking soda and salt (photo 2). Set that aside.
- Now beat together melted butter, oil and sugar. Add the eggs (photo 3) and beat well.
- Add the rest of the wet ingredients, including the red food coloring and carefully mix it together so it doesn’t splatter (photo 4).
- Finally, gently beat in the flour mixture, just until combined (photo 5). Don’t overmix.
- Now just layer it up in the tin with two-thirds of the batter, followed by all the cream cheese filling, then drape the remaining batter over the top (photo 6).
- The cake is baked for around 45 minutes and then left to cool in the tin.
I just use a regular hand mixer for this cake, it’s so simple but feel free to use a stand mixer with a paddle attachment too.
The vanilla glaze
With the cream cheese filling, this red velvet bundt cake doesn’t need a thick layer of buttercream or frosting so I use a simple sweet vanilla glaze made from just icing sugar (powdered sugar), water and vanilla. Just mix those together in a bowl to a thick consistency then pour over the cooled cake.

Tips and tricks
- Make sure to grease your tin well. Bundt tins have lots of little corners and edges and you need to get the grease into all of them. I prefer using butter. Oil will just pool in the bottom of the tin and even spray oils will do the same whereas butter does not move.
- The two-thirds of batter at the base of the cake tin is important as the filling does sink (so when you turn it out, the cream cheese will be in the top half of the cake).
- When you put the cream cheese filling in, just make sure to leave a clear line of cake batter all around the edge, this will ensure your surprise centre stays a surprise and stays in the centre
- Cooling the cake in the tin will allow it pop out of the bundt tin easily and stay in one piece. If you try to demould while it’s still hot, you could have a literal hot mess on your hands. This is also a reason you don’t want to overbake as it needs to stay in the hot tin for a while once you take it out of the oven.
- To turn the cake out, sit your platter over the open base of the bundt tin then, holding it all together. Give it a gentle shake and the cake should drop straight down.
Can I make this cake ahead?
Yes. This red velvet bundt cake is fine made 1-2 days ahead as it stays very moist. Just leave the icing until the day of serving. Overnight it can tend to have the colour of the cake bleed into it.
Overnight, you can just keep it in an airtight container on the kitchen counter but more than that and it should be stored, again in an airtight container, in the fridge.
The cake will keep well for 4-5 days. Let it come to room temperature before serving.
For me this is the perfect Christmas cake recipe. It’s bright and fun and filled with rich flavour. It’s also really striking and just stunning sitting in the middle of your Christmas desserts table. It’s also one of the most quickly devoured cakes I’ve ever made.
PIN IT:
Click to PIN this recipe for later!

If you try this red velvet bundt cake recipe, please take a moment to leave a rating and comment below. I love hearing from you and it helps other readers too! You can also take a photo and tag @sugarsaltmagic on Instagram.
More recipes you’ll love
- Red Velvet Pound Cake
- Red Velvet Brownies
- Red Velvet Doughnuts
- Quick Chocolate Bread (Chocolate Loaf Cake)
- Ginger Loaf Cake
Never Miss a Recipe!
Get the latest recipes straight to your inbox!
Ingredients
FOR THE CREAM CHEESE FILLING
- 250 g cream cheese, softened (9oz / 8oz will work too)
- ¼ cup caster (superfine) sugar (50g / 1.8oz)
- 1 large egg, room temp
- 2 teaspoons vanilla extract
- ¼ cup light sour cream, room temp (60ml)
FOR THE RED VELVET BUNDT CAKE
- 260 g plain (all purp flour) (9.2oz / 2 cups, notes)
- ¼ cup unsweetened cocoa
- 1 ½ teaspoons baking powder
- ½ teaspoon baking (bicarb) soda
- ½ teaspoon salt
- 300 g white granulated sugar (1 ½ cups / 10.5oz)
- 85 g unsalted butter, melted (¾ stick / 3oz)
- ½ cup vegetable oil (125ml)
- 2 large eggs, room temp
- 2 teaspoons vanilla extract
- 1 cup buttermilk, room temp
- 1 ½ teaspoons white vinegar
- ¾ teaspoon red gel food colouring (notes)
FOR THE ICING
- 2 cups icing (powdered) sugar (260g / 9.2oz)
- 2-3 tablespoons water (notes 1)
- 1 teaspoon vanilla extract
For best results, always weigh ingredients where a weight is provided
Instructions
- Preheat the oven to 180C / 350F / 160C fan forced. Grease a bundt pan with butter making sure to get into all the grooves and corners.
FOR THE CREAM CHEESE FILLING
- Beat together the cream cheese and sugar until smooth and creamy. As long as it’s room temp this should take no longer than a minute.
- Add the egg and beat well. Add the vanilla and sour cream and mix through until incorporated. Set aside.
FOR THE RED VELVET CAKE BATTER
- In a large mixing bowl, sift the flour, cocoa, baking soda, baking powder and salt together. Whisk to combine.
- In a large bowl with an handheld electric mixer or in the bowl of a stand mixer, beat together the melted butter, oil and sugar.
- Add the eggs and beat well to combine.
- Add the buttermilk, vanilla, vinegar and food colouring and beat on low to combine (careful as it may splatter and send red batter everywhere).
- Add the flour mixture and on low, beat until it’s just combined.
- Tip ⅔ of the cake batter into the bundt cake pan. Spread evenly around the base. Now spoon in the cheesecake mixture just around the middle of the cake batter but pile it up a bit so it doesn't spread to the edges (leave about 1-2cm of cake batter visible around the outside and middle edges).
- Top with the remaining cake batter, making sure to cover all of the cheesecake filling. This is best done a spoonful at a time, draping each spoon of batter over the cheesecake centre.
- Bake for around 35-40 minutes, turning the tin half way through, until a toothpick inserted comes out clean.
- Let the cake cool in the tin then transfer to a cake plate.
FOR THE ICING
- If making the cake ahead, leave the icing until the day of serving.
- Sift the icing sugar into a medium bowl.
- Add the vanilla and half the water. Mix with a spoon until it starts clumping. Add the water a tiny bit at a time until you have a thick but pourable consistency. You want it to be the thickness that it will smooth out on it’s own in 12-15 seconds. You can add more water or more sugar depending on the consistency you want.
- Pour over the cooled cake. Can be served immediately or let the icing set for 30 minutes first.
Notes
- For best results you should always weigh ingredients like flour and cocoa. Kitchen scales are relatively cheap but if you can’t weigh the ingredients, use the spoon and level method (don’t scoop).
- I use gel food colourings which are much more concentrated than liquid types and generally purchased either online or directly from specialty cake decorating shops. If you prefer to use liquid food colouring, which are more readily available (from grocery stores) you may need to use more than stated in the recipe but just get the batter nice and red.
- Make sure to grease the bundt pan well, getting into all the grooves. Butter will work better than oil or spray oils.
This post may contain affiliate links that earn me a small commission for my referral, at no extra cost to you. Thank you for supporting Sugar Salt Magic.
34 Comments on “Red Velvet Bundt Cake with Cream Cheese Filling”
Can I use full fat sour cream instead of light sour cream in the cream cheese filling recipe?
Hello Ruth. Yes, you can.
I made this for the second time.I used greek yoghurt instead of sour cream and it turned out fine. It was delicious and turned out well.
Such a handy tip, thanks Kim.
Hi Marie…can I do this recipe in 2 x 8″ pans as well?
Hello Riana. Though I haven’t tried doing this, I think it should work. If you do the cream cheese filling too, you could swirl it through the cake batter. I’d love to hear how it turns out, if you do try it 🙂
Hi Marie,
Just found your blog and am excited to try your recipes, including this red velvet cake. I need to buy a Bundt tin for this and noticed there are a few sizes, and not a standard one. What size do you use? Or doesn’t it matter? Thanks in advance!
Hi Surene, I recommend investing in the Nordicware brand. They are a little more expensive but they’re extremely good quality, lovely designs and evenly sized. They’ll last a lifetime. In saying that, I have one that I bought from my local supermarket that is roughly the same size too. If you aren’t sure about the size, just aim to fill them 2/3 to 3/4 full and no more.
The cake is beautiful but 9.2oz. of flour equals to ??? Cups?
Hello Inez, it’s equal to 2 cups. Always best to weigh flour if you can otherwise, spoon it into your cup, then level off with a knife, without tapping it down at all.
Made this and it was great however it had air pockets in the cream cheese mix. I was reluctant to pack it down for fear of it oozing out the side of the cake batter. I will try it again. Thanks
So happy you loved it, Kim. Was it big air pockets? Could it be maybe the cream cheese was beaten too long?
Very good
So happy you love it, Shirley.
I’m confused. The melted butter calls for 1/4 stick or 3 ounces. 3 ounces of butter is 6 tablespoons which is more than 1/4 stick. Which is the correct amount?
Thanks!
David
Sorry D, just a typo. The 1/4 should read 3/4. I’ve updated the recipe card. Thanks for letting me know.
Thank you for your tips. The cake came out well. But my icing wasn’t pouring it was quite thick. Could you please advice.
Hello Reka, some brands of icing sugar may take more liquid than others. All you need to do is add a tiny bit more water just a little at a time until it’s the consistency you like 🙂
I’ve thought about adding some flaked sweetened coconut to the cream cheese filling just for some texture. Do you think I would need to change the baking time? Thanks.
Hello Linda, no it won’t affect the cooking time but may make it a bit drier. Another option is you could sprinkle some coconut over the top when you put the glaze on.
Thanks, so much for responding Marie. I used full fat cream cheese in error. Does this make a difference? If so, this is certainly a learning curb.
Full fat is correct Risha
I’m confused. Should I be using full fat or light. Your recipe says light.
Hi Risha, the recipe calls for light sour cream but full fat cream cheese. Hope this helps.
Marie, my cream cheese mixture is very runny.. How to i thicken it?
It shouldn’t be runny so maybe you have beaten the mixture too much or used sour cream that was more liquid than thick? Did you use light or full fat cream cheese?
Marie
Why don’t you use vinegar in your Red Velvet. I’m curious. If I add vinegar, will it make a difference?
Hello Risha, It’s just not a part of my recipe and is not necessary ? happy baking
That’s a gorgeous bundt pan and the cake looks and sounds fantastic. Love the surprise cream cheese filling!
Thanks Nicole. It’s definitely my favourite bundt tin and I love a surprise centre 🙂
Red velvet and cream cheese is the perfect pairing. It’s one of my absolutely favorite cake flavor too. And gosh I can’t say no to cheese!!
It really is a wonderful combo. Thanks Trang 🙂
Oh, this cake looks so beautiful and festive; that’s a perfect seasonal treat. And this cream cheese filling? That’s basically a hidden cheesecake – awesome! I’ve been considering a bundt cake tin for a while, and I should probably ask Santa to bring it to me this year :).
I don’t often cook using a bundt tin but every time I do I just love how gorgeous they look. I think there may be more coming this way soon 🙂