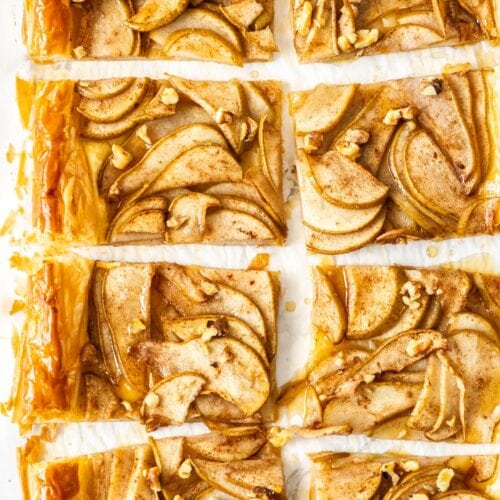
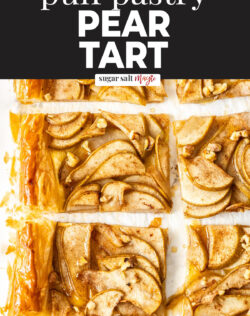
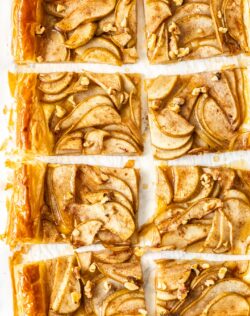
This gorgeous puff pastry pear tart is a layer of puff pastry, topped with lightly spiced pear slices then baked to golden perfection. The pastry turns all flaky, buttery and crisp while the pears get lovely and soft.
Spiced with ginger and cinnamon and just lightly sweetened with maple syrup, this pear puff pastry tart makes a lovely breakfast or brunch treat. It’s delicious served with some more maple syrup, pouring cream or ice cream – pick whichever you like or have a variety on hand for guests to choose their own favourite.
You’ll love this strawberry puff pastry tart too or try these mini puff pastry jam tarts.

Never Miss a Recipe!
Get the latest recipes straight to your inbox.
Ingredients you’ll need
This easy pear tart has the most amazing taste and it all comes from such simple ingredients.

Jump to the recipe for full ingredients and instructions.
- Pears: Just about any pears will work fine here. I’ve used Bartlett pears. If you use bartletts, make sure they aren’t too ripe. Others that are great here are Beurre Bosc pears or Anjou pears.
- Store-bought puff pastry: If you can, get a single piece of puff pastry but if you need, you can also press a couple of pieces together.
- Maple syrup: Maple syrup and cinnamon and pears are so lovely together. There is just a little here to lightly sweeten the pears. You can also swap the maple syrup for white sugar, brown sugar or honey.
- Spices: The spices are made up of ground ginger, ground cinnamon and a pinch of salt.
- Apple cider vinegar: The vinegar just helps to stop the pears from oxidising (turning brown) and you can use white wine vinegar or lemon juice in it’s place.
- Walnuts: Just for a little crunch, there is some chopped walnuts scattered all over the top. You can swap these for other nuts too. Try cashews, pecans, almonds or pistachios.
How to make puff pastry pear tart

Jump to the recipe for full ingredients and instructions.
- Slice the pears: Start by slicing the pears into quarters, then cut on an angle to remove the core from each piece. Now slice each quarter into thin slices about 2-3 mm thick.
- Spice the pears: Add the sliced pears to a large bowl and coat in the spices, maple syrup and vinegar. Set them aside.

- Prepare the puff pastry base: Score roughly a 1 inch thick border all the way around the pastry. I just like to lay a ruler against the edge, then score on the inside of it, moving as needed to create a border all the way round. Use a fork to prick little holes all over the centre part then brush the border only with egg wash.

- Layer it up: Now grab 3-4 slices of pears at a time and layer them up all over the middle section leaving the border clear. Scatter over the walnuts.
- Bake: Now just bake for 27-30 minutes until that border is deep golden brown.
How to serve it
This easy pear tart is best served fresh and warm. You could add another drizzle of maple syrup or top it with runny cream, whipped cream or a scoop of vanilla ice cream. Whichever you choose, it’ll be wonderful.

FAQ’s
Bartlett pears, Anjou pears, Beurre Bosc pears are all lovely in tarts. As long as they aren’t over ripe, they’ll hold their shape nicely
There is no need to peel the pears for this puff pastry pear tart. The skin soften nicely and isn’t noticeable when you eat it.
You actually want the pears underripe for baking so they don’t break down as they bake. Underripe pears will hold their shape better.
Technically no, it will still rise around the pears but I find you get a nicer looking border and more highly puffed border by scoring it.

Did you try this pear puff pastry tart recipe?
Leaving a rating and comment below the recipe is so helpful!
Hungry for more?
- Subscribe via Email, Facebook, Pinterest and Instagram.
- Add Sugar Salt Magic as a Google Preferred Source.
Ingredients
- 3 small pears
- 2 teaspoons apple cider vinegar
- 1 tablespoons maple syrup (notes 1)
- 1 teaspoon ground ginger
- ½ teaspoon ground cinnamon
- pinch of salt
- 375 g rectangle puff pastry sheet, thawed but cold (13 ¼ oz)
- 1 tablespoon chopped walnuts (notes 1)
- 1 egg yolk mix with a teaspoon of milk
- pouring cream or ice cream to serve
For best results, always weigh ingredients where a weight is provided
Equipment
- large baking sheet
- Ruler and sharp knife
Instructions
- Preheat the oven to 210C (190C fan) / 410F.
- Slice the pears in half from stem to base, then in half again, so you have quarters. Cut on an angle to remove the core from each piece. Slice each one into thin slices (2-3mm thick) lengthwise.
- In a medium bowl, combine the pear slices, vinegar, maple syrup, ginger, cinnamon and pinch of salt. Mix well to coat them.
- Take a large piece of baking paper and lay your puff pastry on top of it. Score a line 1 inch from the edge all around the pastry with a sharp knife and a ruler to guide you- don’t cut all the way through.
- Use a fork to prick all over the area inside of this line but don’t prick the border.
- Use the edge of the baking paper to drag it onto a large baking sheet.
- Beat the egg yolk and 1 teaspoon of cream or milk together and brush all over the 1 inch border.
- Top the middle section of the pastry with the pears, using groups of 3-4 slices and overlapping where needed. Scatter the walnuts over the pears.
- Transfer the tart to the freezer for 15 minutes (if you have space) or the fridge for 30 minutes – the pastry will puff better, the colder it is.
- Bake for 28-30 minutes until deep golden brown around the edges and the pears are tender.
- Serve warm drizzled with more maple syrup, pouring cream or ice cream.
- Please take a moment to leave a comment & rating. It's appreciated and so helpful.
Notes
- Tablespoons: I use a standard Australian 20ml tablespoon (equal to 4 teaspoons). Check yours before measuring.
- Keep the pastry as cold as possible: Work quickly once the pastry is out of the fridge and don’t skip the chilling time. Puff pastry puffs much better when cold.
- Nutrition details are approximate only – scroll below the recipe to find the full nutritional information.
This post may contain affiliate links that earn me a small commission for my referral, at no extra cost to you. Thank you for supporting Sugar Salt Magic.


2 Comments on “Puff Pastry Pear Tart”
Your recipe ingredients include chopped walnuts, but the recipe itself never tells how to use them. Bad.
🤣 Sorry, Thomas. I’m human and missed that step. But you can’t really go wrong. Scatter them on before or after baking. I’ll adjust the recipe. Thanks for so kindly letting me know.