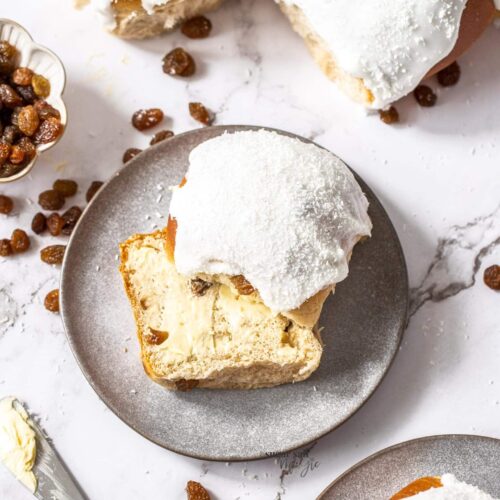

A classic in any Aussie bakery, iced buns with a layer of icing and desiccated coconut are a delicious treat. This soft and fluffy bread treat are similar to finger buns in the UK, and Australia’s answer to the US cinnamon roll.
These buns are similar to my hot cross bun dough base or try these cinnamon rolls for your sweet bready treat. Try these Choc chip hot cross buns too.

What are iced buns?
My iced buns are based on the ones I grew up with in Australia. A classic in any Aussie bakery, often you’ll find them with fruit and spice like these ones but equally as often, you’ll find them without.
Similar to finger buns / iced fingers in the UK (and some places these are common in Australia too), iced buns are normally round, as opposed to long “finger” shape and the icing always has a sprinkling of desiccated coconut over the top.
Why you’ll love it
Do you love making bread from scratch? I find it so therapeutic and a little weekend project like these iced buns is perfect. They actually don’t take long to make at all and can be frozen so you can have them ready for morning tea on a whim or a delicious lunchbox treat.
- Soft, fluffy bread
- With or without fruit – they’re lovely both ways
- That thick sweet icing makes them a real treat
Ingredients you’ll need

Detailed quantities and instructions in the recipe card below.
- Flour: You’ll get best results using strong white bread flour for that perfect chewy, bread texture but plain flour / all purpose flour will work too.
- Sugar: Use plain white granulated sugar.
- Yeast: I use instant yeast (aka fast action yeast) to keep this recipe very simple but you can swap it for active dry. If you use active dry yeast or your instant yeast is a little old, mix it into the warm milk and let it sit for 5 minutes to make sure it puffs up (blooms) – this way you know it’s alive and will do it’s job.
- Ground cinnamon: These buns are lightly spiced but you can certainly leave this out if you prefer.
- Salt: Just a little salt to balance the flavours is essential. Try not to let it come in direct contact with the yeast as it can kill it.
- Egg: The egg adds structure and richness to this sweet bread.
- Milk: Use full fat or whole milk for best results but there’s no reason you can’t use a light version or even a milk substitute (like soy or oat milk). The flavour will change depending on what you use.
- Oil: These buns use oil to help keep them tender and stop them from drying out.
- Vanilla: A little vanilla is lovely and a must.
- Dried fruit: I use the classic sultana in these but you can use raisins, currants or larger chopped dried fruits too. You can also leave it out if you prefer.
- Icing sugar: Icing sugar, also known as powdered sugar or confectioners sugar is a powdery sugar and perfect for making icing.
- Desiccated coconut: You shouldn’t skip this – it’s such a classic flavour in these Aussie iced buns but if you don’t like it, leave it off.
If you want to make the UK finger bun version, you can leave out the cinnamon, fruit and coconut.
Tools you’ll need
- A stand mixer is so helpful for kneading dough but not an absolute necessity. A large mixing bowl if you plan on making it by hand.
- A baking tin that can fit 8 hand sized buns. I like using one where they sit fairly close so they get nice and tall but even a large tray will work.
- A sharp knife for cutting the dough into even pieces.
- Kitchen scales if you want to weigh the dough, so you know your buns are perfectly even.
- A mixing bowl and spatula or piping bag for the icing.
How to make iced buns

Detailed quantities and instructions in the recipe card below.
- Make the dough: Start by mixing the dough ingredients together in the bowl of a stand mixer (or just a large bowl if you don’t have one). Knead the dough for 10-12 minutes in a stand mixer on low-medium speed or for about 15 minutes by hand, until the dough is smooth and a little springy. Knead through the fruit.
- The first rise: Cover the bowl with plastic wrap so the dough doesn’t dry out, then place it in a warm (not hot) spot to rise until double it’s size.
- Shape the dough: Cut the dough into 8 even pieces and shape into smooth balls. A simple way to do this is to pinch in the base over and over until the top is smooth and the base tightly pinched together.
- The second rise: Place the balls of dough into a generously greased baking tray, cover loosely with plastic wrap and let them rise to double again.
- Bake: Bake the buns at 180C / 350F for around 20-22 minutes until the tops are golden then let them cool before icing.

- The icing: The icing for iced buns is seriously easy. Mix together the icing sugar and milk until you have a thick, yet runny consistency – you want it to be thick enough to sit on top of the buns without rolling off but loose enough that it will smooth out in about 10 seconds. Scatter over coconut and they’re ready.
In the UK and some places here in Australia too, these are made in finger shapes – aka finger buns. Either way, they are lovely sliced in half and buttered then eaten just as is.
You could even spread some jam inside if you like, especially if you didn’t include fruit in the dough.
Tips and tricks
- Warm the milk: The milk must be warm (not hot) before you start. This will help the yeast to grow. Around 40C / 104F, if you have a thermometer, is perfect or just make sure it’s warm on your finger.
- If your yeast has been around a while, it’s a good idea to test it before adding to the dough, so you don’t waste a whole lot ingredients if it’s no good. To do this, just mix it into the warm milk and let it sit for 5-10 minutes. If you see it start puffing up (blooming) it’s good to go. If not, throw it out and start with a fresh container of yeast.
- For active dry yeast, you must “activate” it first. Just follow the steps above.
- Don’t rush the rising time. Sit the dough, covered, in a warm (not hot) spot to rise and let it double before proceeding.

How to eat iced buns
As made in this recipe, these are lovely served sliced in half, spread with butter. However, finger bun style, and without the fruit and cinnamon, these are often served with whipped cream and jam.
Storage
Store the finished iced buns in an airtight container in the pantry or fridge for 2-3 days. Bread is always best as fresh as possible but you can just zap these in the microwave for 8 seconds (even with icing) and it will soften and fluff them up again.
Can you freeze iced buns? Yes, these buns can be frozen in an airtight container for up to 3 months. Let them come to room temperature before serving.

More recipes you’ll love
- Raspberry rolls
- Croissant French toast casserole
- Caramel doughnuts with brown sugar custard
- Jumbo Swedish cinnamon buns
- Strawberry chocolate cinnamon rolls
- Chocolate hot cross buns
- Maritozzi (Italian cream buns)
IF YOU TRY THIS iced bun recipe, please take a moment to leave a rating and comment below. I love hearing from you, and it helps other readers too!
Never Miss a Recipe!
Get the latest recipes straight to your inbox!
Ingredients
FOR THE BUNS
- 455 g strong white bread flour (3 ½ cups / 1lb)
- ⅓ cup white granulated sugar (66g / 2.3oz)
- 2 ¼ teaspoons instant yeast (or active dry yeast, notes) (1 sachet / 7g)
- 2 teaspoons ground cinnamon
- ½ teaspoon salt
- 1 large egg, room temp
- 1 cup whole milk (250ml)
- ⅓ cup vegetable oil (80ml)
- 2 teaspoons vanilla extract
- ½ cup sultanas or raisins (optional)
FOR THE ICING
- 2 ½ cups icing sugar (powdered / confectioners sugar ) (325g / 11.5oz)
- 2-3 tablespoons milk
- 1 tablespoon desiccated coconut
For best results, always weigh ingredients where a weight is provided
Equipment
- stand mixer or large mixing bowl
- Large baking tray
Instructions
- MAKE THE DOUGH: To the bowl of a stand mixer (with a dough hook attachment (or see notes if you don't have a stand mixer), add the flour, sugar, yeast, cinnamon and salt and give it a whisk to combine.
- Make a well in the centre. Add the egg, milk (around 40C or warm to the touch, not hot), oil and vanilla. Knead on low-medium for around 10-12 minutes until the dough is smooth but elastic (just gently indent with a fingertip and it should bounce back out).
- Add the sultanas, if using, and knead that through too. You can do this with your hands or with the dough hook again.
- Remove the dough from the bowl then brush the bowl with a little oil. Place the dough into it and flip it over so that has a light coating of oil all over. Cover with plastic wrap and let it sit in a warm place for 1 to 1 ½ hours or until doubled in size.
- ASSEMBLING THE BUNS: Grease a large baking tray generously with butter.
- Punch down the dough and transfer it to a clean work surface. Cut into 8 even pieces (weigh them if you want to be precise).
- Roll each piece into a smooth, round bun by pinching in the base over and over until you have a smooth top. Place on the baking tray 1-2 inches apart. Cover lightly with plastic wrap again and let them rest and rise for another 45-60 minutes until doubled again and they look puffy and soft.
- Preheat the oven to 180C / 350F / 160C fan forced.
- BAKE: Bake for around 20-22 minutes, turning the tray at the halfway mark, until golden.
- Let the buns cool almost to room temperature before icing or the icing may just roll right off.
- ICE: Combine the icing sugar with milk (a little at a time) and mix until you have a thick yet slightly runny consistency (more sugar to make it thicker and more milk to thin).
- Spoon or pipe the icing onto the top of the buns then scatter over desiccated coconut.
- Serve. These are lovely cut in half, spread with butter.
- Please take a moment to rate this recipe. I really appreciate it and it helps me create more recipes.
Notes
- I use instant yeast to keep this recipe very simple but you can swap it for active dry. If you use active dry yeast or your instant yeast is a little old, mix it into the warm milk and let it sit for 5 minutes to make sure it puffs up (blooms) – this way you know it’s alive and will do it’s job.
- You must activate active dry yeast before adding to the dough – as per step 1 above.
- The dough should be a little sticky but still manageable. If you notice it sticking to the sides of the bowl still after 3 minutes of kneading, add 1 tablespoon of flour. No more. You don’t want the dough to become dry.
This post may contain affiliate links that earn me a small commission for my referral, at no extra cost to you. Thank you for supporting Sugar Salt Magic.
6 Comments on “Iced Buns (with coconut)”
Made these again and they work well when you do the second prove in the fridge overnight. Thanks Marie
So great to hear, thanks so much for the tip, Kim.
This recipe worked really well and I substituted cranberries instead of sultanas. Delicious. These are worth the extra proving time. Another winner Thanks Marie
Perfectly festive. Thanks so much Kim.
lovely and easy recipe. Reminds me of my school days and will be on the look out for more of your wonderful recipes
So happy you love it, Barbara.