
Mint slice biscuits (of the cookie variety) are a bit like a peppermint pattie and chocolate cookie all combined into one delicious treat. The peppermint fondant is soft and minty and perfect when coated with chocolate.
Love chocolate and peppermint as much as I do? Try these chocolate peppermint cookies or this peppermint brownie tart.

These are so perfect straight from the fridge, when the chocolate has a crack and the cold somehow enhances that peppermint flavour.
These cookies start with an easy chocolate sugar cookie which, once baked, has crunchy edges and a soft middle. You can cook them a little longer and have a totally crisp cookie if you prefer.
The peppermint cream topping is very similar to a buttercream but the ratios are a little different. It makes a dough that you can roll out and cut shapes.
Handy tools to have
- Stand mixer: you can make the dough without one but it’s easier with it, since the dough is quite thick.
- Round cookie cutter: any shape is actually fine, but traditionally these biscuits are round.
How to make them
Each of the 3 layers are really simple so let’s get started.

- Mix together the simple cookie dough (images 1&2), then roll it out to about 4mm thick.
- Use a cookie cutter to cut out shapes (image 3). You can keep it simple with a round cookie cutter about 5cm (2 inches) wide but as they don’t change shape too much when they bake, you could use any shape you fancy.
- Bake the cookies, then let them cool before proceeding.

- The peppermint cream is a matter of mixing together all the ingredients at once until smooth and creamy (image 5).
- Press it out really thinly between two sheets of plastic wrap (image 6), then place it in the freezer until firm.
- Cut out the same shape from the frozen peppermint fondant, then sit one on top of each cookie base (image 7).
- Give them another few minutes in the freezer to firm up and get cold again.
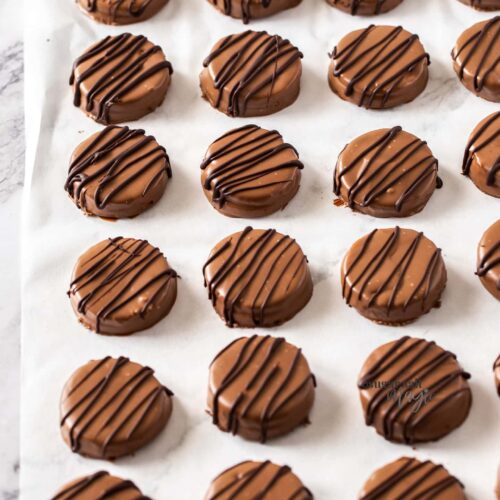
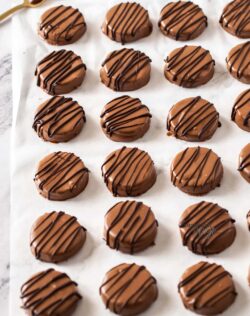
- Coat with melted chocolate and set on a baking tray (image 8) in the fridge until they set.

Tips and Tricks
- Roll the cookie dough between two sheets of non-stick baking paper. This way you don’t need to use extra flour and dry them out. It also saves on mess.
- You can re-roll the dough but try to get as many cut from the first roll as possible. These are always the best texture once baked and also it makes the whole process quicker.
- The peppermint cream is very soft on purpose once encased in chocolate, is silky smooth to bite into. Be aware it will soften quickly once out of the freezer so work quickly and refreeze for a few minutes if necessary.
- Once you’ve topped all the cookies with peppermint cream, place them in the freezer again for a few minutes. Don’t skip this step. It makes them firm enough that the warm chocolate doesn’t melt the peppermint cream and helps to set the chocolate more quickly.
- Using the microwave to melt chocolate is fine IF you don’t overheat it. Only ever zap it in 30 second intervals, stir well between each one and only heat until it’s 80% melted. At that point, it will be warm enough to finish melting just by stirring it. If you’re more comfortable with it, feel free to use the double boiler method.
- I often add a little more unmelted chocolate to the melted chocolate right at the end and stir it in. This has a slight tempering effect on the melted chocolate and sets with more of a crack. (Note: this is not true tempering though)
- Use two forks to move the cookie around in the chocolate but don’t leave it in there for too long – you don’t want that creamy topping to heat up. Take the cookie out of the chocolate and let it drop off a little – I like to swap the fork back and forward to help the chocolate drip off. Scrape the bottom of the fork along the side of the dish, then place it cleanly onto the baking tray.
- You can reheat the chocolate if you need to as it will cool slightly with each cold cookie that gets dunked into it. Only reheat for 10 seconds at once and stir really well.
- Melt more chocolate than the recipe calls for as this will make dipping easier.
- Use your favourite eating chocolate for the coating. That way you know it will taste good.
Click here to Pin this recipe for later!

Best served straight from the fridge, these homemade mint slice biscuits are such a lovely after dinner treat.
More chocolate and peppermint treats
- Chocolate Mint Cupcakes
- Peppermint Hedgehog Slice Recipe
- Peppermint Chocolate Roll Cookies
- Chocolate Peppermint Cookies
- Peppermint Brownie Tart
Never Miss a Recipe!
Get the latest recipes straight to your inbox!
Ingredients
For the Chocolate Sugar Cookies
- 130 g plain (all-purp) flour (1 cup / 4.6oz)
- 30 g cocoa (⅓ cup / 1oz)
- ½ cup caster sugar (100g / 3.5oz)
- 57 g unsalted butter, softened (½ stick / ¼cup)
- 1 large egg
For the Peppermint fondant
- 57 g unsalted butter, softened (½ stick / ¼cup)
- 2 ½ cups icing (powdered/ confectioners) sugar
- 2 tablespoons thickened (heavy) cream (notes)
- 2 teaspoons peppermint extract
To finish
- 350 g milk chocolate (12.3oz)
- 20 g dark chocolate, for drizzling
For best results, always weigh ingredients where a weight is provided
Equipment
Instructions
For the Chocolate Sugar Cookies
- Preheat the oven to 180C / 350F / 160C fan forced, and line 2-3 large cookie sheets with baking paper.
- Sift the flour and cocoa into a bowl and set aside
- Beat the butter and sugar together until lightened. Scrape down the sides of the bowl. Add the egg and beat well, scraping down the bowl a couple of times until well mixed.
- Add the flour mix in 3 parts, keeping the mixer on low until it comes together as a dough.
- Bring the dough into a smooth ball and roll out between 2 sheets of baking paper (cut the dough in half to make it more manageable). Roll it to about 4-5mm thick. The thinner you go, the crispier they will be when finished cooking. The thicker you roll it, the softer the finished cookie will be.
- Use your cookie cutter of choice to cut out cookies. Reroll the dough as required but get as many out of each rolled batch of dough as possible.
- Bake for 10 – 12 minutes, turning the trays at the halfway point so they bake evenly.
For the Peppermint fondant
- Beat all ingredients together until thick but smooth and creamy
- Line a large baking tray with plastic wrap then tip the peppermint mixture out on top. Lay another sheet of plastic wrap over the top and use your hands to press it out to about 4-5mm thick.
- Place the tray in the freezer for one hour.
- Use the same cookie cutter you used for the cookies to cut the peppermint fondant and use a flat metal spatula to help you transfer them onto the cookies (notes)
- If there is scraps of peppermint fondant, you can flatten it out and freeze again, to finish any remaining cookies.
- Place the peppermint topped cookies in the freezer for half an hour.
To finish
- Melt the chocolate in 30 second increments in the microwave, stirring well between each. When it's about 80% melted, stir it to melt the rest of the way.
- Line a baking tray with baking paper. Use two forks to place a cookie into the melted chocolate and turn it over to cover in chocolate. Lift the cookie out of the chocolate and allow excess chocolate to drip off, then give it a gentle shake to smooth out the top. Place the cookies on tray. Place in the fridge to set.
Notes
- I use a standard Australian 20ml tablespoon (4 teaspoons worldwide)
- For best results you should always weigh ingredients like flour and sugar. Kitchen scales are relatively cheap but if you can’t weigh the ingredients, use the spoon and level method (don’t scoop).
- The peppermint fondant will be very soft at room temperature so work quickly and refreeze if you need to, to make topping the cookies easier.
This post may contain affiliate links that earn me a small commission for my referral, at no extra cost to you. Thank you for supporting Sugar Salt Magic.
4 Comments on “Homemade Mint Slice Biscuits”
Amazing recipe! They taste veryyy good although they didn’t quite turn out good looking like in the recipe but that’s just because I lack practice.
So happy you loved them Phoebe
I love chocolate and peppermint together! These biscuits look and sound so delicious!
Me too. Thanks so much Natalie