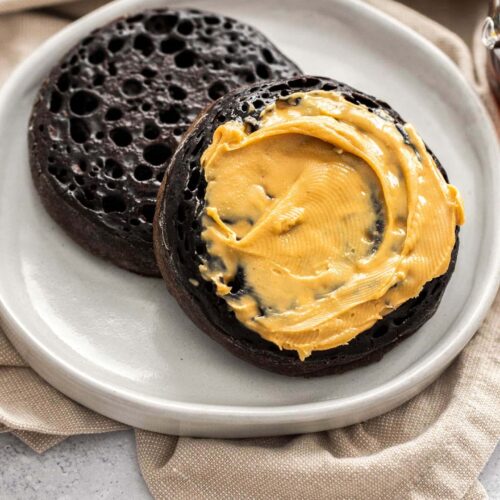
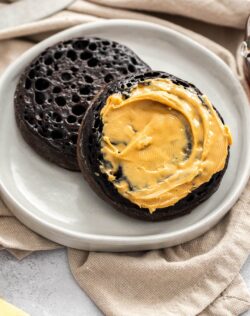
Chocolate crumpets are just like the original but turned chocolatey. Enjoy them for breakfast, brunch or a tea time treat. These ones smothered in butter, peanut butter and maple syrup are amazing.
Want to try the original? Try my homemade crumpets or, if you feel like a savoury breakfast try this puff pastry breakfast tart.

Why you’ll love them
These chocolate crumpets are so fun to make.
- The texture: These are spongey, soft and chewy – just like a crumpet should be.
- The flavour: While filled with cocoa, they have just a subtle chocolate flavour when cooked.
- Difficulty: Very easy to make – the main thing is keeping an eye on the temperature.
- Make ahead: Yes, you can make crumpets ahead. Keep in the pantry for a couple of days or you can freeze them for future.
I tested and tested these crumpets to get the perfect texture whilst still including plenty of cocoa to get a great chocolate flavour. This is one of the chocolatiest crumpet recipes around, though the flavour is still quite subtle.
They pair beautifully with just butter alone but I especially love them topped with peanut butter and maple syrup – so good. You can try Nutella and jams too.
In case you don’t know what crumpets are, they are a leavened pan fried quick bread often eaten at breakfast, brunch or morning or afternoon tea – depending on where you come from. This classic UK treat has signature holes in the top and a funnel-like, spongey texture on the inside perfect for soaking up butter.
What are crumpets made of

Detailed quantities and instructions in the recipe card below.
- Flour: You’ll just need plain flour / all-purpose flour.
- Cocoa powder: I use regular unsweetened cocoa powder in these.
- Sugar: You just need a little white granulated sugar – not too much.
- Yeast: Instant yeast or fast action yeast is one part of the leavening duo….
- Baking soda: … and baking soda is the other.
- Salt: This chocolate crumpet recipe has less salt than my regular crumpets.
- Water: Just warm water is perfect and also extremely important in these.
During testing, I tried the recipe with milk in place of part of the water, hoping it would increase the chocolate flavour. It didn’t though and it also causes one major issue – it will stop you getting holes in the crumpets. Make sure to stick to water to get those classic holes that make a crumpet a crumpet.
Technically, yeast can be considered vegan, making these crumpets vegan, however, check with the vegan in your life if they are comfortable eating yeast as it is a living organism.
Tools you’ll need
- A blender makes mixing the batter so simple. A handheld mixer also works.
- Silicone spatulas so none of the batter gets left behind.
- Crumpet rings. Egg rings or mini tart rings will also work.
- A non-stick frying pan / skillet.
How to make chocolate crumpets

Detailed quantities and instructions in the recipe card below.
- Make the batter: Add the crumpet ingredients to a blender (photo 1) and blend for 20 seconds. Scrape down the sides, then blend for another 20 seconds until smooth (photo 2).
- Rest the batter: Let the batter rest for 45 minutes.
- The first cook: Grease and flour your crumpet rings, then place them in a lightly oiled, non-stick pan. Pour batter into the rings to halfway up (photo 3). Cook on medium for about 3-4 minutes until you see a dry ring form around the outside and some bubbles starting to pop (photo 4).
- The second cook: Turn the heat down to low and cook another 3-4 minutes until the tops are dry and have loads of popped holes. Flip them to seal the tops (photo 5).
- Toast them: Technically, the crumpets are cooked through at this stage but the texture is even better if you toast them. You can continue this in the pan – keeping it on low and being careful not to burn them. I use my toaster on the crumpet setting. You could also use an overhead grill / broiler until the tops are crisp.
- Serve: Serve the crumpets immediately with different sweet topping options – see below.
Tips and tricks
- Make sure to rest the batter: The batter needs to rest for the yeast to begin activating and adding air into the batter.
- Don’t cook too quickly: If you cook these too quickly or have the heat too high, you risk burning the crumpets (and it’s hard to tell when they’re already dark from the cocoa). You also risk those bubbles not popping.
- A non-stick pan is best: I still tend to add a little oil to the pan but not too much and because these are soft and fragile, it’s best if you can move them around easily.
- If you don’t have a blender: No blender, no problem. Just use a large mixing bowl and a handheld mixer and beat for about 1 minute on high, make sure there are no lumps of flour before you let the batter rest.

What to put on crumpets
Whether you make regular crumpets or chocolate crumpets, they’re all lovely served with sweet spreads. These chocolate ones especially are best with sweet toppings. Try these options;
- Butter is a must – choose salted or unsalted.
- Peanut butter and a drizzle of maple syrup together – this is my favourite combo.
- Other nut butters like almond butter or cashew butter
- Maple syrup or honey
- Jams & preserves – strawberry and raspberry are gorgeous on these.
- Biscoff spread or cookie butter
- Nutella
- Salted caramel or dulce de leche for something extra decadent
- Try these compotes as a lovely fresh homemade option – raspberry compote, fresh cherry sauce, blackberry compote or blueberry topping.
Storage
Once made, the chocolate crumpets can be kept in an airtight container in the pantry for a couple of days. Toast them before serving.
Crumpets can be frozen too for up to 2 months in an airtight container. It’s easier to separate them if you place a piece of baking paper between each one, then you can take just what you need. Thaw them before toasting.
PIN IT:
Click to PIN this recipe for later!

IF YOU TRY THIS chocolate crumpets recipe, please take a moment to leave a rating and comment below. I love hearing from you, and it helps other readers too!
More recipes you’ll love
- Homemade crumpets
- Giant chocolate scroll
- English pancakes
- Double chocolate pancakes
- Chocolate scones
- Easter breakfast platter
Never Miss a Recipe!
Get the latest recipes straight to your inbox.
Ingredients
- 1 ½ cups warm tap water (375ml)
- 165 g plain (all purp) flour (1 ¼ cups / 5.8oz)
- 45 g regular unsweetened cocoa (½ cup / 1.6oz)
- ½ teaspoon instant yeast
- 1 tablespoon white sugar
- ½ teaspoon baking soda (bicarbonate of soda)
- ¼ teaspoon table salt
- A little vegetable oil
For best results, always weigh ingredients where a weight is provided
Equipment
- blender
- Non-stick frying pan / skillet
Instructions
- BLEND 1: Place all the ingredients, in order, into a blender. Place the lid on and blend on high for 20 seconds.
- BLEND 2: Scrape the sides down to mix in any flour that's stuck to the sides and blend for another 20 seconds until you have a smooth batter with a thick but runny consistency.
- REST THE BATTER: Set aside the batter in the blender jug, in a warm place, covered, to rest and let the batter rise ever so slightly, for 45 minutes. It should look a little frothy on top and like it's risen a little.
- PREP THE CRUMPET RINGS: Grease the inside of 3-4 crumpet rings with a little butter then dip them in flour and tap off any excess.
- HEAT THE PAN: Add a little bit of oil to a large, non-stick, flat bottomed frying pan over medium heat. Let it heat for a couple of minutes until it feels hot when you hover your hand over the top.
- COOK (STAGE 1): Place 2-4 of the crumpet rings into the pan (depending on it's size) and fill to halfway with crumpet batter (about 1/3 cup). Let them cook for 3-4 minutes until there is a good ring of dry batter and bubbles all burst around the edge of the crumpets.
- COOK (STAGE 2): Now turn the stove to low heat and cook for a further 2-3 minutes until all the bubbles have popped and he crumpets look dry all over (once dry, no more bubbles will pop)
- FLIP & FINISH: Remove the rings and flip the crumpets for 10 seconds to seal the top. Remove them from the pan and allow to cool.
- Clean the rings and re-grease and flour. Start again from step 5 for the remaining batter. I generally get 10-11 crumpets out of each batch.
- TOAST & SERVE: Always toast crumpets until golden before serving. In a toaster (on the crumpet setting) or under a broiler or overhead grill. You can also put them back in the pan on low, toasting the holey side until crusty.
- Please take a moment to rate this recipe. I really appreciate it and it helps me create more recipes.
Notes
- The batter is quite runny so make sure you have a flat based pan and make sure the pan is hot before adding any batter or it will run out under the rings.
- A non-stick pan works best
- For best results, you should always weigh ingredients where a weight is the first measurement given. Kitchen scales are relatively cheap but if you can’t weigh the ingredients, use the spoon and level method (don’t scoop).
- All stove tops are different. I use a gas stove and cook them on my medium sized burner in a 26cm pan doing 3 crumpets at a time. You’ll need to test your own stove but use these visual clues.
– by the end of stage 1 cook, a ring of cooked dry batter should be visible around the top, with still a large centre of wet batter with unpopped bubbles.
– by the end of the stage 2 cook, all bubbles should be popped and the top should look dry. If you find the tops not drying out but the bubbles are mostly popped, flipping them at the end is enough to seal them. - Cooked crumpets can be stored at room temperature for 2-3 days or frozen for up to 2 months.
This post may contain affiliate links that earn me a small commission for my referral, at no extra cost to you. Thank you for supporting Sugar Salt Magic.


2 Comments on “Chocolate Crumpets”
Well these are certainly more tempting than the traditional variety! They look so good.
Thanks so much, Mimi.