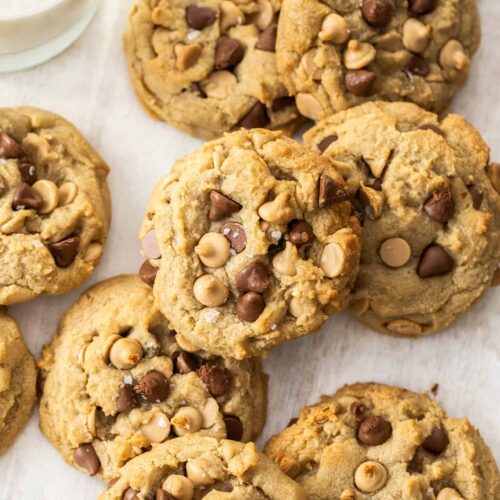
Both the flavour and texture of these caramilk cookies will leave you wanting more. Rich in caramel flavour, these soft, chewy cookies are incredibly simple to make.
For all you cookie lovers, you must try these marshmallow chocolate chip cookies are these white chocolate macadamia cookies as well.

Why you’ll love them
These caramilk cookies have everything you want in a cookie.
- Very easy to make – no fancy equipment
- Just 10 minutes effort
- Rich in caramel flavour – from brown sugar and caramilk
- Thicky, soft and chewy
- Big bakery style cookies
- A combination of chocolate chips for flavour
I can’t say enough, you have to try these. I promise you’ll love them. After giving them to my test group, they immediately demanded the recipe. These cookies are so moreish, so tasty, sweet, chewy – all the right things.
What is caramilk? Cadbury Caramilk chocolate is a much-loved style of chocolate in Australia and New Zealand. Put simply, it’s white chocolate, slow roasted until golden and it has a caramel flavour.
Of course, if you’ve been here for a while, you already know you can make caramelised white chocolate yourself, at home.
Since it hit the supermarket shelves, caramilk recipes have been popping up everywhere and I’m pretty sure you’ll be seeing more caramilk desserts here too. I have loads I’ve been dreaming up.
Ingredients you’ll need
While not the shortest list, it’s also not the longest list of ingredients for these caramilk cookies and you probably have most of them on hand already.

Detailed quantities and instructions in the recipe card below.
- Chocolate Chips: This recipe uses both milk chocolate and caramilk chocolate chips. You could also use chunks if you like by chopping up bars of chocolate. I like that the chips hold their shape though.
- Sugar: Another two type ingredient, these cookies need brown sugar for the moist and chewy factor while using white sugar for regular sweetness and crisp edges.
- Flour: Just plain flour / all-purpose is all you need.
- Baking soda: Baking soda will give these cookies just a little lift.
- Butter: Use unsalted butter so you can control the salt content.
- Vanilla: Use a pure vanilla extract which is a natural flavouring as opposed to vanilla essence which is synthetic.
- Milk: Use whole milk which has fat for added flavour. You could also swap it for other types of ‘milk’ like oat milk and almond milk.
- Salt: You just need a touch of salt to balance out the flavours. There is regular table salt in the cookies and a touch of sea salt flakes on top of each one takes them to a whole new level.
There are no eggs in this recipe so, while caramilk and milk chocolate are not vegan, you could swap that for dark chocolate, swap the milk for a vegan alternative and swap the butter for a plant based butter or even nut butter to turn this into a flavoursome vegan cookie recipe.
How to make caramilk cookies
This recipe is so incredibly easy to make, so I know you’ll love this. There is no chilling required and no electric mixer required. Simply mix up the dough in one bowl, scoop it onto trays and bake.
I recommend using a cookie scoop (or medium ice cream scoop) which makes scooping quick and easy and ensures evenly sized cookies.

Detailed instructions in the recipe card below.
- Dry ingredients: First you whisk together dry ingredients in a medium bowl (photo 1).
- Wet ingredients: Add the sugars in a separate bowl with melted butter, oil, milk, and vanilla extract. Give it a good whisk until smooth and silky (photo 2).
- Combine it all: Now add the flour mixture to the wet ingredients and mix together with a spatula until it’s almost fully combined. Add the chocolate chips and fold those through (photo 3).
- Scoop & bake: Use a large cookie scoop / medium ice cream scoop to take cookie dough balls and place them on baking sheets. Top them with a few more chocolate chips and a little sea salt, (photo 4) then bake.
I definitely recommend adding the sea salt flakes – they add a touch of savoury to the caramelly sweetness (salted caramel lovers, unite) and take these cookies to a whole other level.

Tips and tricks
Caramilk cookies are so easy to make, and you can’t really go wrong, but here’s some tips for perfect cookies.
- Don’t overmix the dough so that they’ll stay soft.
- When you mix the dough, it might look like too many chocolate chips but I promise it’s not. Just keep folding until they mostly incorporate.
- Stick to the scoop size given in the recipe as everything is made to suit that.
- Don’t press the cookies down too much when you add the chocolate chips.
- No chilling required, as a general rule and as long as you don’t press them down too much, they’ll spread a little but bake up with nice thick, soft centres. If you notice it’s very warm in your kitchen though, bake one cookie first to test, then chill if you’d like them thicker.
- Don’t be tempted to overbake these caramilk cookies. They’ll still be soft when you remove them from the oven but, as long as the edges are beginning to turn golden and the tops look dry, they’ll be perfectly baked by the time they’re cool.
- Save some choc chips for the top so the look extra pretty once they’re baked.
Can caramilk cookies be frozen
These cookies can be frozen, before or after baking making them perfect for your freezer stash.
- Before baking: Portion the dough out using your scoop and onto a baking tray. Place in the freezer until they’re solid, then place them in an airtight container. These are best thawed before baking – just let them sit at room temperature for ½ an hour or so.
- After baking: Store the cookies in an airtight container for up to 6 months in the freezer.
These cookies will keep well at room temperature in an airtight container for up to 2 weeks.

If you try this caramilk cookies recipe, please take a moment to leave a rating and comment below. I love hearing from you, and it helps other readers too!
More recipes you’ll love
- Caramelised White Chocolate
- Caramel White Chocolate Rocky Road
- Chunky Chocolate Chip Cookies
- Caramel Chocolate Chip Cookie Bars
- Chocolate Chip Cookie Dough Fudge
- Chocolate chunk cookies
- Biscoff butter cookies
Never Miss a Recipe!
Get the latest recipes straight to your inbox!

Video
Ingredients
- 225 g plain (all purp) flour (1 ¾ cups / 8oz)
- ¾ teaspoon baking soda (bicarb soda)
- ½ teaspoon salt
- ⅔ cup light brown sugar (135g / 4.8oz)
- ¼ cup white granulated sugar (50g / 1.8oz)
- 57 g unsalted butter, melted and cooled (½ stick / ¼ cup / 2oz)
- ¼ cup vegetable oil (60ml)
- ¼ cup whole milk (60ml)
- 1 teaspoon vanilla extract
- 1 cup caramilk chocolate chips (180g / 6.4oz)
- ½ cup milk chocolate chips (90g / 3.2oz)
- ½ teaspoon sea salt flakes (optional)
For best results, always weigh ingredients where a weight is provided
Instructions
- Make sure your butter is melted and cooling to room temperature.
- Preheat the oven to 180C / 350F / 160C fan forced. Line 2 large baking trays with baking paper.
- In a medium mixing bowl, combine the flour, baking soda and salt. Mix well to combine.
- In a large bowl whisk together both sugars, butter, oil, milk and vanilla.
- Use a spatula to mix the dry ingredients into the wet ingredients.
- Hold back a small handful of chocolate chips, then add the rest to the dough. Fold through carefully.
- Scoop balls of dough (roughly ¼ cup) and set them on the baking trays at least 2 inches apart. Top with the reserved chocolate chips and sprinkle on a little sea salt if using.
- Bake for around 12 minutes – they'll still be soft but will look dry with set edges. Let them cool for 5 minutes before using a spatula to help transfer them to a wire rack to cool completely.
Notes
- All ovens vary – check your cookies at 8 minutes – they should look dry and ‘set’ but will still be very soft.
- For best results you should always weigh ingredients like flour and sugar. Kitchen scales are relatively cheap but if you can’t weigh the ingredients, use the spoon and level method (don’t scoop).
This post may contain affiliate links that earn me a small commission for my referral, at no extra cost to you. Thank you for supporting Sugar Salt Magic.
4 Comments on “Caramilk Cookies”
Would love to try these cookies. Where do I find caramilk chips?
Hello Diane. If you can get them where you are they’ll be with the chocolate chips in most supermarkets. If not, you can use butterscotch chips if you can get those. Failing that, use white chips or even peanut butter chips.
Would love to make these Marie…..if I could stop eating all the Caramilk before cooking !
Oh, I know that feeling well 😂