Why you’ll love it
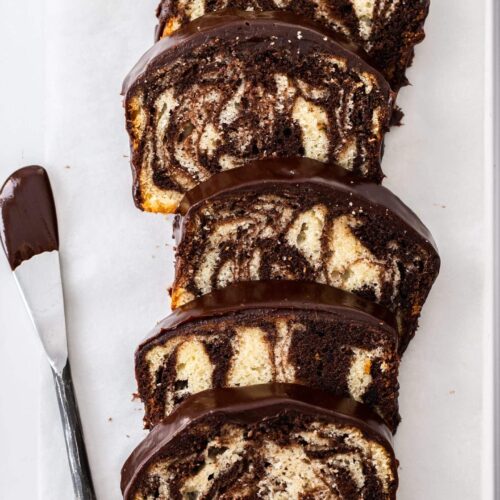
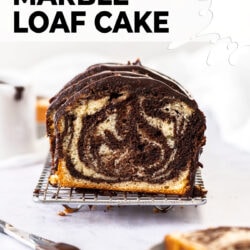
Smaller and quicker than making a layer cake or even a sheet cake, this moist and tender marble loaf cake also looks stunning. A loaf cake, so it’s easy to make, but with that gorgeous swirl, a firm but moist texture and flavours of butter, vanilla and chocolate, this is one classic you must have in your baking collection.
- Mix by hand – you don’t need any special equipment, since this is all mixed by hand in a mixing bowl.
- Just two bowls – this makes clean up a breeze.
- So easy – anyone can make this marble cake. Make one simple batter and flavour half of it with chocolate. So simple.
- Flavour – I love the flavour with butter, chocolate and vanilla in every bite.
- Texture – it’s tender and moist but slightly firm with a crumb a bit lighter than a pound cake.
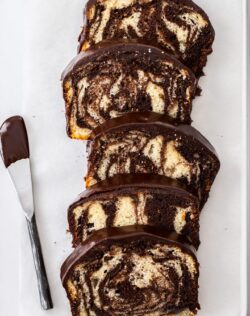
- Easy to decorate – chocolate ganache is the simplest form of cake decoration, but so delicious.
This marble loaf cake is all about indulgent simplicity. Not only is it so easy to make and even easier to decorate it has more flavour than you expect. Both vanilla and chocolate shine and that butter sure lets us know it’s there too.
I may be a little addicted to loaf cakes – how about you? You have to try my ever-popular chocolate bread and this stunning coconut and raspberry cake.

Never Miss a Recipe!
Get the latest recipes straight to your inbox!
Ingredients you’ll need
Here’s a quick rundown of the ingredients you’ll need.

Detailed quantities and instructions in the recipe card below.
- Flour: Just every day plain flour / all-purpose flour.
- Sugar: You’ll just need white granulated sugar for this. Caster (superfine) sugar works well too.
- Butter: Use unsalted butter so you can control the salt level.
- Baking powder: Baking powder gives the cake it’s lift. This is not the same as baking soda.
- Salt: A little salt is added to the dough for balance.
- Eggs: Use large eggs for this cake. Eggs provide structure to the cake.
- Buttermilk: Buttermilk is one of the ingredients that help to keep this cake tender and moist. Don’t swap it for regular.
- Oil: A little oil keeps this cake super moist too.
- Vanilla: Use a pure vanilla extract as opposed to vanilla essence – the latter is synthetic, not natural.
- Cocoa powder: I really love dutch processed cocoa powder in this cake and urge you to grab some. It has a really balanced chocolate flavour and is less bitter than regular unsweetened cocoa.
- Chocolate: I use dark (50%) chocolate for the ganache. It has a great combo of being super chocolatey without being overly bitter.
- Cream: Called thickened cream in Australia, you may know it as heavy cream, whipping cream or double cream. They’ll all work fine for this ganache.
How to make marble loaf cake
You’d be forgiven for thinking this is tricky. I mean, two different flavours and that pretty swirl effect. Let me tell you just how easy this cake is to make.

Detailed instructions in the recipe card below.
For the cake
- Melt the butter: Melt the butter in the microwave until it’s just melted, then set it aside to cool a little.
- Dry ingredients: Combine flour, sugar, baking powder and salt in a large mixing bowl and whisk to aerate and disperse everything.
- Wet ingredients: In another bowl, use a balloon whisk to mix together the eggs, butter, oil, buttermilk and vanilla.
- Combine the two: Make a well in the flour mixture and add the wet ingredients. Gradually combine them together until there are no lumps. Careful not to overmix it.
- Divide and flavour the batter: Now place roughly half of the batter into the second bowl (the one you used for the wet ingredients is fine). Add the cocoa and boiling water and mix gently to combine.
- Layer: Starting with the vanilla cake batter, dollop roughly half a cup into your lined loaf pan. Do the same with the chocolate cake batter next, dolloping it directly on top of the vanilla. You should have enough batter to do this two more times, just dolloping directly on to the last layer. Once it’s all in, run a knife through the batter in a swirl pattern a couple of times to swirl the batter a little.
- Bake for around 45-55 minutes or until a toothpick inserted comes out with a crumb or two attached.
IMPORTANT! Don’t overbake the cake. Loaf cakes are tall and skinny meaning there is a lot of pan surrounding that batter. If you cook it too long, you risk having a dry cake so make sure to test the cake when it’s getting close to time with a toothpick. It should have some sticky crumbs attached.
Keep in mind, all ovens vary and loaf tins also vary. See my notes in the recipe card.
For the chocolate ganache
- Chop the chocolate: You need to chop the chocolate very finely so that it dissolves easily when heated. Place it into a heatproof bowl.
- Heat the cream: Heat the cream in a small saucepan over medium heat, swirling from time to time, until it starts bubbling at the sides.
- Combine: Pour the hot cream over the chocolate, then give the bowl a shake to settle the chocolate under the cream. Let it sit and soften for 1 minute, then stir until you have a smooth, glossy ganache. Let it cool before 10 minutes before pouring over the cake.

Tips and tricks
- Grease and line the pan: Even if you have a non-stick pan, you should grease and line the baking pan with baking paper. Greasing stops the paper from moving when you add the batter and the paper allows you to lift it out easily. Make sure the paper is hanging out the top so you can lift the cake easily.
- Don’t overmix: Be very careful not to overmix the batter. Only mix it enough to just combine everything, making sure there are no lumps left.
- Don’t overbake: I know I already said this above but loaf cakes retain much more heat than cakes that aren’t so deep. They also carry-on bake after coming out of the oven because of that heat. For these reasons, take it out as soon as you have some sticky crumbs – not wet batter but stickiness is fine.
- Allow for cooling time: Loaf cakes retain heat for much longer than layer cake layers, so you’ll need to give it a good couple of hours to cool at room temperature or, after letting it cool for ½ an hour, transfer it to the fridge to speed the process up. Serve it at room temperature though.
- Don’t make the ganache until the cake has cooled: If you add the ganache while the cake is still hot, you risk it all sliding straight off the cake. This is also a good reason to let the ganache cool for 10 minutes before using too.
FAQs
I haven’t tried the Starbucks marble cake, so I can’t confirm if this is the same. It has the same look and flavours though and I know you’ll love it.
No. Regular milk won’t give you the same texture as buttermilk in this recipe. It’s worth using the real thing if you can get it but if you’re really in a bind, you can mix 1 cup of whole milk with 3 teaspoons of vinegar or lemon juice. Mix and let sit a couple of minutes, then just measure out 1 cup for this cake.
Yes. Feel free to add up to 1 cup of chocolate chips to the batter.
Storage
This vanilla and chocolate marble loaf cake will keep well in an airtight container in a cool place (like the pantry) for 3-4 days. If you put it in the fridge, make sure to take it out half an hour before you serve.
This marble cake can be frozen without the ganache, when wrapped well in plastic wrap or in an airtight container for up to 3 months.

More loaf cake recipes you’ll love
If you try this marble loaf cake recipe, please take a moment to leave a rating and comment below. I love hearing from you, and it helps other readers too!
Hungry for more? Subscribe to the newsletter for free recipes straight to your inbox. Also, follow along on Facebook, Pinterest and Instagram.
Video
Ingredients
- 260 g plain (all purp) flour (2 cups / 9.1oz)
- 1 cup white granulated sugar (200g / 7oz)
- 2 teaspoons baking powder
- ¼ teaspoon salt
- 113 g unsalted butter, melted & cooled slightly (½ cup / 4oz)
- 2 large eggs, room temperature
- 1 cup buttermilk, room temperature (250ml)
- ¼ cup vegetable oil (60ml)
- 2 teaspoons vanilla
- ¼ cup dutch processed cocoa (27g / 1oz)
- 2 tablespoons boiling water (8 tsp, notes 1)
FOR THE GANACHE
- 150 g dark (50%) chocolate (notes)
- ½ cup thickened (heavy) cream
For best results, always weigh ingredients where a weight is provided
Equipment
- 8×4 inch loaf pan
Instructions
- Make sure to melt your butter (in a medium mixing bowl) in the microwave first until just melted and set aside to cool.
- Preheat the oven to 180C / 350F / 160C fan forced. Grease then line an 8×4 inch loaf tin with baking paper.
- FOR THE CAKE: In a large mixing bowl, add the flour, sugar baking powder and salt and whisk well using a balloon whisk, to aerate and disperse.
- Combine the melted butter, eggs, buttermilk, oil and vanilla and whisk well.
- Make a well in the centre of the dry ingredients and pour in the wet ingredients. Use a spatula to gently combine just until there are no lumps left.
- Transfer about 1 ½ cups of the batter back to the wet ingredients bowl. Add the cocoa and the boiling water – stir until just combined.
- Drop about ½ cup of the vanilla batter into your prepared tin. Add ½ cup of the chocolate batter directly on top. Repeat these alternating layers until it's all in the tin. Run a knife through to swirl the batters a couple of times – not so much that you completely mix them.
- Bake for around 45-55 minutes (notes) or until a toothpick comes out with a sticky crumb or two attached. Watch it carefully towards the end as loaf cakes can have a tendency to over-bake quickly.
- Let the cake cool in the tin for 10 minutes, before using the edges of the baking paper on the long sides to lift it out. Finish cooling on a wire rack.
- Let the cake cool completely before topping.
- FOR THE GANACHE: Heat the cream in a small saucepan over low-medium heat until it starts to bubble. Pour over the chocolate in a heatproof bowl and give it a shake to settle the chocolate under the cream. Set aside for 1 minute.
- Stir the ganache until smooth. Let it cool for 5 minutes before pouring over the cake.
- Please take a moment to rate this recipe. I really appreciate it and it helps me create more recipes.
Notes
- I use a standard Australian 20ml tablespoon (equal to 4 teaspoons).
- For best results, you should always weigh ingredients like flour and sugar. Kitchen scales are relatively cheap but if you can’t weigh the ingredients, use the spoon and level method (don’t scoop).
- All ovens vary – always test for doneness 5-7 minutes before the recipe suggests.
- Baking time will also depend on what you bake it in. Glass or ceramic will take longer. My own 8×4 loaf tin it takes 52 minutes, while my 8.5×4.5 (only slightly bigger) takes 47 minutes. Check it earlier.
- Loaf cakes retain a lot of heat due to the shape of the tin so don’t let it overbake. It will carry-on bake after you remove it from the oven.
- Cooling the cake: Loaf cakes can take a couple of hours to cool. To speed it up, let it cool at room temperature for half an hour, then transfer to the fridge.
- This cake is best eaten at room temperature and can be stored in a cool place like the pantry. You can store in the fridge but make sure to take it out in time to come to room temperature before serving.
- You can use a darker chocolate for the ganache, say 70% cocoa solids, however you’ll need less – around 115g or 15oz.
This post may contain affiliate links that earn me a small commission for my referral, at no extra cost to you. Thank you for supporting Sugar Salt Magic.
37 Comments on “Marble Loaf Cake”
Hi can i just use regular cocoa powder? I dont have a dutch processed one
Hi Safiah. Yes, it will still work.
Absolutely Delicious loaf… Buttery and moist. So easy to make as well. I would definitely recommend
So happy you love it, Shereen. I truly appreciate you dropping back to leave a review.
Hello! Recipe looks great. Can I swap the boiling water for hot Espresso? And can I add Almond extract to the white batter?
Hi Reesa. Yes to both. Let me know how it turns out.
Stupidly good!!! I added 1.5tbsp of instant coffee to the hot water (plus and additional tbsp of said water) and served it with cream and a strawberry coulis. Love by all, delicious and moist. Thanks for this!
Oh that sounds amazing! So happy you love it, Miia.
This cake turned out great but I decreased the sugar to 180 grams. Easy and delicious.
Glad to hear you love it, Kim. Thanks so much for leaving a review too 🙂
My batter was thin, not like yours. What did i do wrong? I followed the directions
Hello Marlene. It could be a ratio issue – did you weigh your dry ingredients? Definitely measured all the wet ingredients properly? Or did you make the buttermilk yourself (homemade buttermilk tends to be thinner than store-bought). Did you watch the video? The batter looks quite thin but is thicker by the time you add it to the pan?
Awesome Marble Loaf – so moist and delicious! I will be making this again soon! 🙌🍫🍰😋
So great to hear, Pamela. Thanks for trying my recipe.
I made this recipe today because it looked like great and I was hungry for a marble loaf. It is delicious! Definitely be careful not to overbake. I like the combination of chocolate and orange so I swapped out a half teaspoon of the vanilla extract for orange extract. Also I use a small wooden skewer instead of a knife to marble the two batters together. Great recipe! Thank you.
Great idea to add some orange extract. Such a classic flavour combo. So happy you love it, Allen.
Hi,
Can you replace the vegetable oil for olive oil?
Thanks.
Hi Maria. Yes you can. Happy baking.
This marble loaf cake is delicious!
Marie, do you have a moist banana nut loaf cake recipe you can recommend, please? 🙂
I can’t wait to try another recipe, Marie!
Thank you!
So happy to hear this, Maria. I don’t eat bananas at all so I don’t do any recipes with them. However, I have made both of these for clients and they turned out great https://houseofnasheats.com/best-banana-bread-recipe/ and https://www.smalltownwoman.com/banana-nut-bread/
Great, thank you so much.
I can’t wait to bake it.
Heyy!
Was willing to try your recipe,but one question what is the size of your loaf pan?
Hi Iman. Just check the notes in the recipe section. Mine is 8×4 inch but I give some other notes there.
Yummy!!
So happy you love it, Maryann.
Can you use sour cream instead of the buttermilk? If so, same amount? Can’t wait to try this!
Hi Lucy. You can, though I would loosen it a little with some milk. The batter is already quite thick and might be harder to marble if it’s any thicker (with sour cream being less fluid than buttermilk).
Is it necessary to add the boiling water in the batter ?? Will it not ruin the cake?? Bcz baking powder or soda will react immediately after adding hot water.
Nowadays i have seen people adding hot water into the batter but is it safe to add it?? Whats the reason behind adding hot water ?
Hi Mohita. No. Boiling water doesn’t ruin the cake and is quite safe. It is added to help to ‘bloom’ the cocoa – this helps it mix in and actually intensifies the chocolate flavour. There is only a small amount used here to help that cocoa blend in but in some instance a lot of boiling water is added as it adds moisture and softness to the finished cake as well. It doesn’t affect the leavening any more than any other liquids will as the cake is baked straight away – we aren’t storing the batter for any amount of time.
hi Marie, just tried your recipe,
and made 2!! 😋 …although didn’t have the ah ce to taste them.. still warm, they smell and look mouthwatering delicious
thank you Violet
Great to hear, thanks Violet 🙂
This is absolutely delicious! So easy to make and prepping it was not as time consuming as I thought it would be.
Took 55 mins to bake. Next time I’m gonna go for 50 mins instead because it felt a little drier than I wanted it to be.
Solid recipe though, I will make again.
So happy you love it, Hebatallah. Thanks so much for trying my recipe.
Awesome recipe. Cake turned out perfect. Thanks for sharing
So happy to hear Ruth. Truly appreciate you trying my recipe 🙂
Hi, how long to you bake this for as it just has ?? for the time. Thanks
So sorry Dean. Silly error by me. It’s all in the notes but I’ll fix up the instruction now. It’s between 45-55 minutes and will depend on your baking pan.