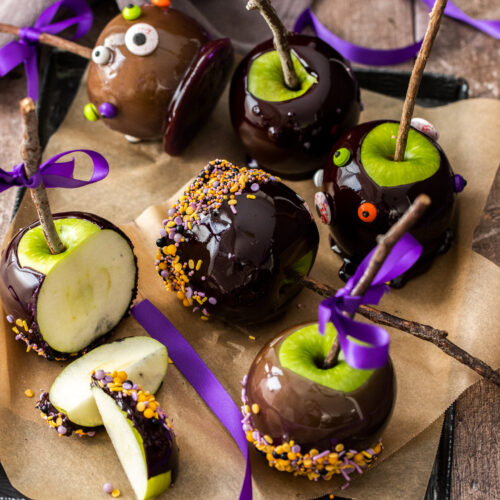

Following on from my classic homemade toffee apples, these Halloween apples are perfectly wicked Halloween treats! Great for Halloween parties or trick-or-treaters, these spooky, delicious apples will cast a spell on you.
- Crunchy toffee-coated crisp fresh apples.
- Colour any colour you like – but black looks pretty spectacular.
- Decorate with Halloween sprinkles or chocolate.
- Kids and adults alike will love them.
While all those gruesome Halloween desserts creep me out, making candy in any form, I can definitely get behind.
This recipe is adapted from my classic toffee apples recipe.

Never Miss a Recipe!
Get the latest recipes straight to your inbox!
Ingredients you’ll need

Detailed quantities and instructions in the recipe card below.
- Apples: You’ll want to use tart apples for these. I find the best apple for candy apples are Granny Smiths – they’re perfect because the sweet coating and tart apple balance each other out perfectly.
- Sugar: You’ll need white sugar – like granulated sugar or caster sugar. I find caster sugar (superfine sugar) best as it dissolves quicker and more easily.
- Liquid glucose or corn syrup: Liquid glucose is very common here in Australia in your local supermarket, however, light corn syrup works perfectly too if that’s more available to you.
- Vinegar: Just a touch of vinegar, like the glucose, helps to prevent crystallisation of the toffee.
- Food colouring: Gel food colouring is best. It has a great depth of colour without watering down your toffee.
- Sprinkles: Totally optional, some Halloween sprinkles add an extra layer of fun to these delicious treats.
If you want to flavour your toffee you can add a teaspoon of vanilla extract or other flavour extracts at the same time as the food colouring.
Tools you’ll need
First up, you’ll need to get yourself some very sturdy skewers, dowels or wooden sticks (like craft sticks) for your Halloween candy apples. Apples coated in toffee are surprisingly weighty and you don’t want your skewer to break while you’re dipping into hot toffee.
Next, make sure you have a large, heavy-based saucepan. This will allow for even and quicker dissolving of the sugar and it makes for easier coating of the apples too.
A pastry brush is needed for washing away sugar crystals that form around the sides of the saucepan.
I recommend using a candy thermometer for ease and the best result. As soon as the thermometer hits 150C / 302F, you’re ready to start coating. However, you can make this without a thermometer too.
Other than that you just need a spoon or spatula for stirring (not wooden), a baking tray and baking paper for sitting the apples on and a bowl for the sprinkles. If you aren’t serving them the same day or they need to be portable, grab some cellophane and ribbon as well for wrapping them.
How to make Halloween apples (step-by-step)

Detailed quantities and instructions in the recipe card below.
Prepare the apples
- Start by washing the apples and then drying them thoroughly. If you have time, let the apples sit uncovered in the fridge for a few hours to help that skin get really dry as any moisture may cause bubbles in your toffee.
- Remove any stalks still present, then press a thick skewer firmly down through the core until it hits the bottom.
- Place the apples on a baking tray lined with baking paper.
Making the toffee
- Double clean your saucepan and stirring spoon (silicone or stainless steel – not wooden) by rubbing vinegar over the surface that will touch the food, then rinse it off. There’s no need to dry them.
- Combine the sugar, water, glucose and vinegar in a large saucepan and place it over the lowest heat possible. Push it around and as it dissolves stir constantly until the sugar has completely dissolved. Don’t let it start to bubble until the sugar is dissolved. Use a pastry brush dipped in water to dissolve any crystals sticking to the side of the pan above the toffee level.
- Put the spoon aside and add a candy thermometer to the side of the pan, then let it come to a boil. Just let it boil away until it hits 150C / 302F or until a little of the toffee dropped into some ice water sets to brittle pieces almost immediately. You’ll notice that, using a spoon, you can create long brittle threads.
- Take the toffee off the heat before adding the colouring and stir it in (careful, as it may bubble up).
Dipping and decorating
- With your sprinkles in a bowl at the ready, hold one apple by the skewer and turn the saucepan on an angle. Dip the apple in and twist and turn until covered. Lift it and let excess toffee drip off – you can even spin it a little to help.
- When the stream becomes very thin, transfer the apple to the sprinkles and roll and dip it until it’s coated to your liking.
- Place the apple, apple side down, stick pointing up onto your baking tray and leave it to set. The toffee will harden on the outside within seconds and it will completely set within about 20 minutes or when it feels cool.
- If you have larger decorations that don’t suit dipping, you’ll have to let the toffee set then use a kitchen blow torch to make a small hot spot on the toffee then add the decoration. You’ll have to do this over and over for each and every decoration.

Tips and tricks
- Clean your equipment: I know you wouldn’t start with dirty pans and spoons but even the smallest speck of fat can cause toffee to crystallise. This is why I recommend rubbing vinegar or lemon juice all around the inside of your pan and over your spoon then rinsing before beginning. In addition, don’t use a pastry brush that you normally use for oil or egg washing.
- Don’t let it boil until the sugar has dissolved: You must be patient and keep stirring and moving the sugar around the pan and brushing down crystals on the sides until the sugar has completely dissolved. If it comes to a boil before this point, the toffee may crystallise making it unusable. Remember to keep the heat low.
- Move quickly but carefully: When dipping, you’ll want to move fairly quickly so the toffee in your saucepan doesn’t start getting too thick as it cools. I’ve found that the food colouring can cause the toffee to seize if you try reheating it, so it’s best to just dip them quickly.
- Cleaning the pan: You may have a coating of toffee in your pan when finished. It’s easy to dissolve simply by filling with water then letting it sit for ½ an hour. The sugar will dissolve and you can wash as normal.
- Be very careful! Toffee is like lava and can cause nasty burns so don’t attempt to touch it or taste test and be careful not to splash yourself.
How to eat candy apples
So how do you eat a candy apple? Of course, you can just try biting into them. As a kid, I remember starting where the thicker toffee had pooled at the bottom of the apple – bite a bit off and then you can get some purchase.
If you prefer not to risk breaking your teeth, use a sharp knife to cut them into pieces.
Yield and storage
This recipe makes 8 Halloween candied apples.
Once the toffee has completely cooled and set, you can wrap the Halloween apples individually in cellophane and tie it in place with some ribbon or sticky tape.
Store them at room temperature (as long as it’s not humid) or in a cool place like the pantry for up to 3-4 days. The candy coating will soften over time so these are best made as close to serving as possible.
They can be stored in the fridge but sometimes (rarely) this can cause your toffee to begin melting. Make sure they’re very tightly wrapped if stored in the fridge.

Did you try this Halloween candied apples recipe?
Leaving a rating and comment below the recipe is so helpful!
Hungry for more? Subscribe to the newsletter for free recipes straight to your inbox. Also, follow along on Facebook, Pinterest and Instagram.

Ingredients
- 8 large Granny Smith apples
- 3 cups caster sugar (superfine sugar) (600g / 1 ⅓ pounds) (notes)
- ⅓ cup water (80ml)
- ¼ cup liquid glucose (or light corn syrup) (60ml)
- 1 teaspoon white vinegar
- Food colouring of your choice (notes)
For best results, always weigh ingredients where a weight is provided
Equipment
- Heavy based saucepan – stainless steel best and definitely not a non-stick pan.
- Sturdy skewers, craft stick or wooden dowels.
- A candy thermometer – I’ll give tips below on how you can make it without one but It’s definitely easier with.
- Spoon or spatula
- Pastry brush
- Cellophane and ribbon
Instructions
- Line a large baking sheet with baking paper and set aside.
- Have your sprinkles in bowls a little larger than the apples to make them easy to dip.
- Give the apples a wash, making sure if they’re waxed to remove all the wax. Remove the stems and dry well. Push in a thick skewer or popsicle stick. If using twigs, see notes.
- Add the sugar, water, glucose and vinegar to a large heavy-based saucepan (stainless steel best), over very low heat. Stir constantly until the sugar completely dissolves.
- Bring the syrup to a boil and sit a candy thermometer on the side of the pan (see note 4 below if you don’t have one). Boil until the mixture hard crack stage – 150C / 302F. Use a pastry brush wet with a little water, to brush down any sugar crystals that form on the sides.
- Take the pan off the heat and mix the food colouring through, then let the bubbles subside.
- Carefully, tip the saucepan on an angle and dip the apples, turning them a few times to coat well all over. Let the excess drip off for a few seconds and give it a spin to help.
- Quickly dip the apples on a slight angle into the sprinkles. If using larger decorations like eyes, the toffee will set a little too quickly to add them one at a time. Instead, let them set, then use a kitchen blowtorch to heat a small spot on the coating and press on a decoration. Repeat as many times as needed.
- Place the apples, apple end down, onto the prepared baking tray and let them set (the outside sets within a few minutes and they’ll harden completely in about 20 minutes).
- These will keep at room temperature for a while in non-humid areas. Once completely cool, you can individually wrap the apples in cellophane tightly, then use sticky tape or ribbon to secure it around the stick. You can chill. Eat within 2 days.
- Please take a moment to leave a comment & rating. It's appreciated and so helpful.
Notes
- TWIGS: Twigs can give these apples a fun look, however, you need to make sure the twigs aren’t from trees that are toxic to humans. When you find a safe type, give the twigs a very good scrub and wash with washing detergent before pushing into the apples. I like to use a sharp skewer first to make a good sized hole, then push in the twig.
- CLEAN EQUIPMENT: Make sure all your equipment is perfectly clean before you start so as not to risk crystallisation. Rub vinegar over each, then rinse off. No need to dry.
- SUGAR: You can use white granulated sugar, but keep in mind it will take longer to dissolve due to the larger size of the sugar crystals.
- FOOD COLOURING: Gel colours are best for depth of colour without watering down your toffee. Get spooky and try some Halloween colours like black, purple, green or orange.
- CANDY THERMOMETER: You can make it without a candy thermometer, though a little less precise. Drop a small amount of mixture into cold water. If it’s ready it will create brittle pieces that you can snap.
- CRYSTALLISATION: I find that, if the mixture looks to be crystallising before it’s changed colour, it can be saved. Just add a tablespoon of water into the syrup, give it good stir, then let it come back to the boil again.
- OFF THE HEAT BEFORE ADDING COLOUR: Don’t add the food colouring in while the toffee is on the heat – it may cause it to seize. Likewise, reheating toffee that has already had colouring added may cause it to seize.
The recipe can be halved.
This post may contain affiliate links that earn me a small commission for my referral, at no extra cost to you. Thank you for supporting Sugar Salt Magic.