
Why you’ll love them
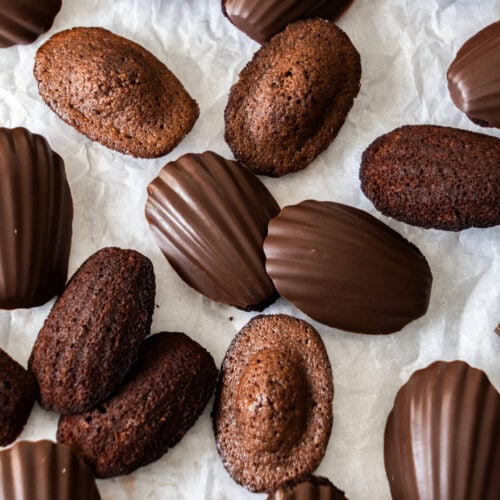
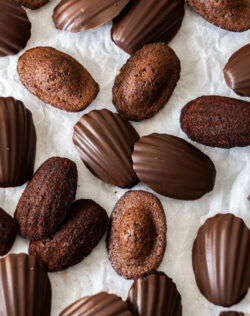
These fluffy chocolate madeleines dipped in chocolate, to make them extra special, are light, so delicious and easy to make. They’re big on chocolate flavour but light on sweetness so they aren’t a heavy or sickly treat and the slight crispness they get on one side with the soft and fluffy inside is just a gorgeous contrast of textures.
With the signature shell shape and the perfect madeleine dome on the top after baking, they’re just so pretty and since the madeleine batter needs to chill before using, you can actually make it ahead then bake these right as guests arrive for a perfect afternoon tea treat, straight from the oven.

Never Miss a Recipe!
Get the latest recipes straight to your inbox.
What are madeleines?
The size of a cookie, madeleines are actually a small French sponge cake created as far back as the mid-1700’s. They’re made using a genoise sponge cake batter and baked in a pan with shell shaped holes. The flavour is light and they’re not overly sweet making them a perfect afternoon tea treat.
While traditionally made in a specific madeleine pan to get that shell shape, there is no reason you couldn’t bake them in a muffin pan, just keep them small so they cook quickly.
Ingredients you’ll need

Jump to the recipe for full ingredients and instructions.
- Flour: You’ll just need plain flour / all purpose flour.
- Cocoa: I use Dutch cocoa powder for these chocolate madeleines, really just for it’s darker colour.
- Baking powder: A little baking powder is used to help get that perfect little dome on the tops of the madeleines.
- Eggs: I use large eggs.
- Sugar: You just need white granulated sugar or caster sugar (superfine sugar).
- Vanilla extract: Please use a pure vanilla extract, not vanilla essence.
- Butter: You just need unsalted butter here.
- Milk: A little whole milk helps with richness and also helps keep the batter texture pipable.
- Chocolate: I use a dark chocolate or semi-sweet chocolate to coat these chocolate dipped madeleines.
How to make chocolate madeleines
Jump to the recipe for full ingredients and instructions.
Make the chocolate madeleine batter

- Start by beating together sugar and eggs until they’re super pale and fluffy – 4-5 minutes is great.
- Now add your dry ingredients and gently fold it in until fully combined.
- Finally, add the melted butter and milk and fold it gently again.
- Chill. It’s so important to chill the batter. This helps to get the signature dome on top of the madeleins.

- Grease the tin with just barely melted butter then dust it well with cocoa.
- Transfer the madeleine batter into a piping bag, cut the tip off and pipe into the pan molds. You want them to be about ⅔ to ¾ full.
- Bake for 6-8 minutes. French madeleines are ready when you gently press the top of the dome and it springs back.
- Transfer them to a wire rack to cool.
The chocolate coating

- If you want to go the extra mile and coat your chocolate madeleines in chocolate, first melt some chocolate in 30 second intervals in the microwave, stirring well between each, until it’s just melted then stir in some oil.
- You can either just dip the madeleines in chocolate or do it in the pan so they keep that stunning shell shape. To do this, clean and dry the madeleine pans then pour 2 teaspoons of chocolate into each mold. Press the madeleines in shell side down.
- Chill in the freezer for 5-10 minutes, then just gently tap the pan on a clean work surface until they pop out.
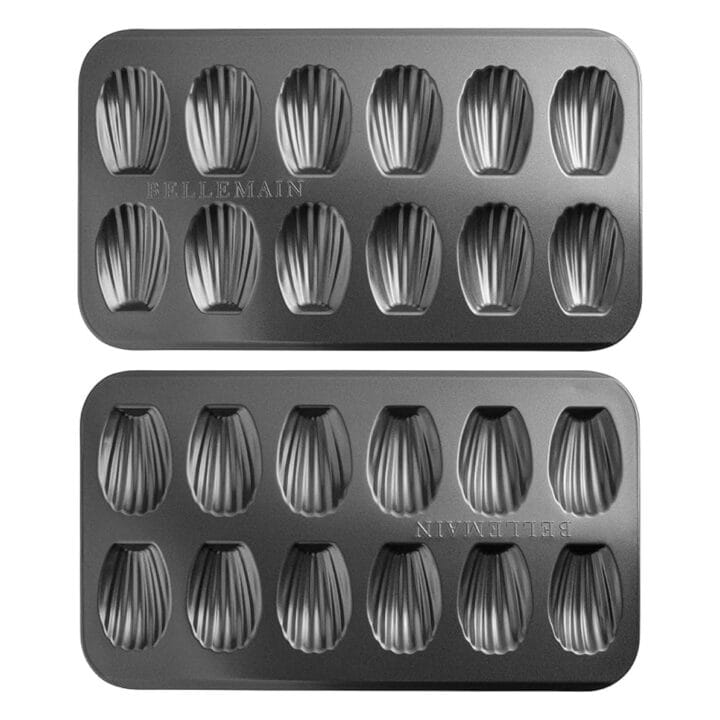
The classic shell shape of a madeleine is achieved by using a special madeleine pan.
Tips and tricks
- Make sure to use a non-stick pan for best results. I still grease and dust my pan even though it’s non-stick, as I just find it helps in releasing the madeleines without any damage.
- Madeleines are best eaten as soon as they’re baked, even while they’re still warm. You can actually make the batter ahead by a couple of days so that you can bake them fresh.
- If you do want to serve them fresh from the oven, you can absolutely eat them as is or make a chocolate ganache to dip them in as you eat them (like a madeleine fondue). Alternatively, just dust them with some icing sugar (powdered sugar).
- If you want to coat them in chocolate like these, let the chocolate madeleines cool to room temperature first.

Storage
Madeleines can be stored in an airtight container in a cool spot like the pantry or in the refrigerator if chocolate coated. While they’re best fresh, they’ll keep for 3-4 days fine. Give them a little 8-9 second zap in the microwave to fluff them up again.
FAQ’s
Madeleines are the size of a cookie and as easy to eat as a cookie but are actually a cake.
Madeleines are made using a genoise sponge base. Flour, eggs, sugar, butter and a little baking powder.
Madeleines originated in the Lorraine region in the north east of France.
Madeleines should be eaten fresh, even a little warm still from the oven, as an afternoon snack with a cuppa.
While the classic madeleine has a shell shape, you can also make them in a muffin pan or mini muffin pan. Don’t fill them full, you just want a tablespoon or so in each regular muffin pan hole.
Yes, madeleines can be frozen. Give them a little zap in the microwave to thaw and fluff up again.

Did you try this chocolate madeleine recipe?
Leaving a rating and comment below the recipe is so helpful!
Hungry for more?
- Subscribe via Email, Facebook, Pinterest and Instagram.
- Add Sugar Salt Magic as a Google Preferred Source.
Ingredients
- 95 g plain flour (all purpose flour) (¾ cup)
- 2 tablespoons Dutch cocoa powder (20g / ¾oz)
- 1 teaspoon baking powder
- ⅛ teaspoon fine sea salt
- 2 large eggs
- ½ cup white granulate sugar (100g / 3½oz)
- 1 teaspoon vanilla extract
- 113 g unsalted butter, melted + 3 teaspoons extra for greasing (4oz / 1 stick / ½ cup)
- 1 tablespoon milk (20ml)
TOPPING
- 200 g dark chocolate (semi-sweet chocolate) (7oz)
- 1 teaspoon vegetable oil or coconut oil
For best results, always weigh ingredients where a weight is provided
Equipment
- 2 12 hole madeleine pans Or just 1 and wash in between
- Large mixing bowl and spatula
Instructions
- If you haven’t already, melt the 113g of butter and set aside.
- Sift the flour, cocoa powder, baking powder and salt together and whisk to combine.
- In a large bowl using a electric mixer on high speed, beat the eggs, sugar and vanilla together for 4-5 minutes until pale, thickened and fluffy. You can also use the bowl of a stand mixer with the whisk attachment.
- Sift over the flour mixture, fold in gently so you don’t lose any air.
- Add the melted butter and milk and fold in gently again. Do not overmix.
- Cover and chill for 2 hours or up to 48 hours.
- Preheat the oven to 200C (180C fan forced) / 395F.
- Melt the remaining 3 teaspoons of butter until it’s only just melted. Brush it into the depressions of 2 x 12 hole madeleine pans generously.
- Transfer the madeleine batter to a piping bag (or a plastic ziplock bag with the corner snipped off. Fill the madeleine molds ⅔ full with batter (this is roughly a tablespoon of batter) then bake 6-8 minutes until the madeleines are domed and spring back when you press gently.
- Let the chocolate madeleines cool in the pans for 2 minutes, then tap out onto a wire cooling rack. Clean and dry the madeleine pans.
- Melt the chocolate to about 90% melted in 30 second increments in the microwave, stirring well between each. add the oil and stir in until melted and combined.
- Fill each mold with 2 teaspoons of melted chocolate, then press the baked madeleines, shell side down, back into them. Freeze for 5 minutes, then carefully pop the madeleines out. You can give them a tap on a hard surface if needed to help them pop out.
- Please take a moment to leave a comment & rating. It's appreciated and so helpful.
Notes
- Tablespoons: I use a standard Australian 20ml tablespoon (equal to 4 teaspoons). Check yours before measuring.
- Try other chocolates: You can try white chocolate, milk chocolate, caramelised white chocolate or even ruby chocolate to coat this. All will taste amazing.
- Nutrition details are approximate only – scroll below the recipe to find the full nutritional information.
This post may contain affiliate links that earn me a small commission for my referral, at no extra cost to you. Thank you for supporting Sugar Salt Magic.

