These super soft choc chip hot cross buns are just perfect for your Easter weekend (or anytime). These fluffy buns are so much better than store-bought.
Ingredients
FOR THE BUNS
- 1 cup whole milk (250ml)
- ⅓ cup white granulated sugar (66g/2.3oz)
- 2 ½ teaspoons instant yeast (or active dry yeast, notes)
- 455 g white bread flour (3 ½ cups / 1lb)
- 1 teaspoon ground cinnamon
- ½ teaspoon salt
- 1 large egg, room temp
- ¼ cup vegetable oil (80ml)
- 2 teaspoons vanilla extract
- 1 cup chocolate chips
FOR THE TOPPING
- ½ cup thickened cream (heavy cream) (125ml)
- 1 egg yolk (beaten with a dash of cream, milk or water)
- 2 ½ tablespoons plain flour (all purpose flour) (notes 1)
- 2 tablespoons unsweetened cocoa powder (notes 1)
- ¼ cup water (60ml)
For best results, always weigh ingredients where a weight is provided
Equipment
- stand mixer (helpful but not necessary)
- deep 9x13 baking pan or casserole dish
- mixing bowl
- Piping bag
Instructions
- MAKE THE DOUGH: Warm the milk in the microwave — if it’s cold, about 35-40 seconds is good, you want it to be just slighlty warm to the touch. add it to the bowl of a stand mixer (with a dough hook attachment (or see notes if you don't have a stand mixer) with the sugar and yeast and give it a good whisk. Let it sit for 10 minutes to allow the yeast to activate — you should see it start to puff up a little.
- Add the flour, cinnamon, salt, egg, oil and vanilla. Give it a manual mix with the dough hook, then attach the dough hook and knead on the low setting for 8-10 minutes until the dough looks smooth but elastic (just gently indent with a fingertip and it should bounce back out). The dough should have come away from the sides of the bowl but just be stuck to the bottom. If it’s too sticky just knead in another 1 tablespoon of flour. The dough shouldn’t be too sticky to handle but also not dry enough that it doesn’t cling to the bottom of the bowl.
- Add the chocolate chips and knead those through too. You can do this with your hands or with the dough hook again. It’ll take a minute to work them in evenly.
- THE FIRST RISE:Remove the dough from the bowl and drizzle in a little oil. Rub it around the bowl, then place the dough back in and flip it so that it is also coated lightly in oil. Cover with plastic wrap and let it sit in a warm place for 1 to 1 ½ hours or until doubled in size. I advise against using a proving drawer unless it’s particularly cold where you are. If the dough gets too warm, your choc chips can begin to soften or melt so it’s best to just be patient.
- ASSEMBLING THE BUNS:Grease a deep 9x13 baking pan or casserole dish generously with butter.
- Punch down the dough and transfer it to a clean work surface. Cut into 12 even pieces (weigh them if you want to be precise).
- Roll each piece into a smooth, round bun by pinching in the base over and over until you have a smooth top. Now place it down on the worktop, smooth side up and roll your hand over it in a circle to smooth and plump it up a bit more. Place on the baking tray evenly spaced apart. Cover lightly with plastic wrap.
- THE 2ND RISE:You can either chill overnight and bring them out 1 hour before baking in the morning or let them rise for another 45-60 minutes until they look puffy and soft. If you gently press your finger into the top of one bun it shouldn’t bounce back immediately.
- BAKING:Preheat the oven to 200C / 400F / 180C fan forced. If your buns proofed in the fridge overnight, bring them out 1 hour before baking.
- Brush the egg wash over the tops of the buns.
- Pour the cream around the buns (missing the top as much as possible).
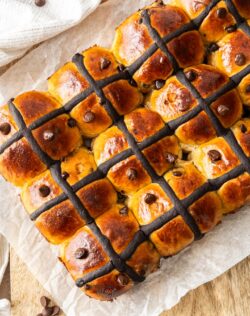
- In a small bowl, mix together the flour, cocoa and water and transfer to a piping bag. Snip the end off so you have just a small hole and pipe crosses over the top of the buns. The easiest way is to pipe long lines over each row of buns, then turn 90° and repeat so each bun has a cross.
- Bake for 22-25 minutes until shiny and crisp on top. Baked bread should reach 88C/190F on a thermometer poked into the middle.
- Serve warm, with butter or toast in a toaster and then spread over butter.
- Please take a moment to leave a comment & rating. It's appreciated and so helpful.
Notes
- Tablespoons: I use a standard Australian 20ml tablespoon (equal to 4 teaspoons). Check yours before measuring.
- All ovens vary – always test for doneness 3-5 minutes before the recipe suggests
- For best results, you should always weigh ingredients like flour and cocoa. Kitchen scales are relatively cheap but if you can’t weigh the ingredients, use the spoon and level method (don’t scoop).
- Yeast: You can use instant or active dry yeast. If you use rapid rise, your dough may double in size quicker.
- Flour: While bread flour gives a better texture, you can use plain flour / all purpose flour in it’s place.
- No stand mixer? You can make the dough without a stand mixer, just make sure to knead until it is smooth and elastic – about 10-12 minutes.
- Nutrition details are approximate only - scroll below the recipe to find the full nutritional information.
Have you tried this recipe?Don't forget to leave a rating and comment below and let me know how it was! I love hearing from you. Nutrition information is approximate and derived from an online calculator. The brands you use may cause variations.